AWS: Data Store Deployment
How-to create and register
Prerequisites
- You are an admin in AWS (for step 1).
- You are an Account Owner (for step 2).
This guide outlines how to setup a Data Store for storing troubleshooting and temporary data in your AWS cloud.

Steps
1. Deploy
You can deploy the object storage and associated resources in your AWS cloud using the following quick-create link:
And if you need to share with a colleague or first review the template you can download a copy here (source).
When deploying these resources, for all Monte Carlo accounts created after April 24th, 2024, the relevant Monte Carlo AWS Account ID will be 590183797493. If your account was created before this date, please reach out to your Monte Carlo representative for the ID.
2. Register
After creating the bucket and role you can register either via the Monte Carlo UI or CLI.
After this step is complete all integrations that you add to this collection service will automatically use this bucket for storing troubleshooting and temporary data. You can add these integrations as you normally would using Monte Carlo's UI wizard or CLI.
UI
If you are onboarding a new account, you can also register by following the steps on the onscreen
- Navigate to settings/integrations/agents and select the
Createbutton. - Follow the onscreen wizard for the "AWS" Platform Type. The "Bucket name" is the bucket you created in step one and "AWS assumable role"(and optional "External ID") are the ARN (and ID) from step two.
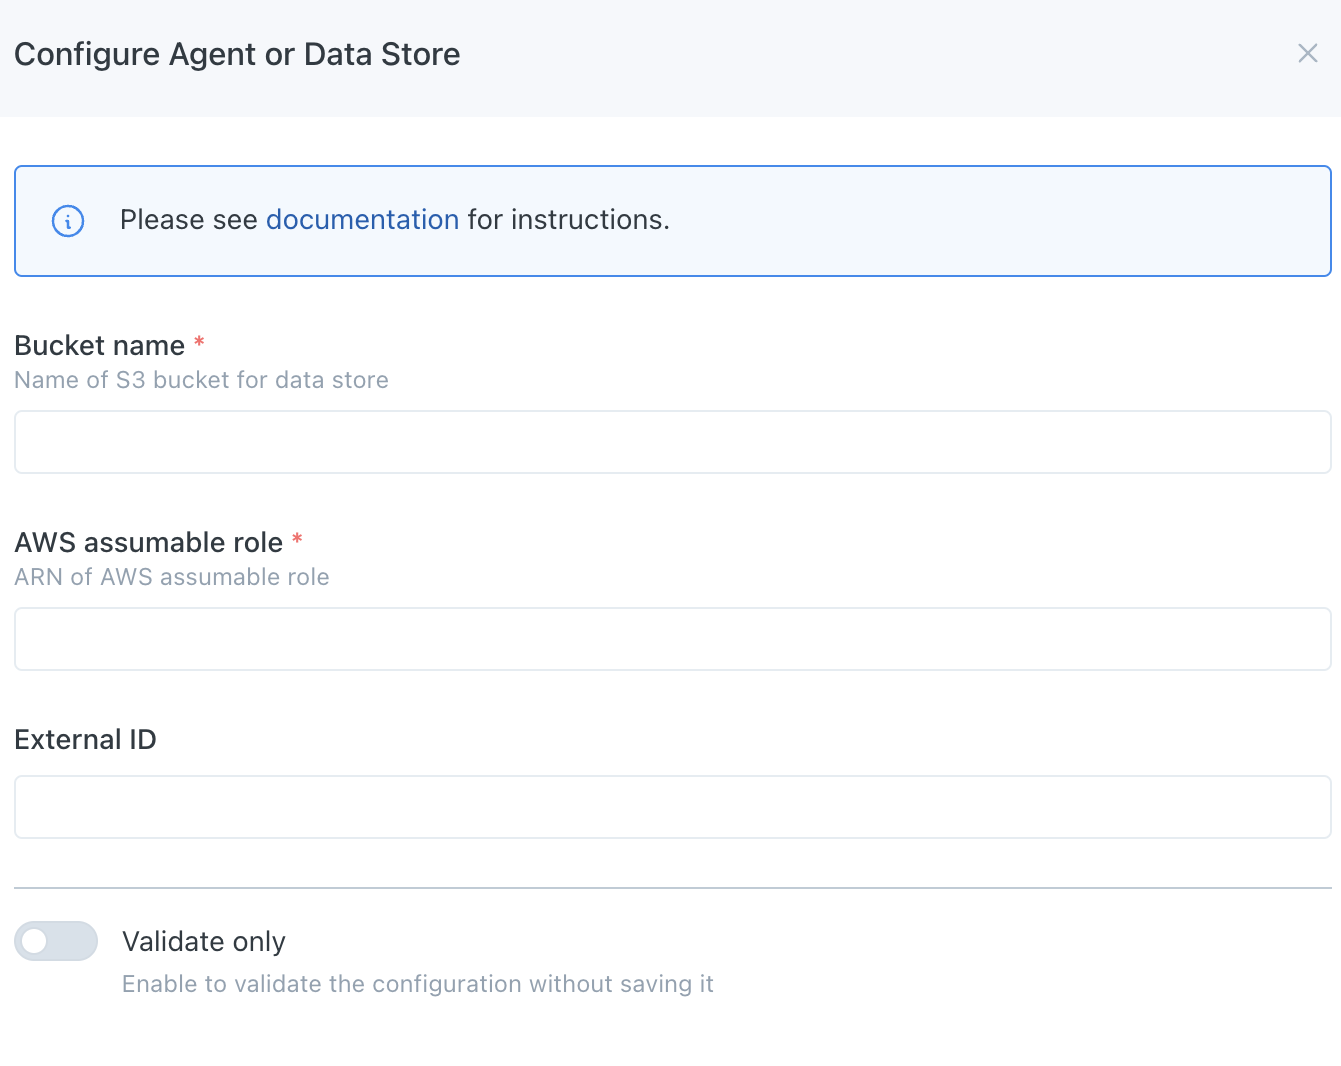
AWS Data Store Registration Wizard
CLI
Use the command montecarlo agents register-s3-store to register.
For reference on this command please see here. And see here for how to install and configure the CLI.
The bucket-name is the bucket you created in step one and assumable-role (and optional external-id) are the ARN (and ID) from step two.
montecarlo agents register-s3-store \
  --bucket-name example-bucket \
  --assumable-role arn:aws:iam::123456789:role/mcd-test-apollo-role \
  --external-id 1234567890
FAQs
Can I further constraint access to this Data Store (S3 Bucket)?
For all accounts created after April 24th, 2024 Monte Carlo will use private endpoints to communicate to the AWS Object Storage by default in supported regions. If you wish to constraint this you can update the IAM policy permissions to include a aws:SourceVpce condition. For instance, you can add the following element to the policy statement:
"Condition": {
    "StringEquals": {
        "aws:SourceVpce": "<VPCE_ID>"
    }
}
For reference the mapping per supported region can be found below:
| Region | VPCE ID |
|---|---|
| us-east-1 | vpce-004394176d889792d |
| us-east-2 | vpce-090022b0ef5e83ba9 |
| us-west-1 | vpce-0e16caf67c05371fe |
| us-west-2 | vpce-07802dc845e1bdc33 |
| af-south-1 | vpce-07de4a15107004567 |
| ap-south-1 | vpce-07d66ddd8818bb7c9 |
| ap-south-2 | vpce-0ef033dc31dc15fc1 |
| ap-southeast-1 | vpce-0ea18c9725c52de53 |
| ap-southeast-2 | vpce-0268e5ba31f63745a |
| ap-southeast-3 | vpce-026d7688a2beb3324 |
| ap-southeast-4 | vpce-08d83169799eb7a32 |
| ap-northeast-1 | vpce-02e680d8515648a0b |
| ap-northeast-2 | vpce-0fa4b42dc2a0dcea5 |
| ap-northeast-3 | vpce-05a7c91d103abf35f |
| ca-central-1 | vpce-0ba5e11a63241e656 |
| ca-west-1 | vpce-025b9264ccfdc0cf4 |
| eu-central-1 | vpce-0c031174af3b40c5f |
| eu-central-2 | vpce-0a643e6db02e5b4f3 |
| eu-west-1 | vpce-026aa8ed1be81e54c |
| eu-west-2 | vpce-0ebbd41740f0c2951 |
| eu-west-3 | vpce-0d5af6bade8e5244c |
| eu-north-1 | vpce-091b17d5a8bb076e8 |
| eu-south-1 | vpce-09734ac9c572f135b |
| eu-south-2 | vpce-0c24407352e9d0267 |
| il-central-1 | vpce-090d9f377c40ebce0 |
| sa-east-1 | vpce-05607f980709214e9 |
If your account was created before April 24th, 2024 you can still further constraint access with the aws:SourceIp condition. Please Reach out to your Monte Carlo representative or support at [email protected] for an IP Address to allowlist. Then, for instance, you can add the following element to the policy statement:
"Condition": {
    "IpAddress": {
        "aws:SourceIp": [
            "<IP>/32"
        ]
    }
}
How do I check the reachability between Monte Carlo and the Data Store?
Reachability is automatically validated during registration, but you can also use this CLI command or "test" button on the UI to test anytime.
Updated 2 days ago