Tableau - PAT version, CLI-only initial setup
Authenticate to Tableau and integrate views and workbooks with Monte Carlo
Tableau Version Support
Monte Carlo supports integrating with both Tableau Online and Tableau Server. Tableau Server requires version 2019.3 or later.
PAT - Agent CompatibilityAgent deployments do not support a Tableau Personal Access Token (PAT) connection. All setups involving a remote agent require a Tableau Connected Apps integration instead.
Setup Overview
Admin credentials requiredTo complete this guide, you will need Tableau admin credentials.
To review all steps necessary to integrate a BI tool with Monte Carlo, please see here.
To connect Monte Carlo to Tableau, you must first create a Personal Access Token in Tableau. Once you have a Personal Access token, you can then add the integration in Monte Carlo.
Creating a Personal Access Token
To create a PAT:
- Go to "My Account Settings".
- Click on the "Users" tab, then in the settings pane you can make a Personal Access Token.
- Give your token a name and hit "Create new token". Make sure you copy the token secret because it will only be shown to you once.
If you are integrating with multiple sites, please use a separate PAT for each
Add the Tableau Integration
Monte Carlo CLI
The CLI will take the following mandatory parameters to setup a Tableau integration using Connected Apps:
server-name- The URL where your tableau server is hosted (e.g.https://prod-useast-b.online.tableau.com)site-name- The name of your Tableau sitetoken-name- The name of the Tableau personal access token.token-value- The value of the Tableau personal access token.
You can see all the available options in the CLI doc or by running montecarlo integrations add-tableau --help
❯ montecarlo integrations add-tableau --help
Usage: montecarlo integrations add-tableau [OPTIONS]

  Setup a Tableau integration. For reports.

Options:
  --token-name TEXT               Name for the personal access token. This
                                  option cannot be used with 'username',
                                  'client-id', 'user', 'password', 'secret-
                                  value', and 'secret_id'. This option
                                  requires setting 'token-value'.
  --token-value TEXT              Value for the personal access token. If you
                                  prefer a prompt (with hidden input) enter
                                  -1. This option cannot be used with
                                  'username', 'client-id', 'user', 'password',
                                  'secret-value', and 'secret_id'. This option
                                  requires setting 'token-name'.
  --username TEXT                 Username for the Connected App. This option
                                  cannot be used with 'user', 'token-value',
                                  'token-name', and 'password'. This option
                                  requires setting 'secret-value', 'client-
                                  id', and 'secret_id'.
  --client-id TEXT                Client ID for the Connected App. This option
                                  cannot be used with 'user', 'token-value',
                                  'token-name', and 'password'. This option
                                  requires setting 'secret-value', 'username',
                                  and 'secret_id'.
  --secret-id TEXT                Secret ID for the Connected App. This option
                                  cannot be used with 'user', 'token-value',
                                  'token-name', and 'password'. This option
                                  requires setting 'secret-value', 'client-
                                  id', and 'username'.
  --secret-value TEXT             Value of the Connected App secret. If you
                                  prefer a prompt (with hidden input) enter -1
                                  This option cannot be used with 'user',
                                  'token-value', 'token-name', and 'password'.
                                  This option requires setting 'client-id',
                                  'username', and 'secret_id'.
  --site-name TEXT                The Tableau site name.  [required]
  --server-name TEXT              The Tableau server name.  [required]
  --name TEXT                     Friendly name for the Tableau integration.
  --verify-ssl / --no-verify-ssl  Whether to verify the SSL connection
                                  (uncheck for self-signed certs).  [default:
                                  verify-ssl]
  --collector-id UUID             ID for the data collector. To disambiguate
                                  accounts with multiple collectors.
  --skip-validation               Skip all connection tests. This option
                                  cannot be used with 'validate-only'.
  --validate-only                 Run connection tests without adding. This
                                  option cannot be used with 'skip-
                                  validation'.
  --auto-yes                      Skip any interactive approval.
  --option-file FILE              Read configuration from FILE.
  --help                          Show this message and exit.
- Server Name and Site Name: To find out your server and site names, please visit your Tableau account in your browser, and check the URL in your browser’s address bar. For example:
Default SiteIf you do not have a site name or are on the default site, you can leave "Site Name" blank. You can specify a blank site name in the CLI using the following syntax:
--site-name ''
Tableau Functionality
Read more about BI integrations in Monte Carlo at Overview: BI
Data Quality Warnings
Note: you must have the Data Management add-on and have Catalog enabled to use this feature.
From a Table-Asset or an Incident page, with Reports Affected, you can set a Tableau Data Quality Warning on any Tableau Data Source.

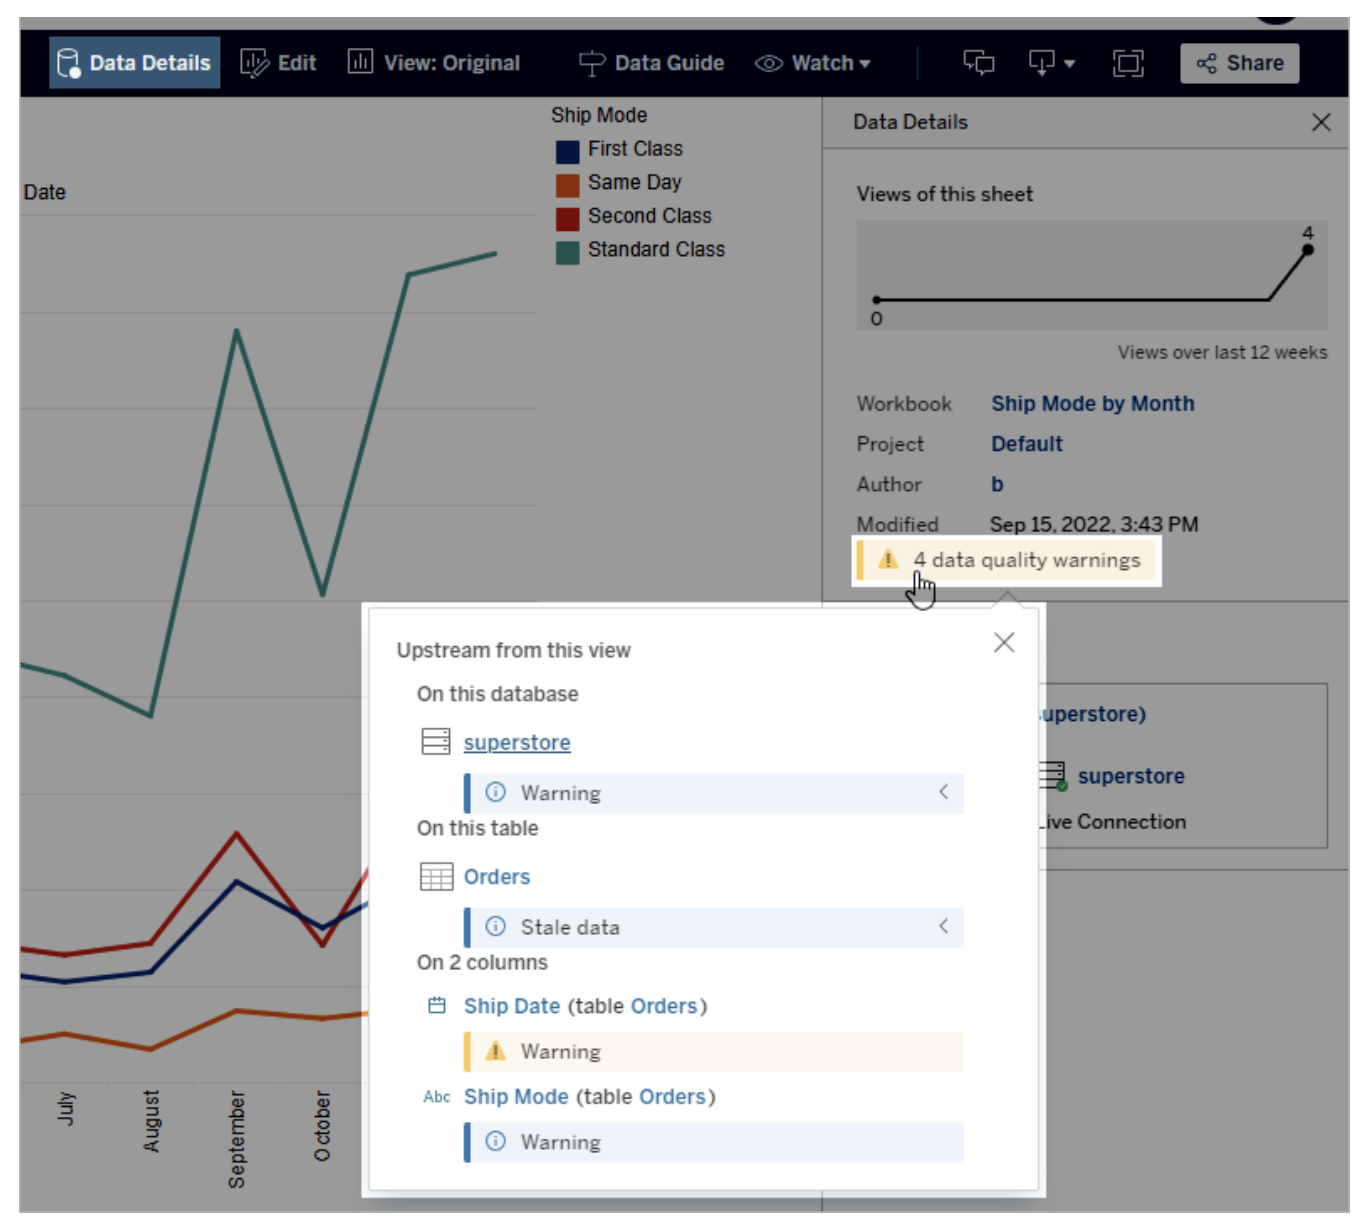
It will show up in Tableau like this:

And overlaid on views like this:

And you can edit the warning afterwards

The warnings will automatically clean-up and expire approximately 24 hours after you set or edit them.
Updated 8 months ago
