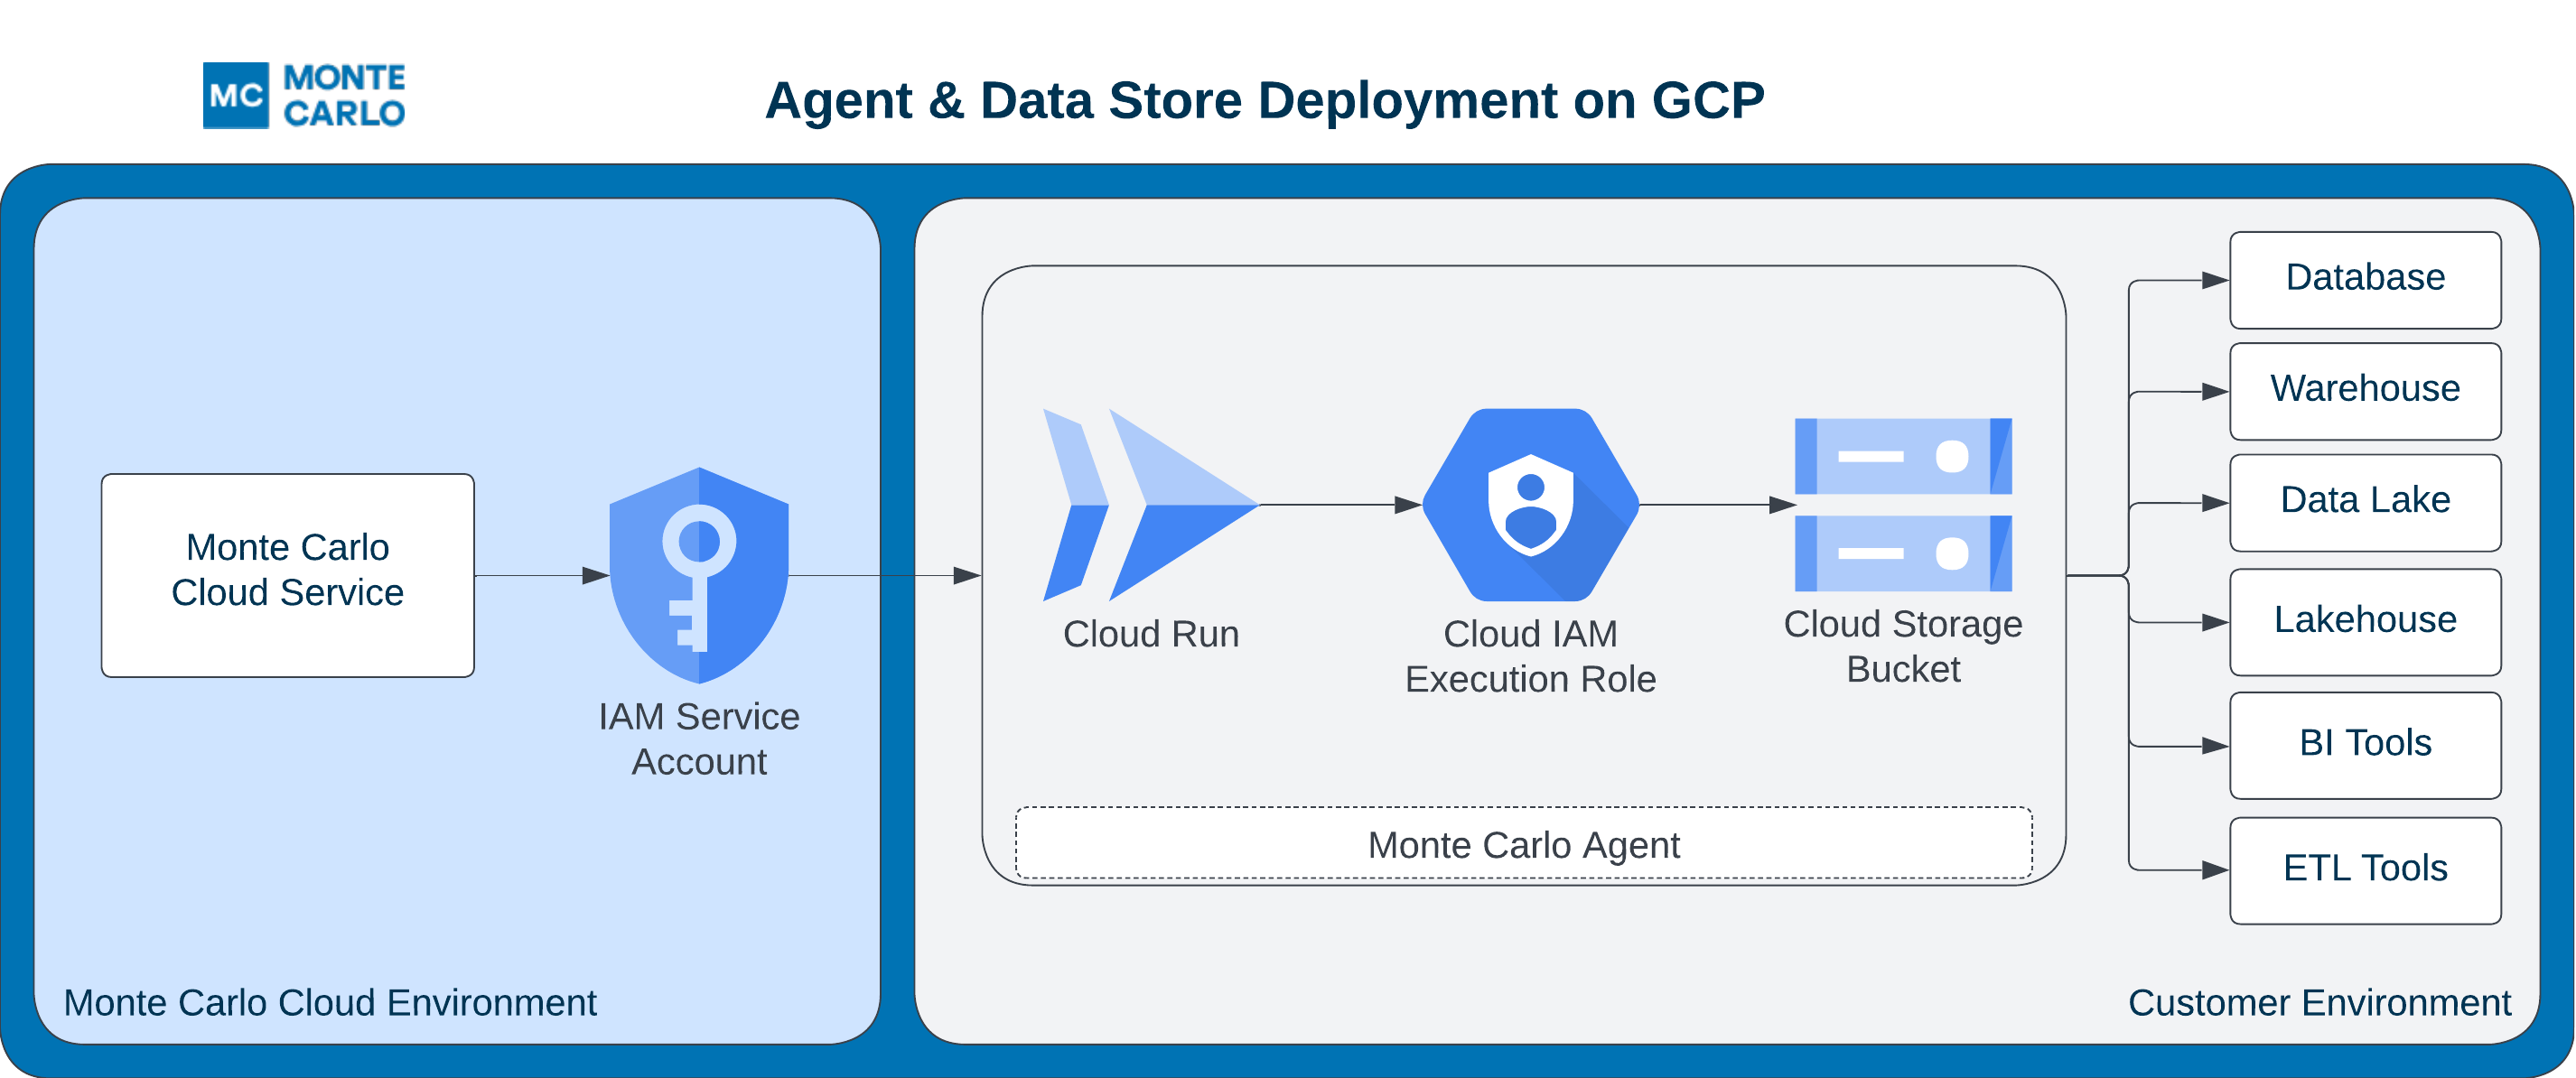
GCP: Agent Deployment
How-to create and register
Prerequisites
- You are an admin in GCP and have installed Terraform (>= 1.3) with GCP Authentication) (for step 1).
- You are an Account Owner (for step 2).
This guide outlines how to setup an Agent (with object storage) in your GCP cloud.
The FAQs answer common questions like how to review resources and what integrations are supported.

Steps
1. Deploy the Agent
You can use the mcd-agent Terraform module to deploy the Agent and manage resources as code (IaC).
For instance, using the following example Terraform config:
module "apollo" {
  source  = "monte-carlo-data/mcd-agent/google"
  version = "1.1.0"

  # Required variables
  generate_key = true
  project_id   = "<REPLACE_ME_WITH_YOUR_GCP_PROJECT>"
}

output "url" {
  value       = module.apollo.mcd_agent_uri
  description = "The URL for the agent."
}

output "key" {
  value       = module.apollo.mcd_agent_invoker_key
  description = "The Key file for Monte Carlo to invoke the agent."
  sensitive   = true
}
You can build and deploy via:
terraform init && terraform applyNote that setting generate_key = true will persist a key in the remote state used by Terraform. Please take appropriate measures to protect your remote state. If you would rather create the key outside of Terraform please set this value to false and see the instructions here.
This module will also activate the Cloud Run API in the project you specified. This resource (API) is not deactivated on destroy.
Additional module inputs, options, and defaults can be found here. And other details can be found here.
2. Register the Agent
After deploying the agent you can register either via the Monte Carlo UI or CLI.
And see here for examples on how to retrieve Terraform output (i.e. registration input).
After this step is complete all supported integrations using this deployment will automatically use this agent (and object store for troubleshooting and temporary data). You can add these integrations as you normally would using Monte Carlo's UI wizard or CLI.
UI
If you are onboarding a new account, you can also register by following the steps on the onboarding screen
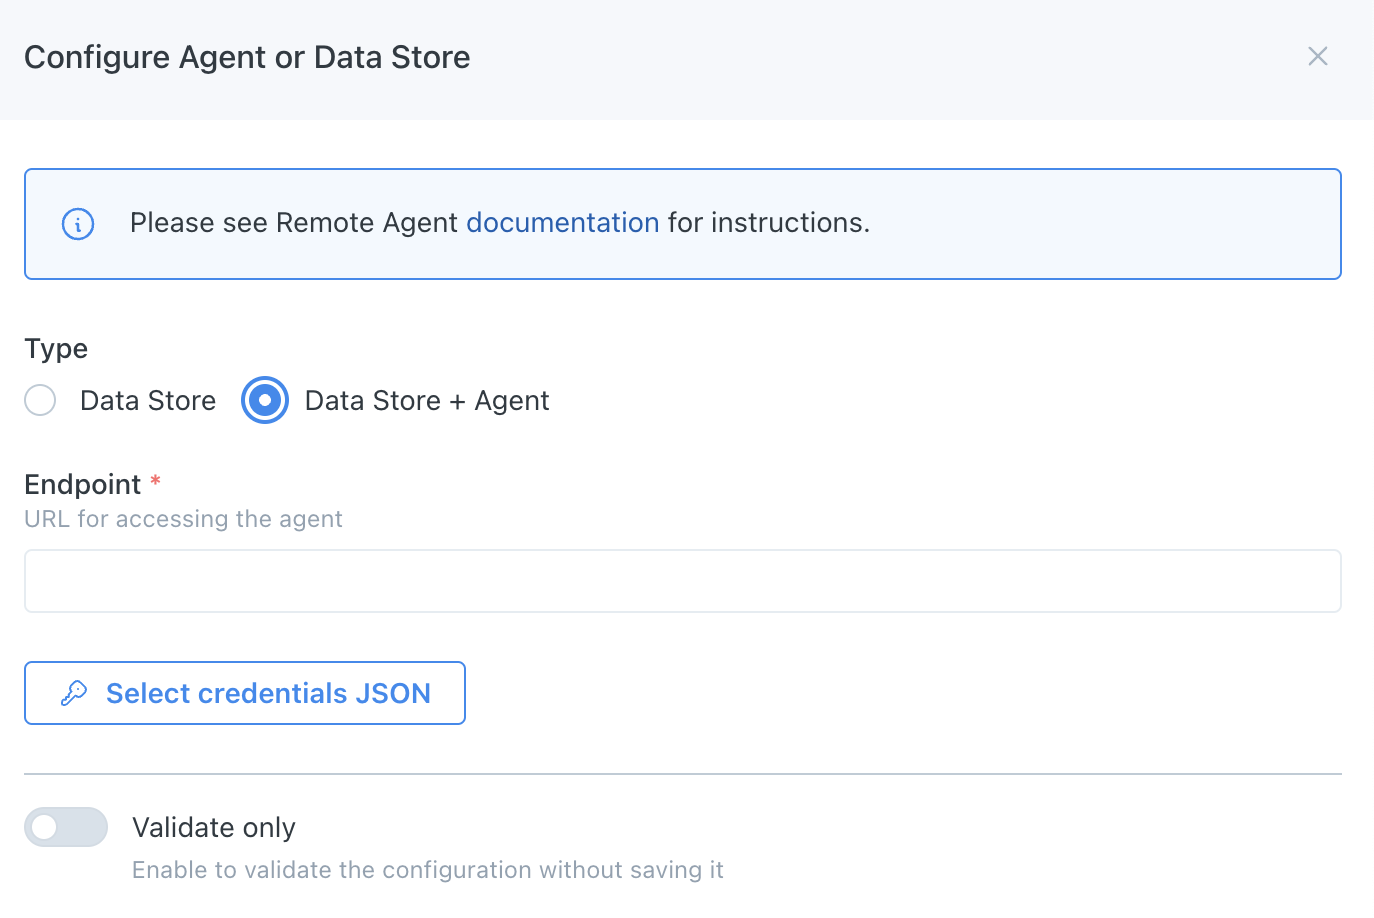
- Navigate to settings/integrations/agents and select the
Createbutton. - Follow the onscreen wizard for the "GCP" Platform and "Data Store + Agent" Type.

GCP Agent Registration Wizard
CLI
Use montecarlo agents register-gcp-agent to register.
See reference documentation here. And see here for how to install and configure the CLI. For instance:
montecarlo agents register-gcp-agent \
  --url $(terraform output -raw url) \
  --key-file <(terraform output -json 'key' | jq -r '.[0]' | base64 -d)
FAQs
What integrations does the Agent support?
The agent supports all integrations except for the following:
- Data Lake Query Logs from S3 Buckets are not supported: Learn more.
- Tableau requires using the connected app authentication flow: Learn more.
Note that onboarding (connecting) any supported integration using this deployment will use the agent if one is provisioned. Otherwise, any other integrations will use the cloud service to connect directly.
Some integrations, such as dbt Core, Atlan, and Airflow, either leverage our developer toolkit or are managed by a third party and do not require an agent. These integrations natively push data to Monte Carlo, so an agent is not needed.
Can I use more than one Agent?
Yes, please reach out to [email protected] or contact your account representative if you would like to use more than one.
Can I review agent resources and code?
Absolutely! You can find details here:
What GCP permissions are necessary for me to deploy and manage the Agent?
- Cloud Run Admin
- Storage Admin
- Role Administrator
- Create Service Accounts
- Delete Service Accounts
- Service Account Key Admin
- Service Account User
- Logs Viewer
- Monitoring Viewer
- Cloud Functions Developer
- Project IAM Admin
Note these are not the same as the permissions the Agent requires to run. These are listed below and are automatically granted by the module.
For Storage (mcd_agent_storage_role):
- storage.objects.create
- storage.objects.delete
- storage.objects.get
- storage.objects.list
- storage.objects.update
- storage.buckets.get
- storage.buckets.getIamPolicy
Project access (mcd_agent_project_role):
- iam.serviceAccounts.signBlob
- logging.logEntries.list
- only if remote upgrades are enabled:
- iam.serviceAccounts.actAs
- run.operations.get
Cloud Run Service (mcd_agent_service_role):
- run.services.get
- only if remote upgrades are enabled:
- run.services.update
How do I retrieve registration input from Terraform?
The url can be retrieved via: terraform output url.
And if not disabled, the key-file can be retrieved via: terraform output -json 'key' | jq -r '.[0]' | base64 -d > mcd-agent-key.json. Otherwise, see here for details on how to create the key outside of Terraform.
How do I monitor the Agent?
The Agent automatically generates a log of all operations, which can retrieved from this CLI command, Cloud Run or the Logs Explorer. For instance with Logs Explorer you can use the following query:
resource.type = "cloud_run_revision"
resource.labels.service_name =~ "mcd-agent-service*"
severity>=DEFAULT
If you have more than one agent in a project you should specify the full ID instead, which is retrievable as an output from Terraform. Metrics and other configuration can also be retrieved from Cloud Run.
Additional details can be found here.
How do I upgrade the Agent?
Please refer to the documentation here.
How do I create a service account key outside of Terraform?
If you set generate_key = false and would prefer to manually provision the service account key you can do so too. To create a JSON Key in the project:
-
Under IAM & Admin, go to the Service Accounts section in your Google Cloud Platform console.
-
Filter for the Invoker Service Account "MCD Agent Invoker SA" created in step 1. To retrieve the full service account email address you can add the following output:
output "invoker_sa" { value = module.apollo.mcd_agent_invoker_sa description = "The agent invoker SA name." } -
Select "Keys" and create a JSON key. A JSON file will download – please keep it safe.
Can I further constraint inbound access (ingress) to the Agent?
Note that making changes to an active (running) agent might result in temporary inaccessibility, which can affect jobs.
It's always recommended to coordinate with support or your account representative before doing so.
Absolutely! By default Monte Carlo will only make HTTPS requests to the Agent using the service account key you provide during registration.
If you prefer you can further restrict requests to the Agent via an IP allowlist. For instance you can:
- Please refer to the documentation for the list of IP addresses that need to be allowlisted for your platform version.
- Create a HTTPS Application Load Balancer by following these instructions. Importantly, please be sure to use HTTPS for the protocol as Monte Carlo does not accept the HTTP scheme. This requires a domain, certificate, and external IP reservation. We strongly recommend you do not use self-signed certificate.
- Create a Cloud Armor policy that denies all traffic, except to the IP address from #1 and attach the HTTPS Load Balancer from #2.
- Update the Ingress Controls for the Agent's Cloud Run Service to "Internal and Cloud Load Balancing". You can achieve this by setting the
ingressparameter to"INGRESS_TRAFFIC_INTERNAL_LOAD_BALANCER"in Terraform. - Add a new "Custom Audience" to the Cloud Run Service that matches the public URL of the load balancer (more information in the Google Documentation here). You can achieve this by setting the
custom_audiencesparameter in Terraform, for example:custom_audiences = ["https://example.loadbalancer.com"]. Please note that the audience you configure here must be the exact same value you use as theendpoint\when configuring the agent in Monte Carlo. - Test connectivity between Monte Carlo's Service and the Agent. See here for further details.
For more information on connectivity, please refer to our Network Connectivity documentation.
Can I configure the agent with no public Internet egress access?
Yes! You can attach the Cloud Run Service to a VPC configured with access only to private Google services, that way the agent will be able to access Google Cloud Storage and BigQuery but not other public services.
You can use the vpc_access attribute to attach the Cloud Run Service to a VPC and inside vpc_access you can set the egress attribute to ALL_TRAFFIC to configure the service to send all traffic to the VPC.
The example here shows how to deploy a VPC with a single subnet (which enables private access to Google Services) and how to configure the agent to use it.
module "apollo" {
  source  = "monte-carlo-data/mcd-agent/google"

  generate_key = true
  project_id   = "<REPLACE_ME_WITH_YOUR_GCP_PROJECT>"
  vpc_access {
    egress = "ALL_TRAFFIC"
    network_interfaces = {
      network    = "<VPC_NETWORK_NAME>"
      subnetwork = "<SUBNET_NAME>"
    }
  }
}
Can I use a Serverless VPC Access Connector?
Yes! You can use the connector attribute under vpc_access :
module "apollo" {
  source  = "monte-carlo-data/mcd-agent/google"

  generate_key = true
  project_id   = "<REPLACE_ME_WITH_YOUR_GCP_PROJECT>"
  vpc_access {
    connector = "<CONNECTOR_ID>"
    egress = "ALL_TRAFFIC"
  }
}
Can I further constraint outbound access (egress) from the Agent?
Absolutely! As with any Cloud Run Service you can control egress in multiple ways. For instance:
- Using VPC Service Controls with a Service Perimeter and sending all traffic directly to a VPC.
- Setting up a Static outbound IP for use with IP filtering.
Depending on your integration this might be necessary to establish connectivity.
How do I check the reachability between Monte Carlo and the Agent?
Please refer to the documentation here.
How do I debug connectivity between the Agent and my integration?
Please refer to the documentation here.
Updated 8 days ago
