Azure DevOps (Public Preview)
Integrate Monte Carlo with Azure DevOps Repos to gain visibility into code impact on your data
In previewThis feature is in preview. See Integration & Feature Lifecycles documentation for more information on what this means.
Overview
The integration with Azure Repos allows customers to
-
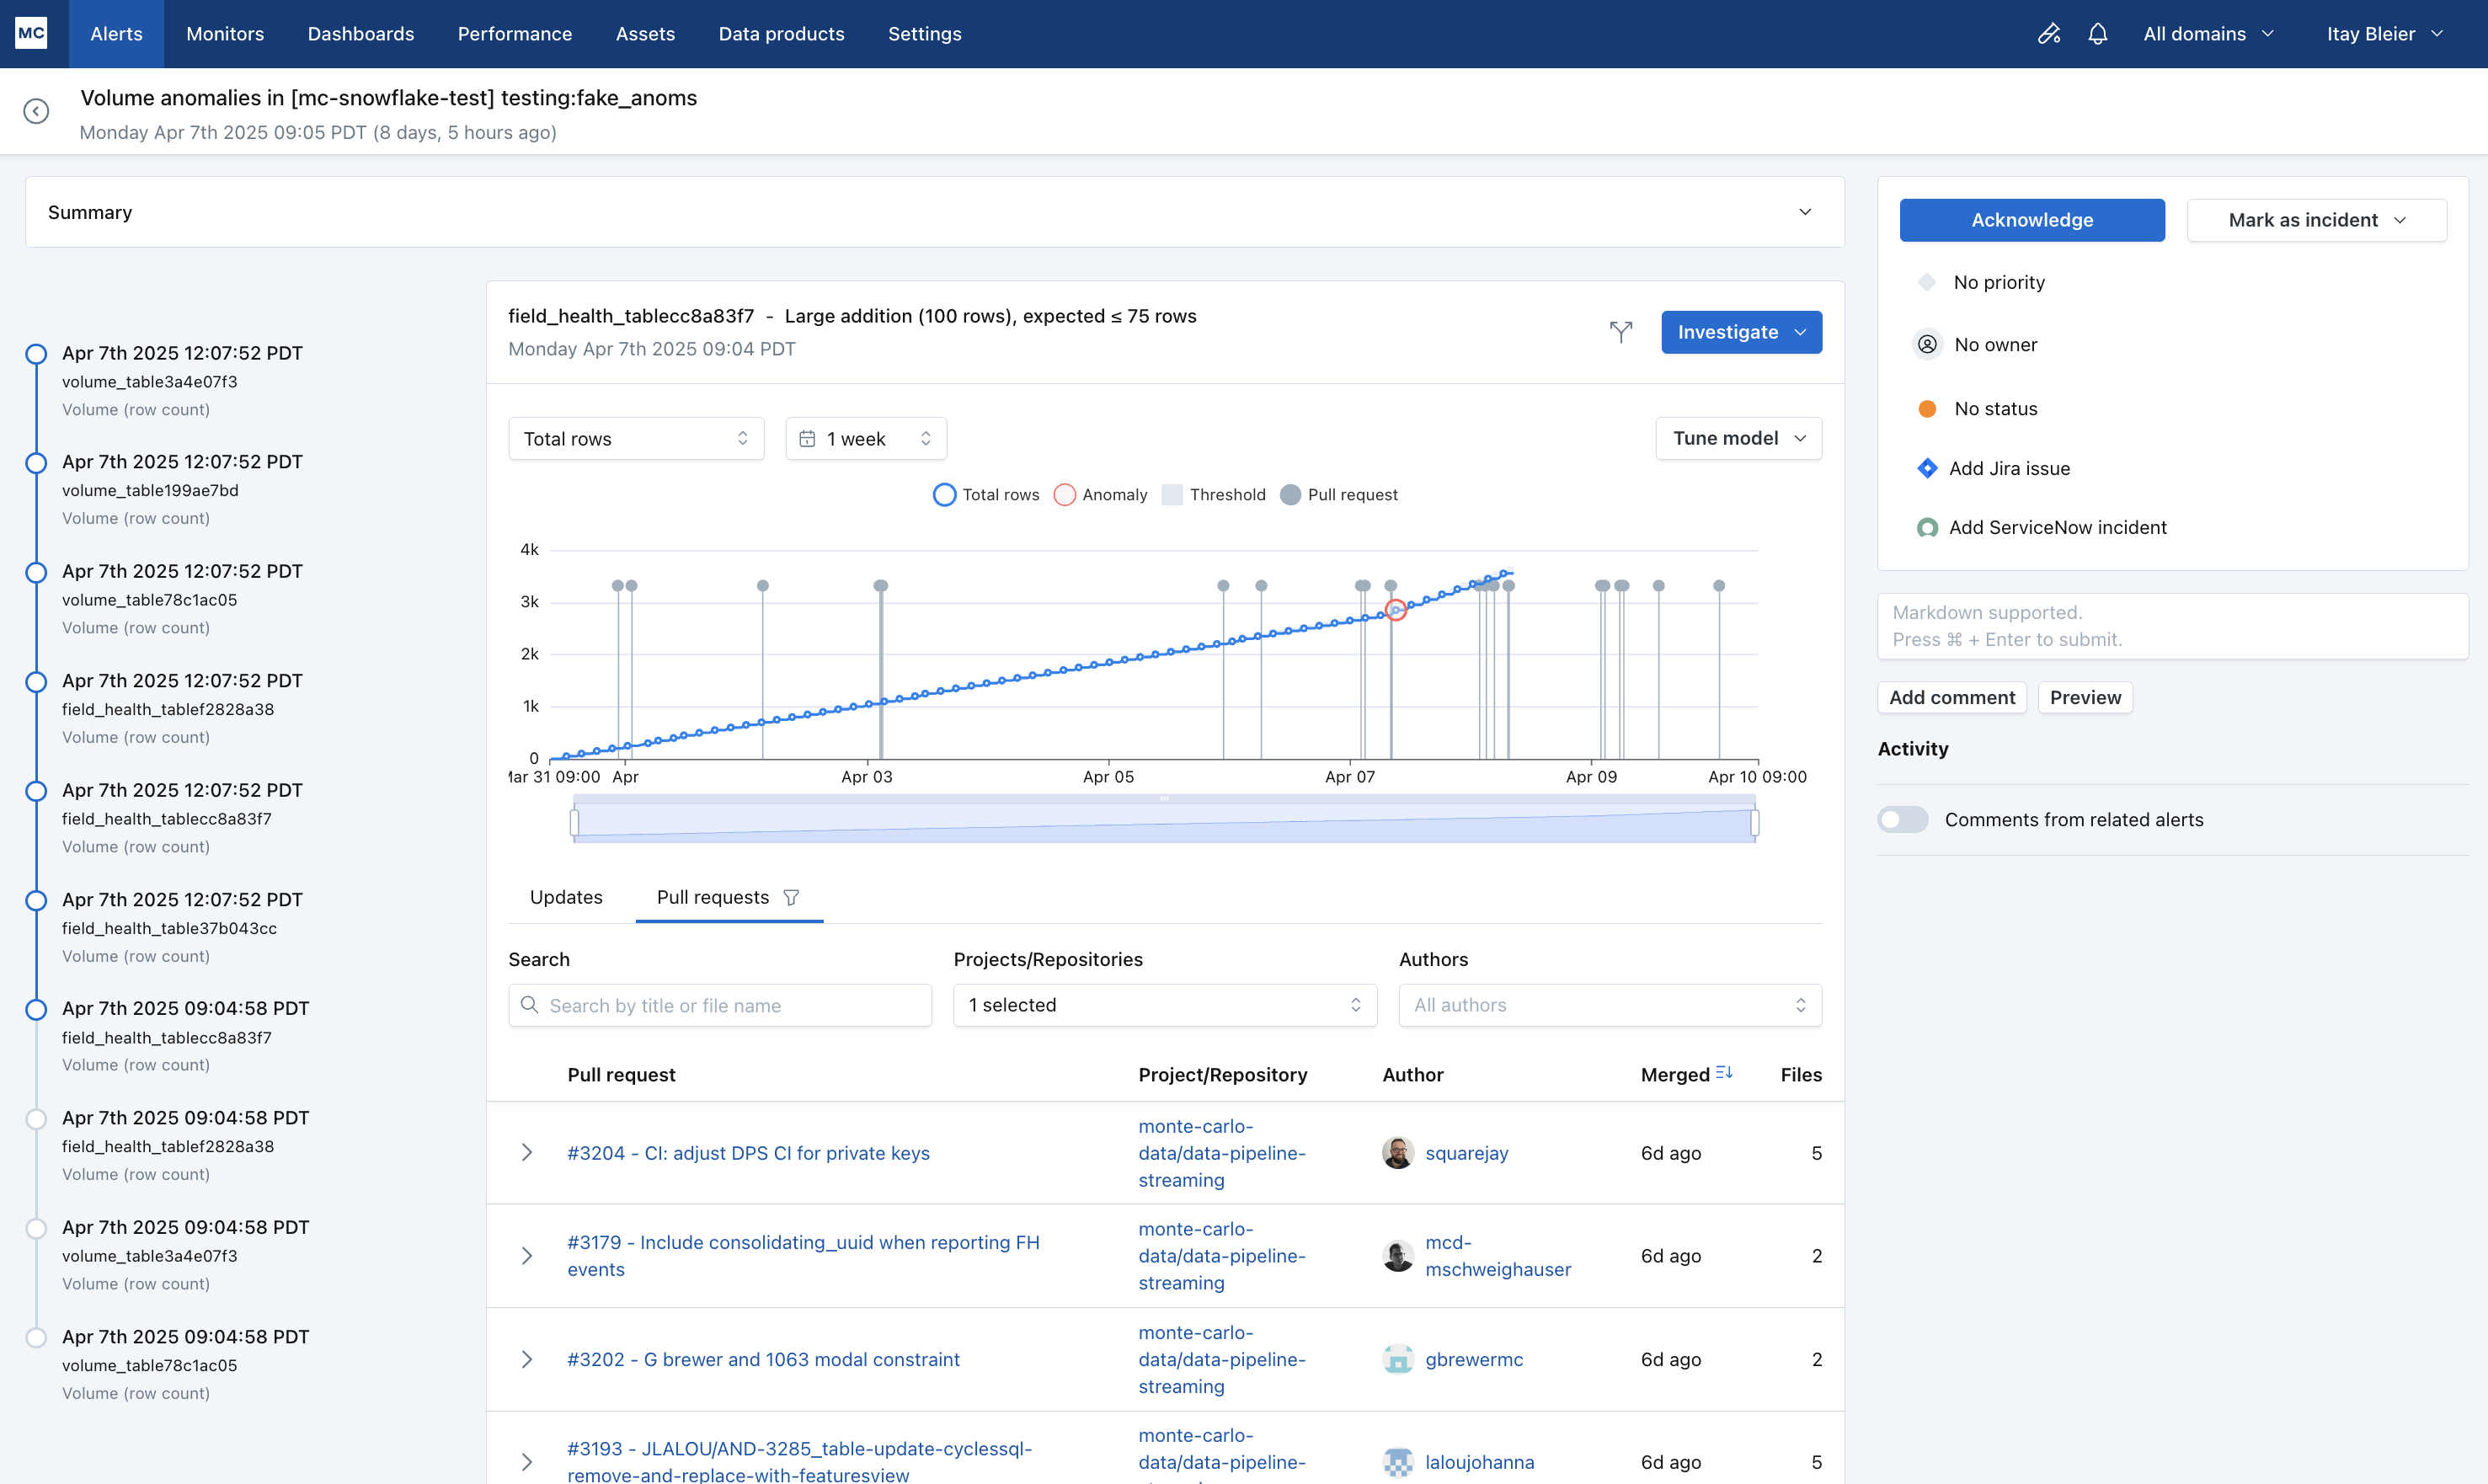
Reduce time to resolution by easily checking potentially relevant pull requests from Azure DevOps in the context of an freshness or volume incident via PRs overlaid on incident charts.
-
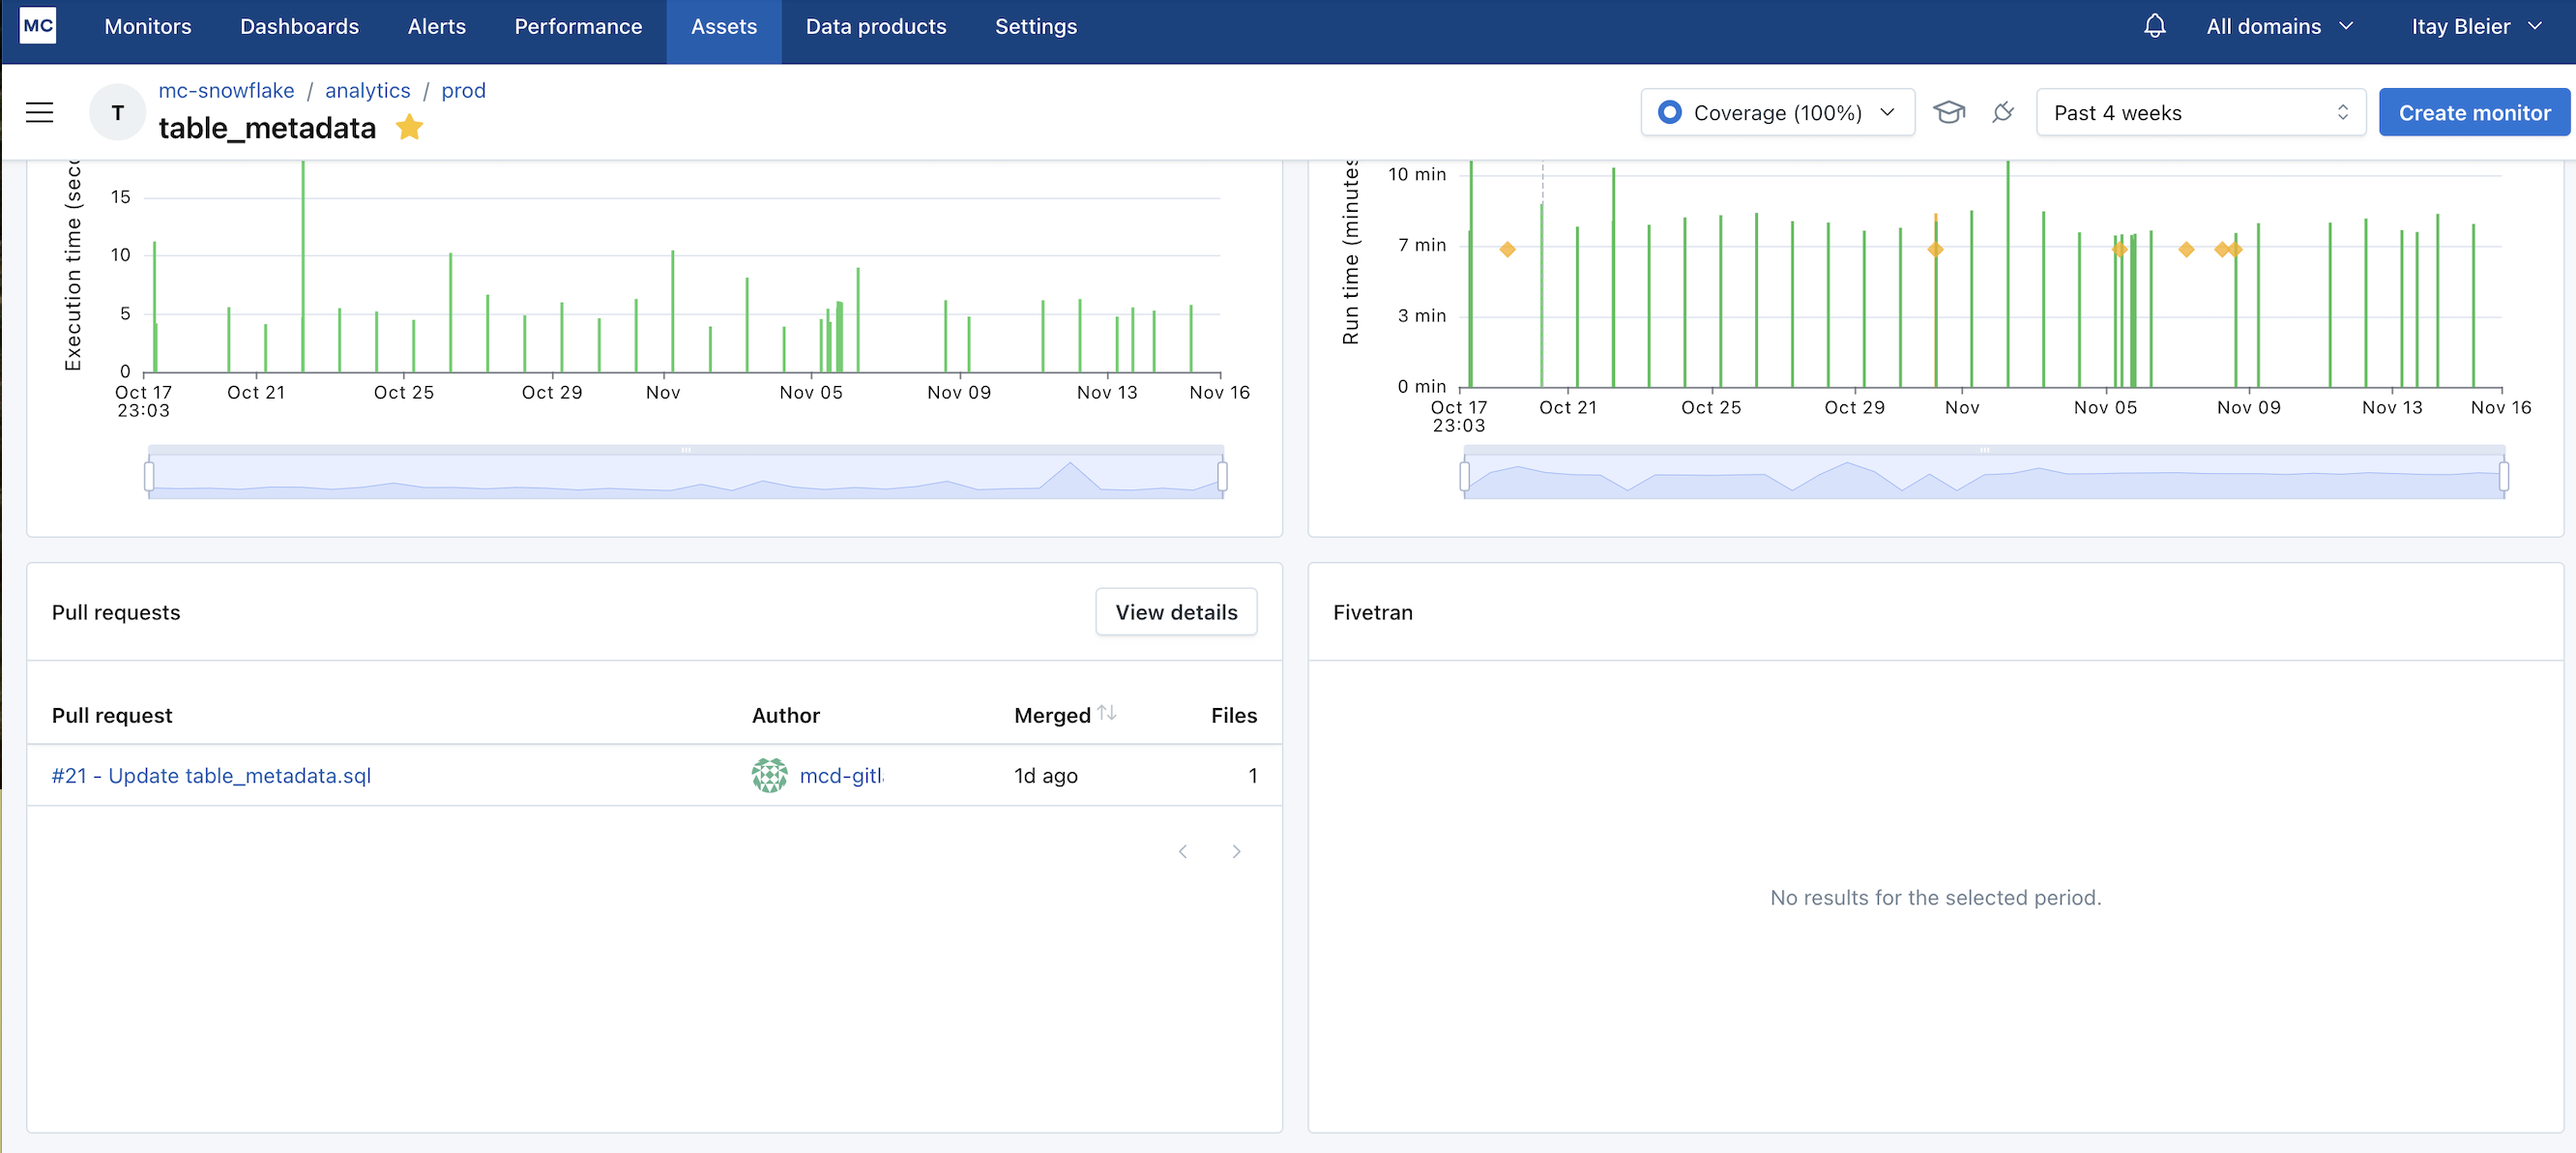
Get code change context on tables via reviewing recent pull request history on the asset page.
Setup Instructions
1. Create Integration
Azure DevOps can be integrated with either OAuth Authentication or Access Token Authentication. Follow one of the two sections below to create an integration with the desired authentication method.
OAuth Authentication
1.1 Create a MonteCarlo Application in Microsoft Entra
Create Application
Login to Microsoft Entra, navigate to "Applications" -> "App registrations" and click on "New registration". Complete the form as follows:
Name: MonteCarlo.
Account type: Single tenant
Redirect URI: Web | https://getmontecarlo.com/auth/callback/azure-devops
Click "Register" to create the new application.
Copy and save the "Application (client) ID" and "Directory (tenant) ID" so they can be entered into MonteCarlo later.
Configure Client Secret
Navigate to "Certificates & secrets" and click "New client secret". Enter "MonteCarlo" for the description and select your desired expiry.
Click "Add".
Copy and save the Client Secret (Value) so it can be entered into MonteCarlo later.
Configure Permissions
In the new application, navigate to "API Permissions". Under "Configured permissions", click "Add a permission". Select "Azure DevOps" and add the following read-only permissions:
vso.buildvso.codevso.work
Click "Add permissions".
Add Application to Azure DevOps
Navigate to your organization in Azure DevOps. Select "Organization settings" -> "Users" and click the "Add users" button. Start typing "MonteCarlo" to find the newly created Microsoft Entra application and select it. Under "Add to projects" select the projects that you may want to monitor with MonteCarlo and then click "Add".
1.2. Create Azure DevOps Integration in MonteCarlo
Login to MonteCarlo and navigate to "Settings" -> "Integrations". Under “Notifications and collaboration” click “Create” and select “Azure DevOps”. Enter the name of your Azure DevOps organization as well as the Tenant ID, Client ID, and Client Secret you saved earlier. Click "Create".
You should be redirected to Microsoft to grant the requested access. Once granted, you should be redirected back to MonteCarlo where your Azure DevOps integration is now connected.
The next step is to select which projects or repositories to monitor.
Access Token Authentication
These instructions will assume that a Personal Access Token is being used. Although any valid access token will work too.
1.1 Create a Personal Access Token in Azure DevOps
The user creating the Personal Access Token needs to be a Project Administrator in all projects that will be selected for monitoring. This is because only Project Administrators have permission to create web hooks.
In Azure DevOps, select "User settings" in the top right-hand corner and click "Personal access tokens". Click the "New Token" button and name the token "MonteCarlo". Select the desired expiry but be aware that the token will need to be manually updated in MonteCarlo once it expires.
Grant "Read" permission for "Work Items", "Code", and "Build".
Click "Create" to create the token. Copy and save the token value so it can be entered into MonteCarlo.
1.2 Create Azure DevOps Integration in MonteCarlo
Login to MonteCarlo and navigate to "Settings" -> "Integrations". Under “Notifications and collaboration” click “Create” and select “Azure DevOps”. Select "Access Token" authentication. Enter the name of your Azure DevOps organization as well as your personal access token. Click "Create".
Your Azure DevOps integration is now connected. The next step is to select which projects or repositories to monitor.
2. Select Repositories
Once an Azure DevOps integration has been created using either OAuth Authentication or Access Token Authentication, you can select which projects or repositories should be monitored.
In Monte Carlo, navigate to your Azure DevOps integration and select "Edit". The list of available Azure DevOps projects is displayed. All repositories in a project can be monitored using "Select all". Otherwise, individual repositories can be monitored by expanding the project and using the toggle for each repository.
Click "Update" to save these selections.
Pull requests from the selected repositories will be displayed in MC UI to help investigate their impact on your tables.
3. [Recommended] Supercharge with dbt integration
MC can map pull requests to the tables they update via the dbt integration. If you want PR-to-impacted table mapping in the UI or impact reports for PRs during CICD, make sure to set up dbt integration following docs.
If you have dbt cloud, then once you set up the dbt integration above you are all set, since all mapping will be done automatically. If you have dbt core, then go to “Configure dbt projects” under the Azure DevOps integration setting to complete the final step.
Under “Configure dbt projects”, you will see a list of dbt connections you set up in MC. Most customers will have just one. For each dbt connection, you will be able to select the dbt project you want to map, then add the project's remote URL and subdirectory. This helps MC point each dbt project at the relevant Azure DevOps repository, so we can map each PR to the corresponding dbt model and tables.
- Azure DevOps repository remote URL: this should be in the format of
https://<devops-org>@dev.azure.com/<devops-org>/<project>/_git/<repo>or[email protected]:v3/<devops-org>/<project>/<repo> - Project subdirectory: This is the root directory of the dbt models within the repo. It is only needed if the dbt project is further down the directory. For example, if a model path is
analytics/models/foo/bar.sqlthen subdirectory would beanalytics. If a model path ismodels/foo/bar.sqlthen subdirectory would be empty.

Once each project has been configured, you should be all set. Note only PRs merged after the integration setup will show up in the UI.
Network Access Control
You can restrict access to the Azure DevOps webhook endpoint by IP address using Network Access Control Lists. See Network Access Control for setup and configuration details.
Updated 6 months ago