Azure Private Link
About
For Azure resources or deployments that are not publicly accessible, or if you prefer to connect privately, you can utilize private endpoints. This helps ensure that traffic between the Monte Carlo Platform and the service traverses the Microsoft backbone network. For additional details, please refer to the Azure Private Link Overview.
To get started, please follow the guide appropriate for your deployment type after reviewing the requirements:
If you are unsure about the deployment type you are using, please see the definitions below or reach out to your account representative.
Definitions and Terminology
To help with clarity, we have defined the following terms and phrases:
-
Cloud Deployments: Refers to customers who connect to an integration without deploying any infrastructure. This term is synonymous with SaaS deployments.
-
Hybrid Deployments: Refers to customers who connect to an integration using an Agent or have a Data Store. For more details, please see the definition here.
-
Integrations: This term encompasses a variety of connections supported by the Monte Carlo Platform, independently of the developer toolkit.
Refer to the documentation here to determine your deployment type and check if it is supported.
Requirements
- Monte Carlo Role, Subscription, and Supported Type: You must have the Account Owner role in Monte Carlo. Additionally, your account must be subscribed to either the Scale or Enterprise tier with the Advanced Networking add-on and a supported deployment type.
- Azure Admin: Administrative access to Azure is necessary for the setup.
- Additional Admin Roles: Depending on the specific integration, you may also need administrative rights. Additionally, please note that certain integrations require specific subscription tiers and configurations with their respective vendors. Refer to your vendor's documentation for more details.
Supported integrations and limitations can be found here and here, respectively.
For Cloud Deployments
Leveraging Private Link between the Monte Carlo Platform (cloud service) and an integration varies based on the resource. Please follow the guide that is relevant to the integration you wish to add.
Databricks
The Azure Databricks workspace must be on the Premium plan. See other vendor requirements here.
-
Navigate to Databricks Workspace
Navigate to the Databricks section in your Azure console and select the applicable workspace. -
Save Location and Resource ID
In the Workspace overview tab, save the location information. Then, switch to the JSON view and copy the resource ID for future reference.
Azure Console Example
-
Request Private Link Establishment
Contact us at [email protected] to request the establishment of a Private Link for Azure. Ensure you include the integration type (i.e. Databricks), Monte Carlo Account ID (can be found here), resource ID and location you retrieved in Step 2 in your email. Monte Carlo will create the private endpoint and notify you once the process is complete.Note: Do not proceed with the registration process until you receive confirmation from Monte Carlo that the endpoint has been created.
Typically, you will receive a response within 24-48 hours (US business days).
-
Approve the Private Endpoint
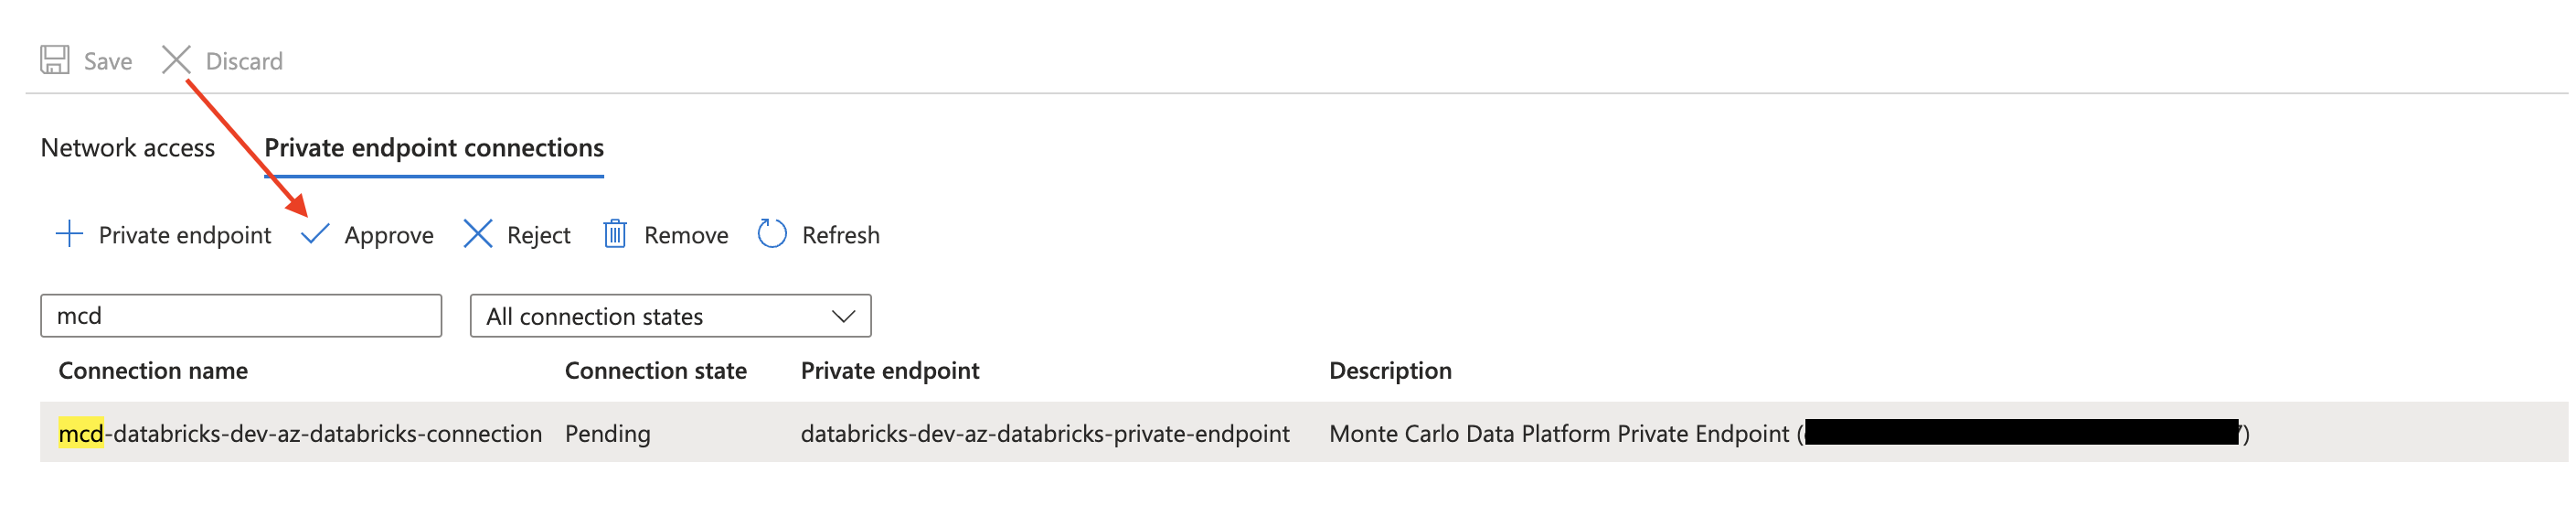
Once you have been contacted by Monte Carlo confirming the Private Link has been established, navigate back to the workspace in the Azure console. Follow these steps:-
Go to Security -> Networking.
-
Under Private endpoint connections, locate the requested endpoint and select Approve. You might need to refresh the page first. The state should then change from Pending to Approved.
Azure Console Example
-
-
Onboard Databricks Integration
Continue to follow this guide to create the relevant service account, grant permissions, set up SQL warehouses, and register the integration in Monte Carlo. Importantly, when entering the Workspace URL, use the value provided by Monte Carlo in response to step 3. The URL should follow this format:https://{private_endpoint}.pl-auth.azuredatabricks.net.
Snowflake
Snowflake requires Business Critical (or higher). See other vendor details here and here.
Setting up Private Link can consist of two components: 1) The Snowflake Service and optionally, 2) Snowflake Internal Stage. Note that if you only set up #1, Private Link might not be used for certain queries. This is generally the case for larger result sets when Snowflake internally stores the results in Azure Blob Storage (the internal stage), which are then accessed directly. To enable Private Link for this, you need to follow the steps for both components.
If you want to use Private Link with Snowflake Internal Stages as well as with the Snowflake Service, it is recommended to set them up in tandem by following the optional steps under the Snowflake Service subsection. This helps minimize back-and-forth and prevents any potential downtime that might occur when updating records on an active integration before the endpoint is approved.
Snowflake Service
-
Execute Snowflake Command
As anACCOUNTADMINin Snowflake, execute the following command and save the results:USE ROLE ACCOUNTADMIN; SELECT SYSTEM$GET_PRIVATELINK_CONFIG(); -
Optionally, Set Up Private Link for the Snowflake Internal Stage
If you'd like to use Private Link for the Snowflake Internal Stage as well, please follow steps 1-2 here. Otherwise, please continue to the next step. -
Request Private Link Establishment
Contact us at [email protected] to request the establishment of a Private Link for Azure. Ensure you include the integration type (e.g., Snowflake Service), Monte Carlo Account ID (can be found here), and the results of the command executed in Step 1 in your email. If you plan on using Private Link for the Snowflake Internal Stage and have completed step 2, please also include the results of that command. Monte Carlo will create the private endpoint(s) and notify you once the process is complete.Note: Do not proceed with the registration process until you receive confirmation from Monte Carlo that the endpoint has been created.
Typically, you will receive a response within 24-48 hours (US business days).
-
Contact Snowflake Support to Approve the Endpoint for the Snowflake Service
Open a support case with Snowflake and ensure you provide the following information:- Your Snowflake account URL
- The Private Endpoint resource ID for the Service (Monte Carlo will provide this in our reply to Step 3)
- A request to approve the endpoint
Note: Do not proceed with the registration process until you receive confirmation from Snowflake that the endpoint has been approved.
-
Optionally, Approve the Endpoint for the Internal Stage
This step only applies if you'd like to use Private Link for the Snowflake Internal Stage as well. Otherwise please skip to the next step. As anACCOUNTADMINin Snowflake, execute the following command, filling in the private endpoint resource ID that Monte Carlo shared with you in the response from the step 3:USE ROLE ACCOUNTADMIN; SELECT SYSTEM$AUTHORIZE_STAGE_PRIVATELINK_ACCESS('<private_endpoint_resource_id>'); -
Onboard Snowflake Integration
Continue to follow this guide to create the relevant service account and register the integration in Monte Carlo. Importantly, when entering the ACCOUNT, use the value provided by Monte Carlo in response to step 3. The account should generally follow this format:{account}.{region}.privatelink.
If you are also using network policies in Snowflake to restrict external access, please see details here on how to allowlist Monte Carlo's IPs in addition to using Private Link.
If you prefer, you can also use the Azure API, CLI or any other tool of preference to manage and update any config.
Snowflake Internal Stage
If you want to use Private Link with Snowflake Internal Stages as well as with the Snowflake Service, it is recommended to do so alongside the steps above to minimize back-and-forth and prevent any potential downtime that might occur with updating records on an active integration before the endpoint is approved.
-
Execute Snowflake Command
As anACCOUNTADMINin Snowflake, execute the following command if you have not previously enabled the private connectivity feature in Snowflake.USE ROLE ACCOUNTADMIN; ALTER ACCOUNT SET ENABLE_INTERNAL_STAGES_PRIVATELINK = TRUE; -
Execute Snowflake Command
As anACCOUNTADMINin Snowflake, execute the following command and save the results:USE ROLE ACCOUNTADMIN; SELECT KEY, VALUE::VARCHAR INTERNAL_STAGE FROM TABLE (FLATTEN(INPUT =>PARSE_JSON(SYSTEM$GET_PRIVATELINK_CONFIG()))) WHERE KEY = 'privatelink-internal-stage';Note that you might need an active warehouse in order to execute the above command.
-
Request Private Link Establishment
Contact us at [email protected] to request the establishment of a Private Link for Azure. Ensure you include the integration type (e.g., Snowflake Internal Stage), Monte Carlo Account ID (can be found here), and the results of the command executed in Step 2 in your email. Monte Carlo will create the private endpoint and notify you once the process is complete. If you are using network policies in Snowflake to restrict external access, you will also need to add Monte Carlo’s Private IPs to your policy. Please let us know if this is the case.Note: Do not proceed until you receive confirmation from Monte Carlo that the endpoint has been created.
Typically, you will receive a response within 24-48 hours (US business days).
-
Approve the Endpoint
As anACCOUNTADMINin Snowflake, execute the following command, filling in the private endpoint resource ID that Monte Carlo shared with you in the response from step 3:USE ROLE ACCOUNTADMIN; SELECT SYSTEM$AUTHORIZE_STAGE_PRIVATELINK_ACCESS('<private_endpoint_resource_id>');If you are also using network policies in Snowflake to restrict external access, please see details here on how to allowlist Monte Carlo's IPs in addition to using Private Link.
If you prefer, you can also use the Azure API, CLI or any other tool of preference to manage and update any config.
Azure SQL Database
-
Navigate to SQL servers
Navigate to the SQL servers section in your Azure console and select the applicable server. -
Save Location and Resource ID
In the server overview tab, save the location information. Then, switch to the JSON view and copy the resource ID for future reference.
Azure Console Example
-
Request Private Link Establishment
Contact us at [email protected] to request the establishment of a Private Link for Azure. Ensure you include the integration type (i.e. SQL Server), Monte Carlo Account ID (can be found here), resource ID and location you retrieved in Step 2 in your email. Monte Carlo will create the private endpoint and notify you once the process is complete.Note: Do not proceed with the registration process until you receive confirmation from Monte Carlo that the endpoint has been created.
Typically, you will receive a response within 24-48 hours (US business days).
-
Approve the Private Endpoint
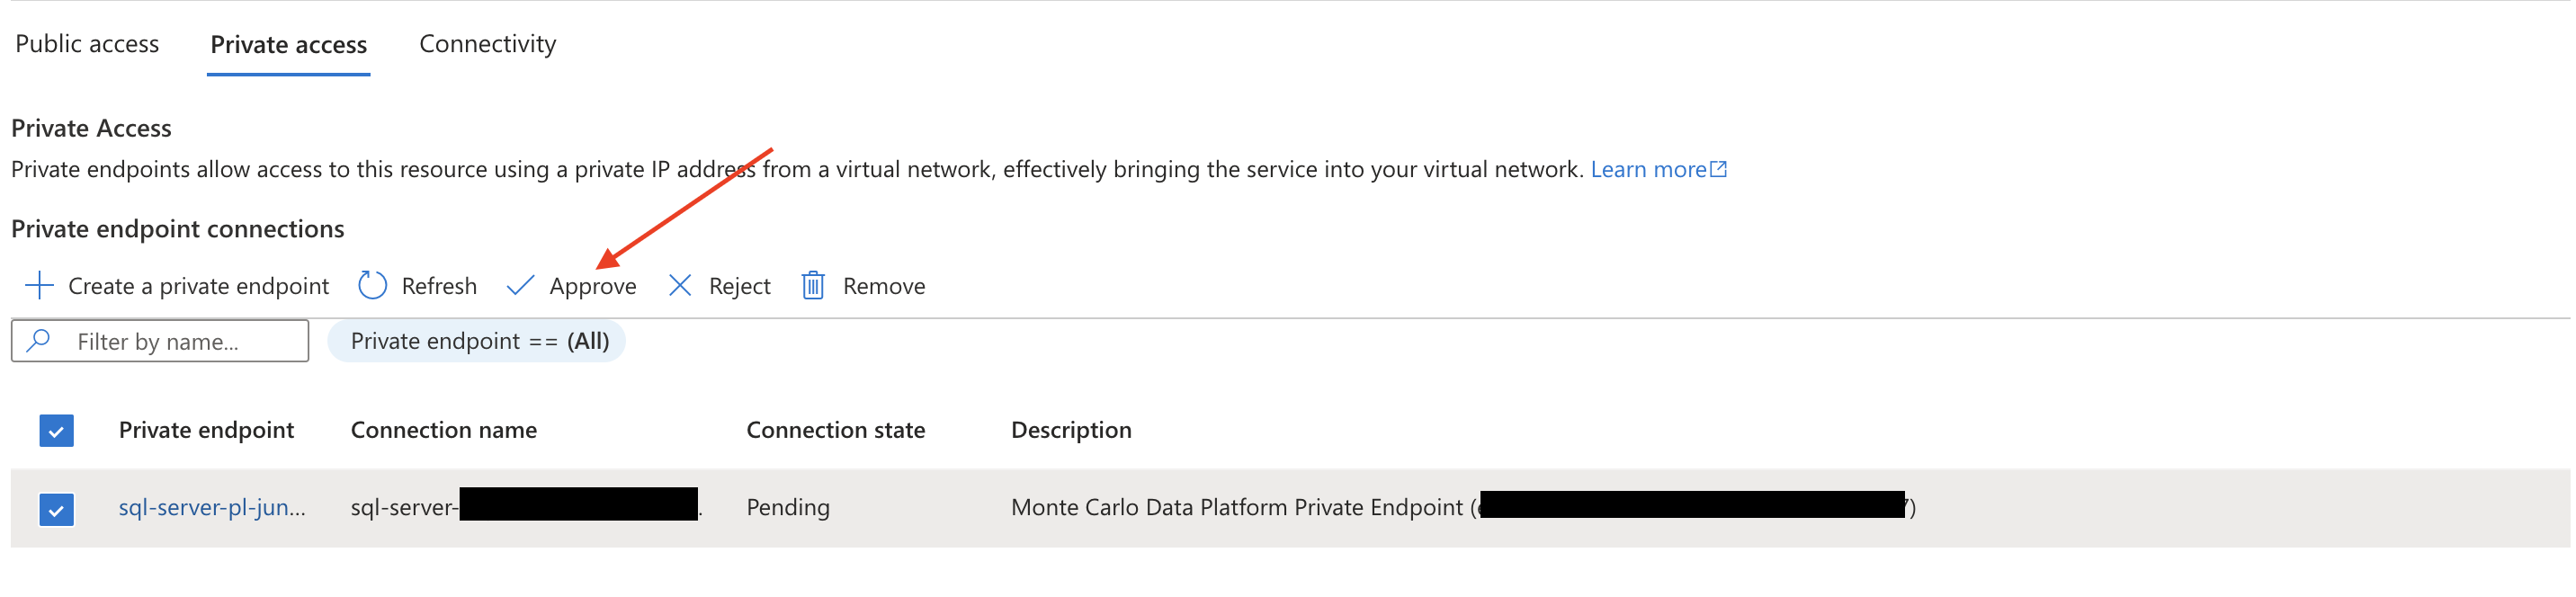
Once you have been contacted by Monte Carlo confirming the Private Link has been established, navigate back to the server in the Azure console. Follow these steps:-
Go to Security -> Networking.
-
Under Private access, locate the requested endpoint and select Approve. You might need to refresh the page first. The state should then change from Pending to Approved.
Azure Console Example
-
-
Onboard SQL Server Integration
Continue to follow this guide to create the relevant service account and register the integration in Monte Carlo. Importantly, when entering the Host, use the value provided by Monte Carlo in response to step 3. The Host should follow this format:{private_endpoint}.privatelink.database.windows.net.
If you prefer, you can also use the Azure API, CLI or any other tool of preference to manage and update any config.
Azure SQL Managed Instance
Private endpoints to SQL Managed Instance can be used to connect only through port 1433.
See other vendor details and limitations here.
-
Navigate to SQL Managed Instance
Navigate to the SQL managed instance section in your Azure console and select the applicable instance. -
Save Location, Host and Resource ID
In the overview tab, save the location and host information.
Azure Console Example
Then, switch to the JSON view and copy the resource ID for future reference.

Azure Console Example
-
Request Private Link Establishment
Contact us at [email protected] to request the establishment of a Private Link for Azure. Ensure you include the integration type (i.e. SQL Managed Instance), Monte Carlo Account ID (can be found here), resource ID, host, and location you retrieved in Step 2 in your email. Monte Carlo will create the private endpoint and notify you once the process is complete.Note: Do not proceed with the registration process until you receive confirmation from Monte Carlo that the endpoint has been created.
Typically, you will receive a response within 24-48 hours (US business days).
-
Approve the Private Endpoint
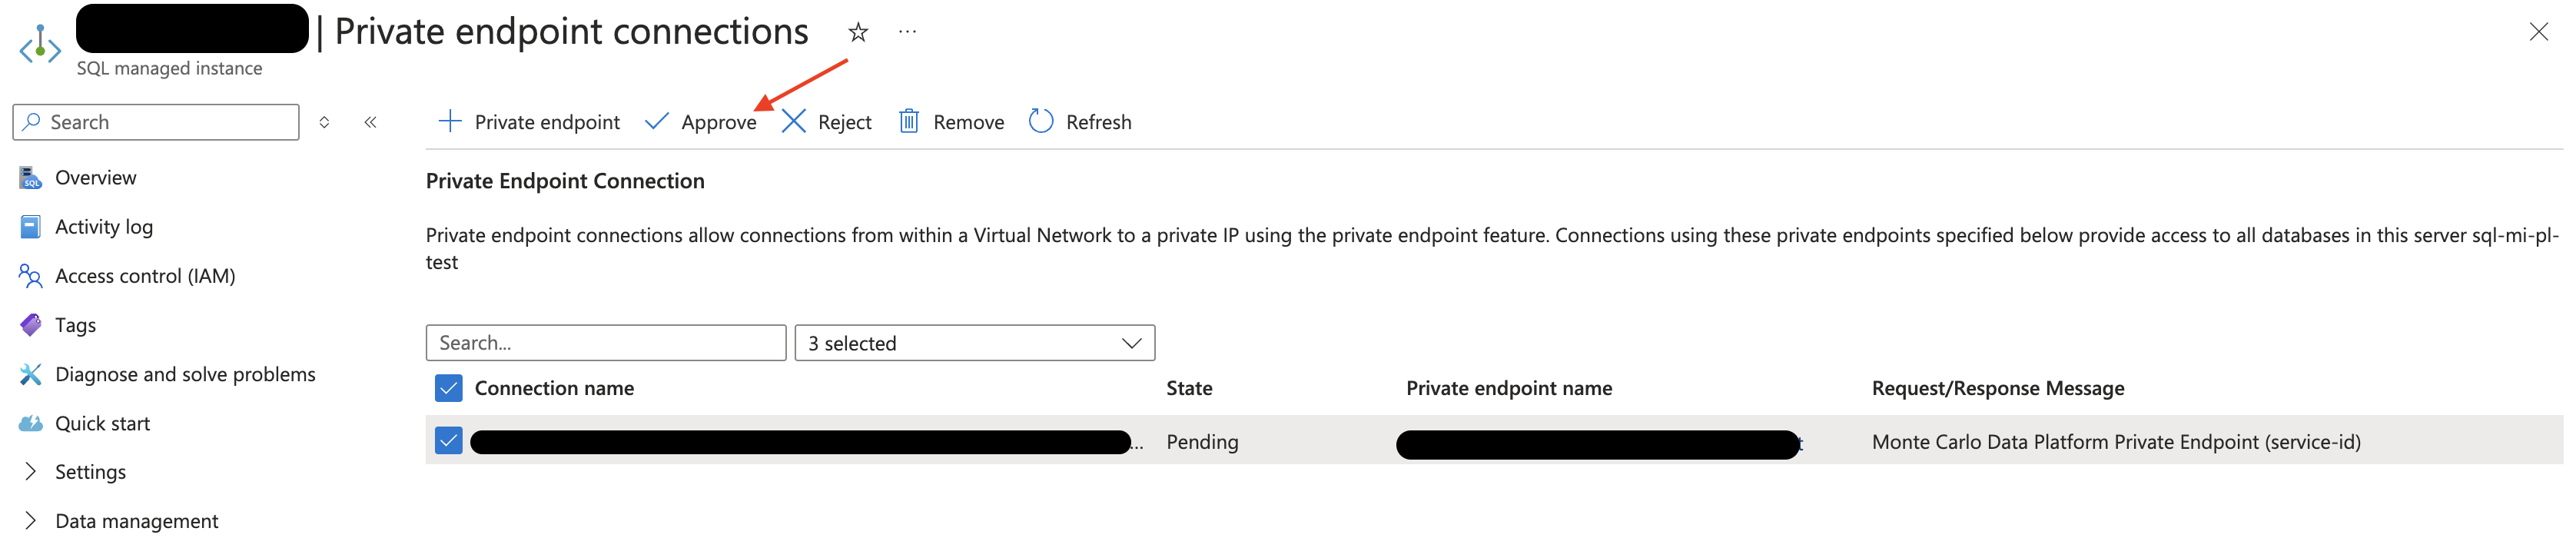
Once you have been contacted by Monte Carlo confirming the Private Link has been established, navigate back to the instance in the Azure console. Follow these steps:-
Go to Security -> Private endpoint connections.
-
Under Private Endpoint Connection, locate the requested endpoint and select Approve. You might need to refresh the page first. The state should then change from Pending to Approved.
Azure Console Example
-
-
Onboard Integration
Continue to follow this guide to create the relevant service account and register the integration in Monte Carlo.
Azure Database for Postgres flexible server
-
Navigate to Azure Database for Postgres flexible server
Navigate to the Azure Database for Postgres flexible serves section in your Azure console and select the applicable server. -
Save Location, Server name and Resource ID
In the overview tab, save the location and server name information.
Azure Console Example
Then, switch to the JSON view and copy the resource ID for future reference.
Azure Console Example
-
Request Private Link Establishment
Contact us at [email protected] to request the establishment of a Private Link for Azure. Ensure you include the integration type (i.e. Azure Database for Postgres flexible server), Monte Carlo Account ID (can be found here), resource ID, server name, and location you retrieved in Step 2 in your email. Monte Carlo will create the private endpoint and notify you once the process is complete.Note: Do not proceed with the registration process until you receive confirmation from Monte Carlo that the endpoint has been created.
Typically, you will receive a response within 24-48 hours (US business days).
-
Approve the Private Endpoint
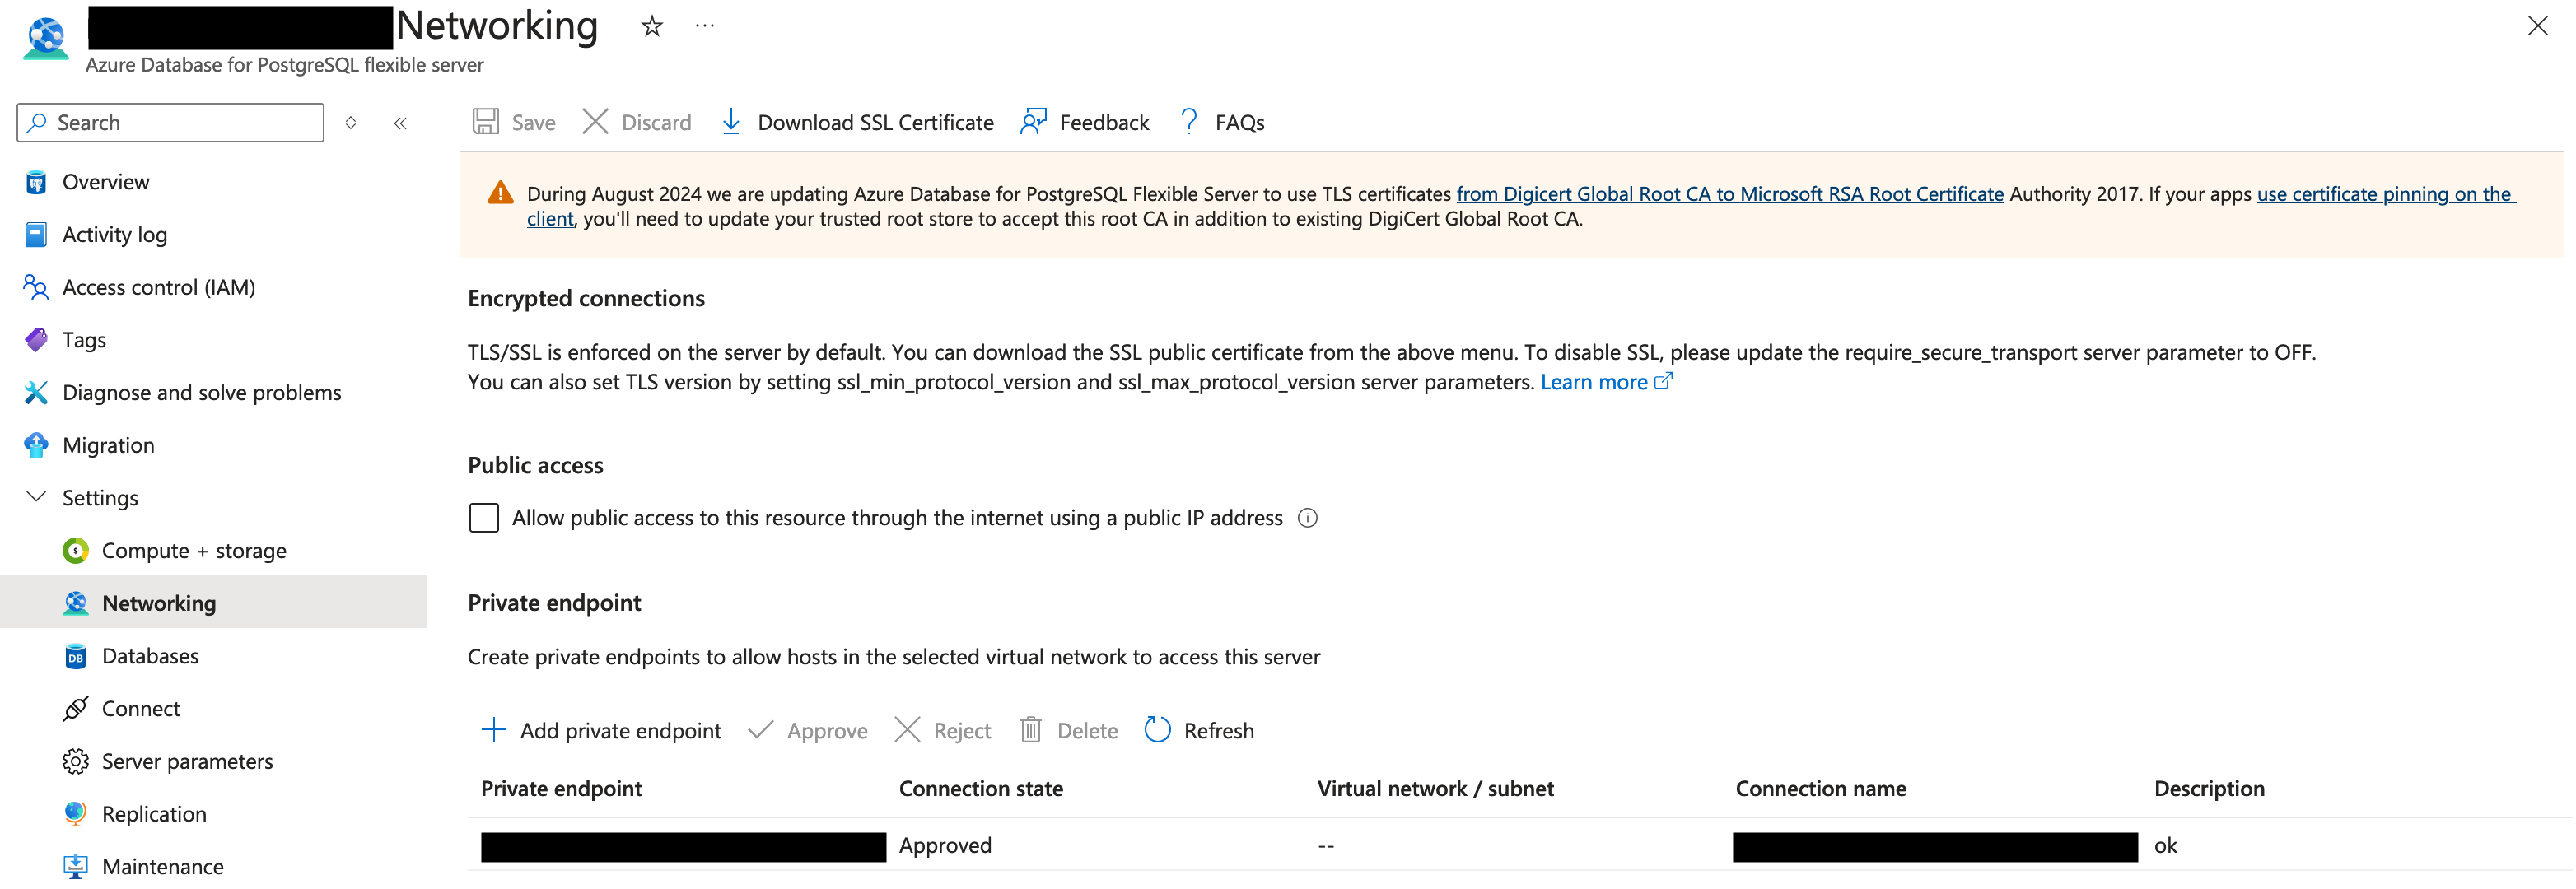
Once you have been contacted by Monte Carlo confirming the Private Link has been established, navigate back to the instance in the Azure console. Follow these steps:- Go to Settings -> Networking.
- Under Private endpoint, locate the requested endpoint and select Approve. You might need to refresh the page first. The state should then change from Pending to Approved.
Azure Console Example
-
Onboard Integration
Continue to follow this guide to create the relevant service account and register the integration in Monte Carlo. Importantly, when entering the Host, use the value provided by Monte Carlo in response to step 3. The Host should follow this format:{server_name}.privatelink.postgres.database.azure.com.
If you prefer, you can also use the Azure API, CLI or any other tool of preference to manage and update any config.
Azure Database for MySQL flexible server
-
Navigate to Azure Database for MySQL flexible server
Navigate to the Azure Database for MySQL flexible serves section in your Azure console and select the applicable server. -
Save Location, Server name and Resource ID
In the overview tab, save the location and server name information.
Azure Console Example
Then, switch to the JSON view and copy the resource ID for future reference.
Azure Console Example
-
Request Private Link Establishment
Contact us at [email protected] to request the establishment of a Private Link for Azure. Ensure you include the integration type (i.e. Azure Database for MySQL flexible server), Monte Carlo Account ID (can be found here), resource ID, server name, and location you retrieved in Step 2 in your email. Monte Carlo will create the private endpoint and notify you once the process is complete.Note: Do not proceed with the registration process until you receive confirmation from Monte Carlo that the endpoint has been created.
Typically, you will receive a response within 24-48 hours (US business days).
-
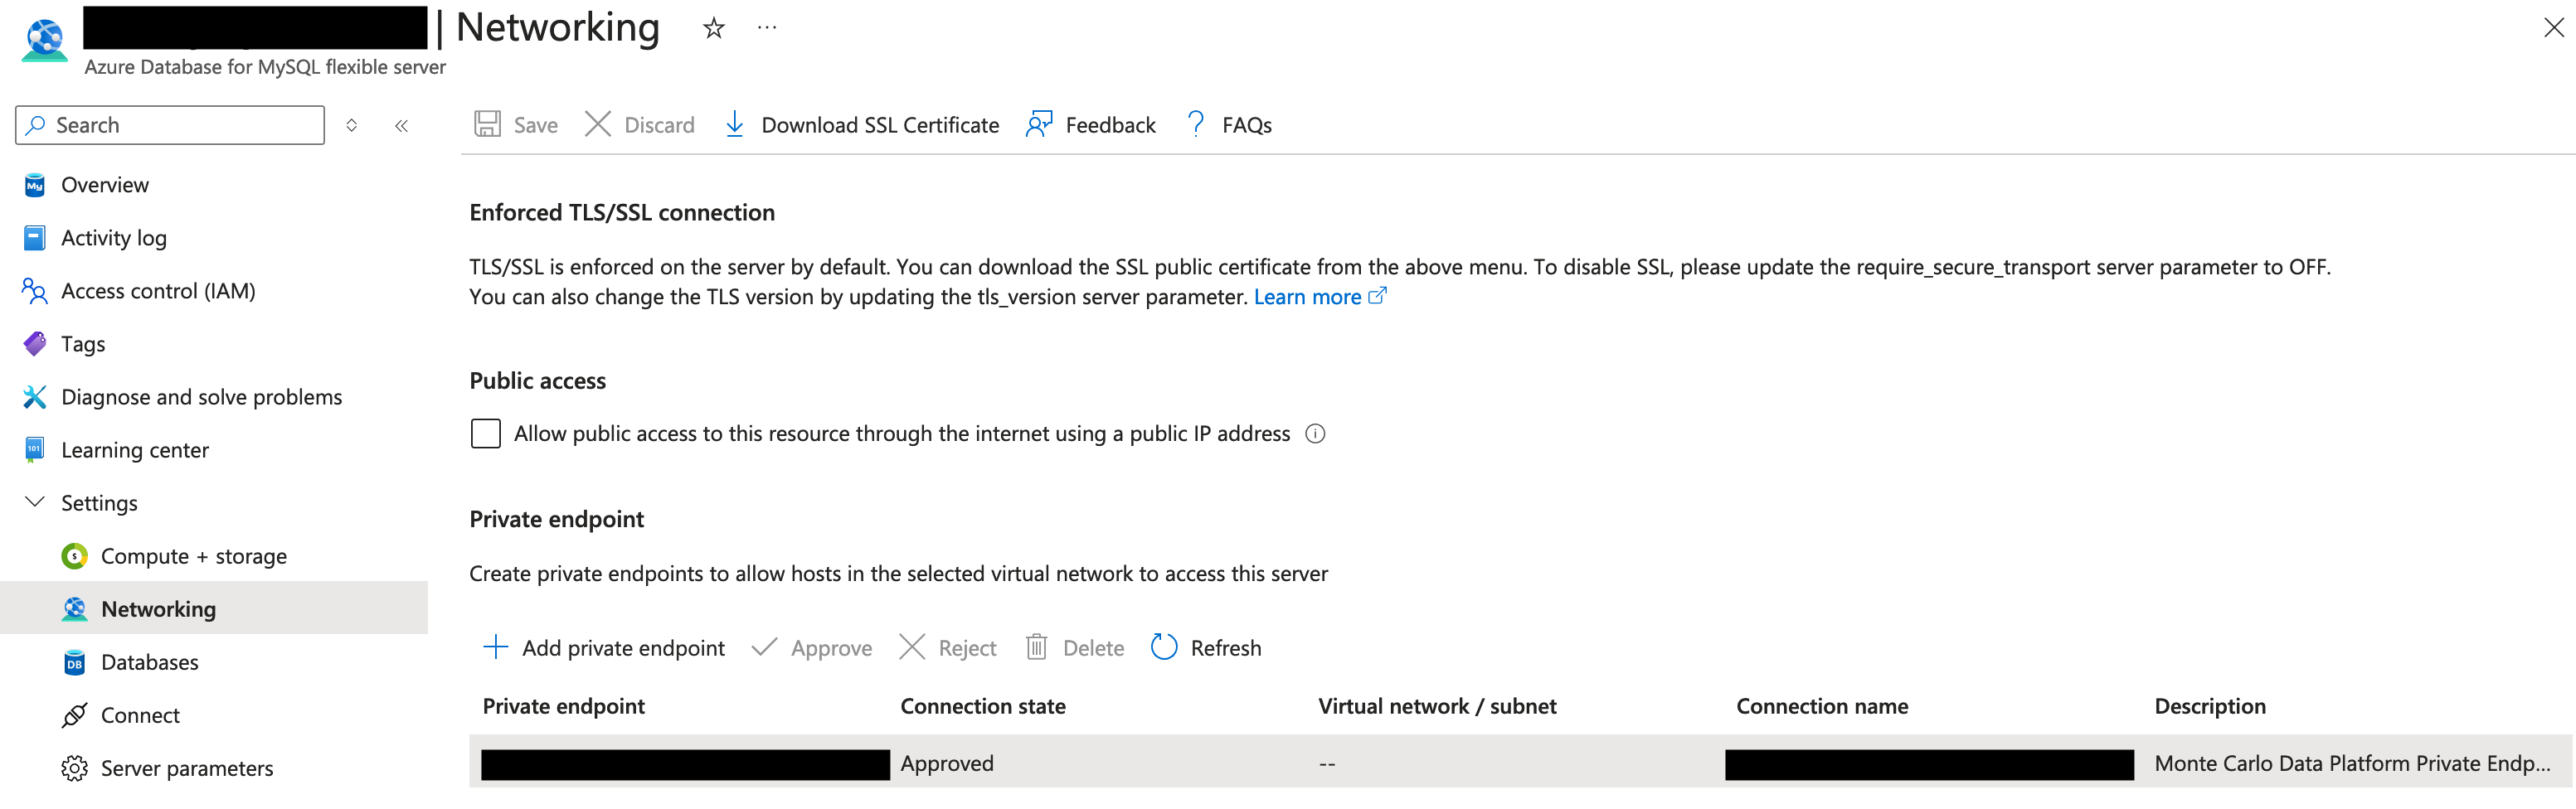
Approve the Private Endpoint
Once you have been contacted by Monte Carlo confirming the Private Link has been established, navigate back to the instance in the Azure console. Follow these steps:- Go to Settings -> Networking.
- Under Private endpoint, locate the requested endpoint and select Approve. You might need to refresh the page first. The state should then change from Pending to Approved.
Azure Console Example
-
Onboard Integration
Continue to follow this guide to create the relevant service account and register the integration in Monte Carlo. Importantly, when entering the Host, use the value provided by Monte Carlo in response to step 3. The Host should follow this format:{server_name}.privatelink.mysql.database.azure.com.
If you prefer, you can also use the Azure API, CLI or any other tool of preference to manage and update any config.
SingleStoreDB Cloud
You can configure a SingleStoreDB Cloud integration as a MySQL integration in Monte Carlo.
- Contact SingleStoreDB Cloud Support to Request an Azure Private Link Alias
Open a support case with SingleStoreDB and ensure you provide the following information:- Cluster URL (Cluster ID)
- Mention that the request is for an Inbound Azure Private Link.
- Provide the ID and name of the Monte Carlo Azure Subscription (available in the Account information page).
- Region Details
- You will get from SingleStoreDB Support: an alias (a string ending with
.azure.privatelinkservice) and a port number.
- Request Private Link Establishment
Contact us at [email protected] to request the establishment of a Private Link for Azure. Ensure you include the integration type (i.e. SingleStoreDB Cloud), Monte Carlo Account ID (can be found here), resource alias and port number you received from SingleStoreDB Cloud Support. Monte Carlo will create the private endpoint and notify you once the process is complete.Note: Do not proceed with the registration process until you receive confirmation from Monte Carlo that the endpoint has been created.
Typically, you will receive a response within 24-48 hours (US business days).
- Onboard SingleStoreDB Cloud as a MySQL Integration
Continue to follow this guide to create the relevant service account and register a MySQL integration in Monte Carlo. Importantly, when entering the Host, use the value provided by Monte Carlo in response to step 2. The Host should follow this format:pl-{number}.privatelink.mcd-pl.com. For the port use the port number provided by SingleStoreDB Cloud Support, the same value you included when requesting the establishment of the Private Link to Monte Carlo.
If you prefer, you can also use the Azure API, CLI or any other tool of preference to manage and update any config.
For Hybrid Deployments
You can enable the use of private endpoints for communication between the Monte Carlo Platform (cloud service) and an agent or data store in Azure for any features or functionality that do not rely on pre-signed URLs. Please follow the guide that corresponds to the option you are using.
Ingress vs. EgressPlease note that using private endpoints for egress between the agent and your integrations differs from using them for ingress. Only the ingress scenario is described in this section.
For more information, please refer to the details provided here.
Agent
-
Provision the Agent in Monte Carlo
Follow Step 1 in this guide to provision the agent in Monte Carlo — navigate to settings/deployments, click Add, choose the "Azure" Platform and "Data store + agent" type, supply a deployment name, then click Provision. This provisions the collection node that will pair with your agent and leaves the deployment in a disabled state until you complete registration in a later step.
You must provision the agent before requesting the Private Link. The private endpoint connects from the collection node provisioned in this step — until the agent is provisioned, Monte Carlo cannot determine which collection node to connect to your agent.
-
Deploy the Azure Agent
Follow Step 2 in this guide to deploy an Azure agent with the
disable_public_inboundvariable set totrue(i.e., public network access disabled). Ensure you use module version 0.1.3 or later.module "apollo" { source = "monte-carlo-data/mcd-agent/azurerm" disable_public_inbound = true ... } ...Note: Please refrain from completing registration (enabling the agent) at this point. This will be done after establishing the private endpoint in a subsequent step.
-
Locate the Agent's Function*
Navigate to the Function App page in the Azure console and search for the agent's function. The agent's function follows the naming pattern:
mcd-agent-service-*. You can retrieve the full name via Terraform outputs:terraform output -raw function_name -
Save Location and Resource ID*
In the Function App overview tab, save the location information. Then, switch to the JSON view and copy the resource ID for future reference.

Azure Console Example
-
Request Private Link Establishment
Contact us at [email protected] to request the establishment of a Private Link for Azure. Ensure you include the deployment type (i.e. Azure Agent), Monte Carlo Account ID (can be found here), resource ID and location you retrieved in Step 4 in your email. Monte Carlo will create the private endpoint and notify you once the process is complete.Note: Do not proceed with the registration process until you receive confirmation from Monte Carlo that the endpoint has been created.
Typically, you will receive a response within 24-48 hours (US business days).
-
Approve the Private Endpoint
Once you have been contacted by Monte Carlo confirming the Private Link has been established, navigate back to the agent function in the Azure console. Follow these steps:-
Go to Networking.
-
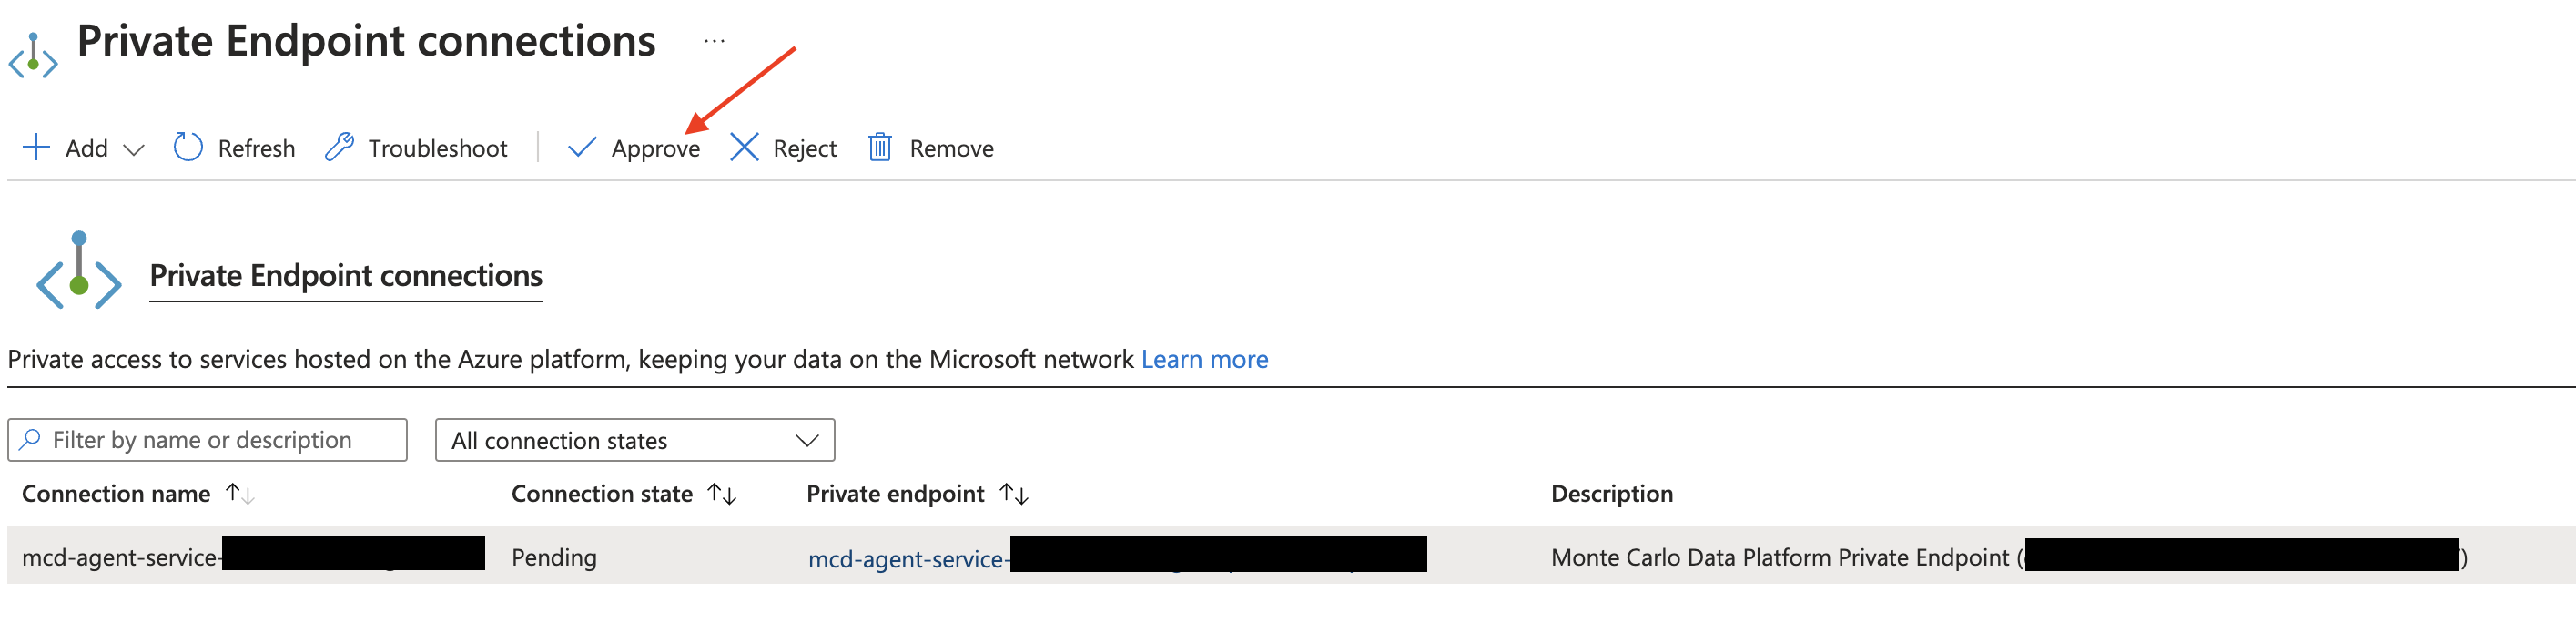
Under Inbound traffic configuration, select Private endpoints.
-
Locate the requested endpoint and select Approve. You might need to refresh the page first. The state should then change from Pending to Approved.
Azure Console Example
-
-
Complete Registration
Follow Step 3 in this guide to complete registration and enable the agent. After completing registration, you can proceed to add integrations as usual. Communication between the Monte Carlo Platform (cloud service) and the agent function will automatically leverage the private endpoint.
*If you prefer, you can also use the Azure API or CLI to fetch these values. For instance with the CLI:
az functionapp show --name mcd-agent-service-example --resource-group mcd-agent-group-example | jq '{id, location}'
{
  "id": "/subscriptions/123456789/resourceGroups/mcd-agent-group-example/providers/Microsoft.Web/sites/mcd-agent-service-example",
  "location": "East US"
}
Data Store
Using private endpoints for the data store prevents the use of pre-signed URLs.
This means features like the download of breached data or query results as CSV are not supported in such deployments.
-
Deploy the Data Store
Follow Step 1 in this guide to deploy the data store. Please refrain from registering the data store at this point. This will be done after establishing the private endpoint in a subsequent step.Reminder: We strongly recommend that you do not use an existing storage account or share it with other jobs. Monte Carlo might overwrite existing data or prevent access by changing network configurations in subsequent steps.
-
Disable Public Access
Navigate to the Networking tab of the Storage account created in Step 1. Under Public network access, select Disabled and save your changes. You can also perform this step while creating the bucket if you prefer.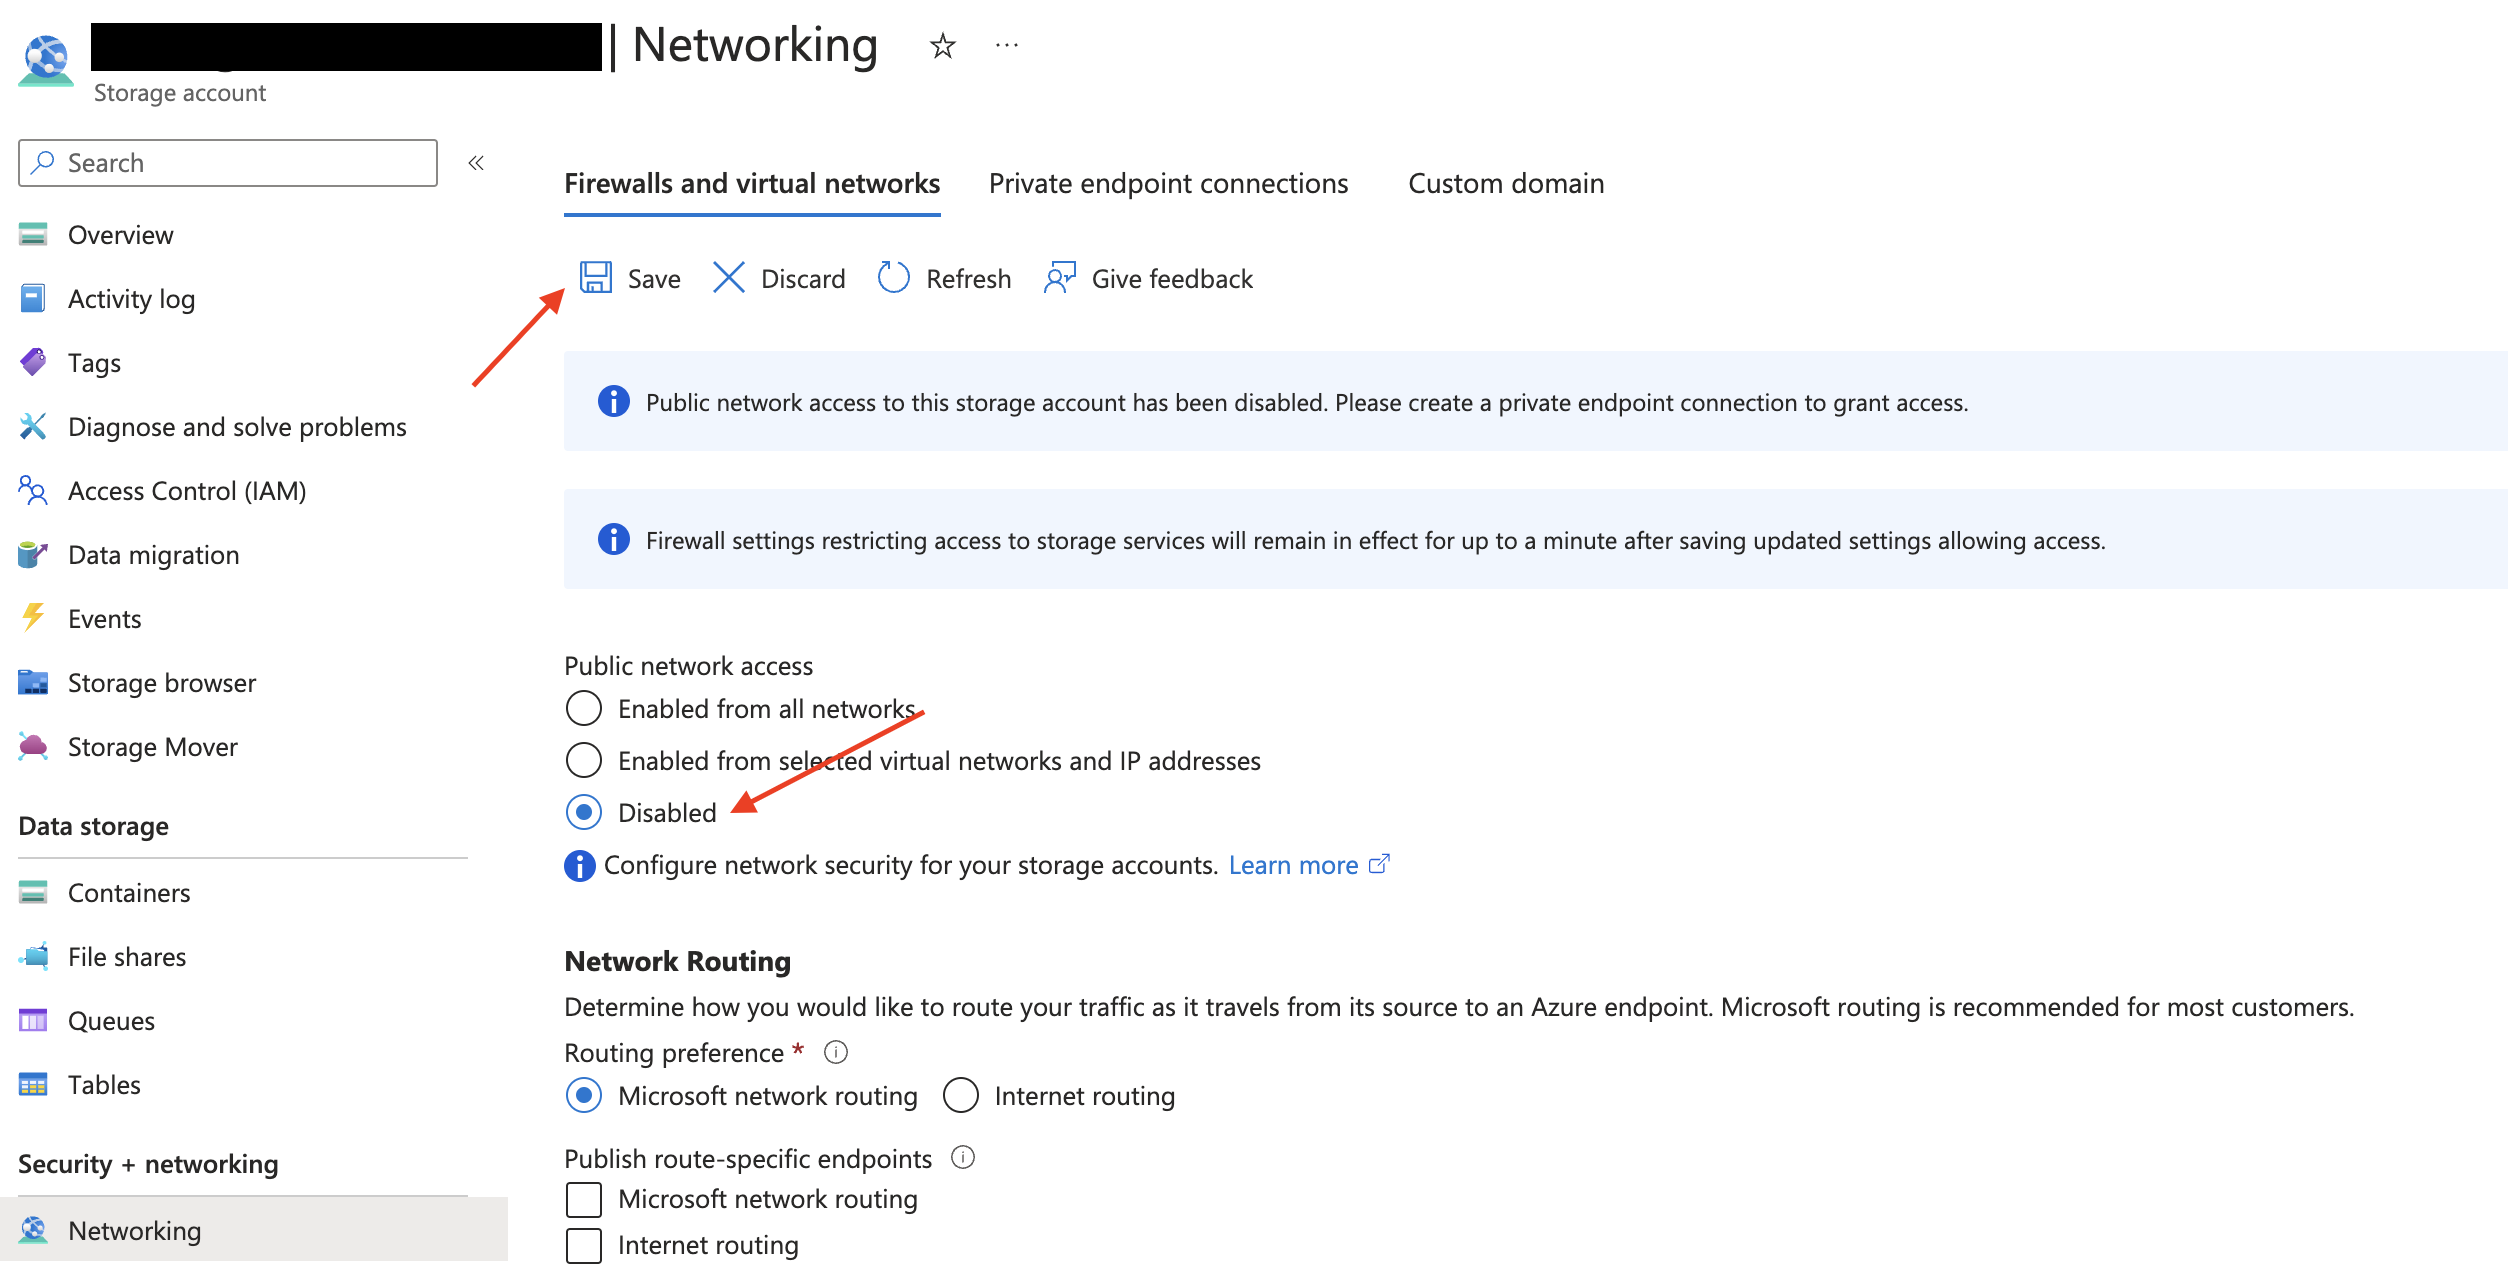
Azure Console Example
-
Save Location and Resource ID
Navigate back to the Overview section for the storage account. Save the location information, then switch to the JSON view and copy the resource ID for future reference.
Azure Console Example
-
Request Private Link Establishment
Contact us at [email protected] to request the establishment of a Private Link for Azure. Ensure you include the deployment type (i.e. Azure data store), Monte Carlo Account ID (can be found here), resource ID and location you retrieved in Step 3 in your email. Monte Carlo will create the private endpoint and notify you once the process is complete.Note: Do not proceed with the registration process until you receive confirmation from Monte Carlo that the endpoint has been created.
Typically, you will receive a response within 24-48 hours (US business days).
-
Approve the Private Endpoint
Once you have been contacted by Monte Carlo confirming the Private Link has been established, navigate back to the storage account in the Azure console. Follow these steps:-
Go to Networking.
-
Under Private endpoint connections, locate the requested endpoint and select Approve. You might need to refresh the page first. The state should then change from Pending to Approved.

Azure Console Example
-
-
Register the Data Store
Follow Step 2 in this guide to register the data store. After completing the registration, you can proceed to add integrations as usual. Communication between the Monte Carlo Platform (cloud service) and the data store will automatically leverage the private endpoint.
If you prefer, you can also use the Azure API, CLI or any other tool of preference to manage and update data store.
FAQs
How Do I Know What Type of Deployment I Am Using and If It Is Supported?
If your account was created after April 24th, 2024, it will automatically be using the V2 platform or newer.
To check the status of your deployment, follow these steps using our API or Command Line Interface (CLI).
API
-
Access the API Explorer:
Visit the API Explorer in the Monte Carlo UI (learn more about the API Explorer here).
Alternatively, you can generate an API key and use tools such as cURL or Postman to make API calls. -
Trigger the API:
Use this API to fetch deployment details. For instance:query getPlatformServices { getPlatformServices { uuid deployment { deploymentType } } }
CLI
- Install and Configure the CLI:
If you haven't done so already, follow the installation and configuration instructions. Ensure you have at least versionv0.100.0of the CLI. - Execute the Command:
Open your terminal and run the following command (reference docs):montecarlo platform list
Either way, you can use the following table to interpret the output and determine the status of your deployment:
| Type | Platform | Description | Supported |
|---|---|---|---|
| CLOUD_V1 | V1 | Legacy cloud deployment | No |
| CLOUD_V2 | V2 | Cloud deployment using the new platform | Yes |
| REMOTE_V1 | V1 | Legacy hybrid deployment (data collector) | No |
| REMOTE_V1.5 | V1.5 | Hybrid deployment (remote agent or data store) not using the new platform | No |
| REMOTE_V2 | V2 | Hybrid deployment (remote agent or data store) using the new platform | Yes |
See here for information about supported integrations, and here for any limitations related to using private endpoints.
What Integrations Are Supported?
If on a compatible platform (see table above), Monte Carlo supports using Private Endpoints with the following:
- Cloud deployments:
- Databricks on Azure
- Snowflake on Azure
- Azure SQL Database
- Azure SQL Managed Instance
- Azure Database for Postgres flexible server
- Azure Database for MySQL flexible server
- Hybrid deployments:
- Azure Agents
- Azure Data Stores
Note that for hybrid deployments, this refers to connectivity from the Monte Carlo platform to the agent. See further details here.
Does the use of private endpoints limit any Monte Carlo features or have other limitations?
Limitations include:
- Adding the same private endpoint to multiple Monte Carlo workspaces is not supported.
- After enabling private endpoints, you cannot use the host without using the private endpoint.
- Databricks cannot be added or managed via Partner Connect to leverage private endpoints.
- Private Link is not supported when using external OAuth with Snowflake.
- Features and functionality that rely on pre-signed URLs do not use private endpoints.
- If the Storage Account is private (most likely if private endpoints are enabled), then the download of breached data or query results as CSV is not supported, this feature uses pre-signed URLs.
Please see the other FAQs for further information on supported integrations, and deployments.
What Is the Difference Between Using a Private Link for Ingress vs. Egress in Agent Hybrid Deployments?
- Ingress: Connectivity from the Monte Carlo Platform to the agent.
- Egress: Connectivity from the agent to your integrations.
The current document outlines how to enable ingress connectivity. Similar to other networking configurations (such as connecting a Virtual Network), you can also use private endpoints to further connect an agent to your integrations once it is deployed in your cloud, if you prefer. For additional details on constraining outbound access (egress) from the agent, see here.
What if I want to allowlist Monte Carlo's IPs in addition to using Private Link?
If you are using network policies to further restrict access, you can add your deployment’s internal IP addresses to the allowlist. Note that these are different from the public IP addresses the cloud service uses to connect when not using endpoints.
To do so, you can fetch the IP address for your deployment using the getPlatformServices API. For instance:
- Access the API Explorer:
Visit the API Explorer in the Monte Carlo UI (learn more about the API Explorer here).
Alternatively, you can generate an API key and use tools such as cURL or Postman to make API calls. - Trigger the API:
Use the getPlatformServices API to fetch deployment details. For instance:query getPlatformServices { getPlatformServices { uuid deployment { deploymentType platform { ipAddresses } } } }
Importantly, unlike public IP addresses, these internal IPs are not guaranteed to be static. Although they are generally stable, they may occasionally change due to various factors. Therefore, if you want to supplement your usage of PrivateLink with an allowlist, please periodically update it with the results from this endpoint for the relevant deployment. We recommend creating a job that runs daily to compare the results. Otherwise, there might be partial outages in connectivity.
Note that if you have more than one deployment and/or want to see which connections are using a specific deployment, you can also do so via the API. Please refer to these docs for more information.
How Can I Debug or Test Connectivity When I Am Using Private Endpoints?
Even though each network configuration is unique, you can try the following steps to help debug connectivity:
-
Double Check Connection Details
Verify the connection details provided to Monte Carlo, such as host, port, database, and user, for any typos or omissions. -
Confirm Service User Functionality
Ensure that the service user you created is working correctly (e.g., you are able to log in as the service user). -
Use Monte Carlo Network Utilities
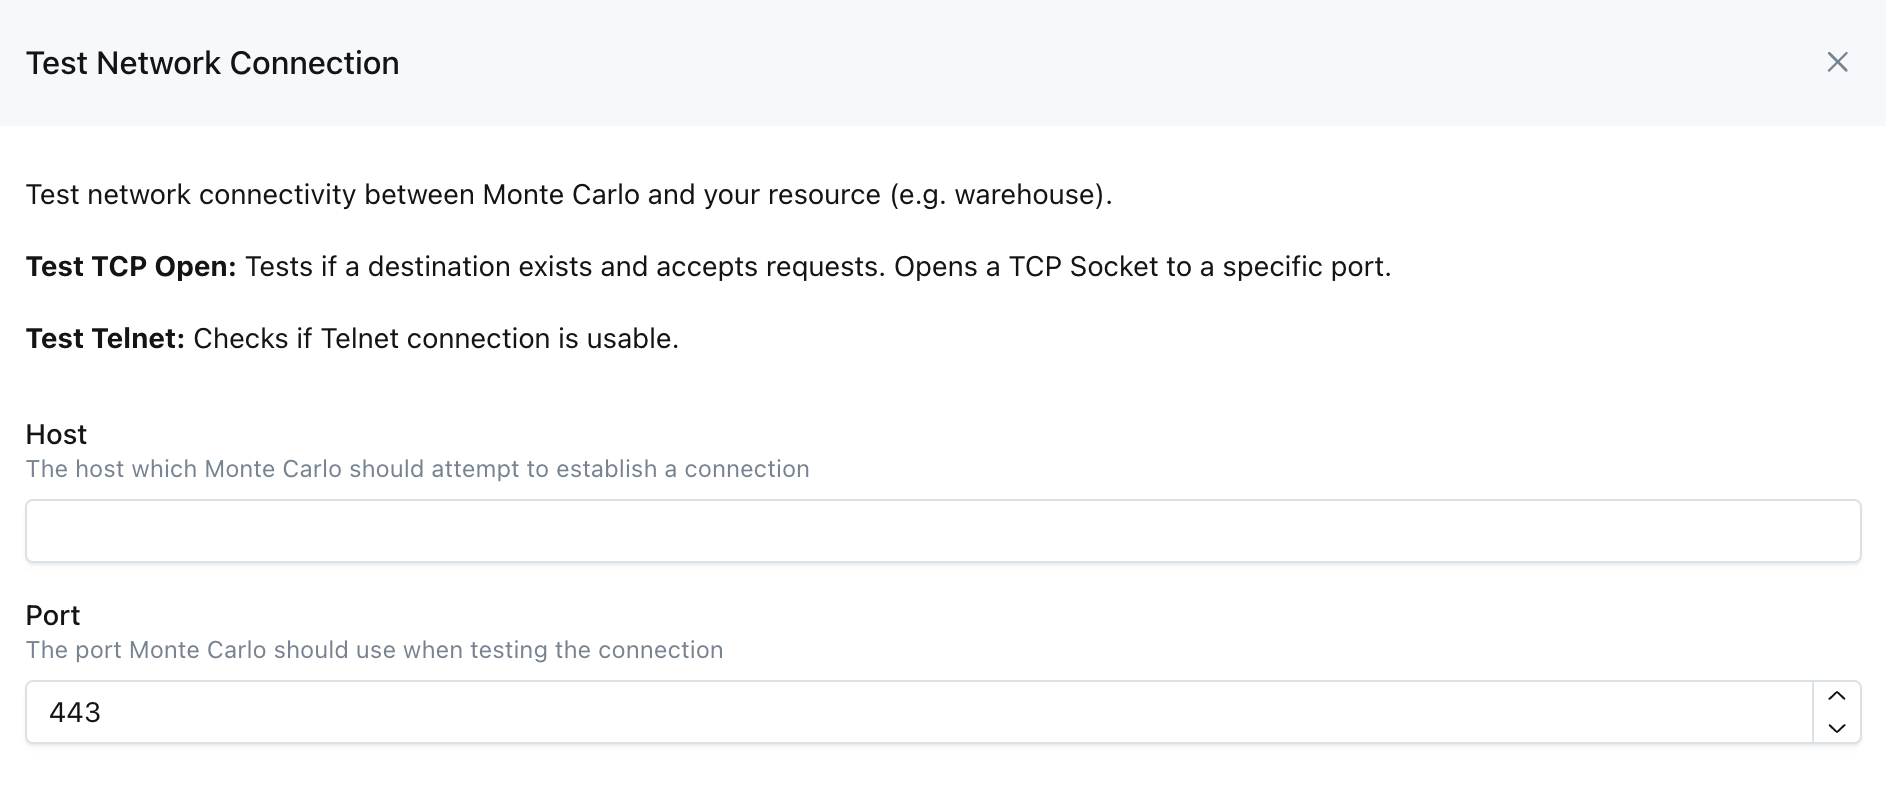
Monte Carlo UI Example
These two utilities are available on the UI by navigating to Settings->Integrations->Test Network, as well as via the CLI and API (Tcp Open and Telnet).
Note that you can use our API from the UI via the API Explorer. Learn more about the API Explorer here.
Updated 19 days ago