Databricks
What is Databricks?
Databricks is a platform for building, deploying, sharing, and maintaining data and analytics. It provides tools that help you connect your sources of data to one platform to process, store, share, analyze, and model datasets. The Databricks Data Intelligence Platform integrates with cloud storage and security in your cloud account, and manages and deploys cloud infrastructure on your behalf.
Databricks SQL Warehouses requirementPlease note that Monte Carlo uses SQL Warehouses to connect to Databricks, and Databricks only supports SQL Warehouses in the Premium and Enterprise tiers. The Standard tier is not supported.
Why connect Databricks to Monte Carlo?
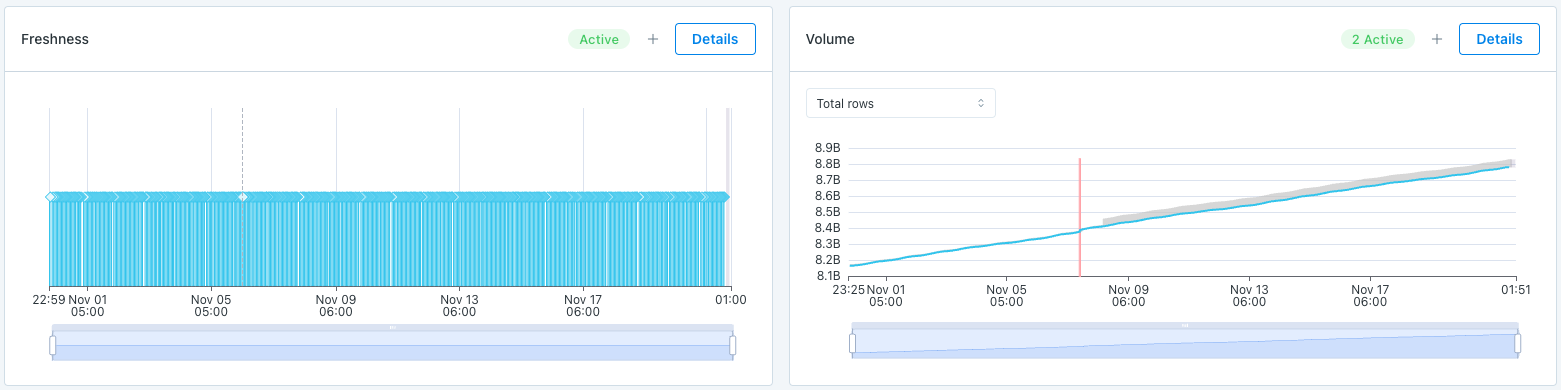
Connecting your Databricks account to Monte Carlo and providing access to the data within is essential for Monte Carlo to function. Monte Carlo collects the metadata from tables in your Databricks environment to enable our automated Freshness and Volume Table monitors.
Monte Carlo is a Data + AI Observability tool after all, so the biggest step in getting value from it is letting it observe your data!
What integrations does Monte Carlo currently support?
Monte Carlo currently supports integration with all three Databricks platforms - AWS, GCP, and Azure.
For Delta tables, Automated Freshness and Volume Table monitors are available. You can opt in to any field health, dimension, custom SQL and SLI monitors for all three platforms. Please note that by default any volume monitors are measured in bytes, but we offer customers the ability to opt-in to row count monitoring for any table.
Table lineage can also be tracked for Databricks users with Unity Catalog.
Query Logs can be tracked for Databricks users with Unity Catalog that use SQL Warehouses.
Freshness and volume collection on Databricks
For new Databricks integrations, freshness and volume are collected only for tables that have a monitor. To collect them for a table, add a monitor on it.
Collection starts when the monitor is added, so there's no historical data beforehand. Anomaly-detection monitors need some history to establish a baseline, so a newly monitored table will take a short period before it starts alerting.
To collect freshness and volume for all tables automatically, contact your Monte Carlo account team to enable it. A monitor is still required to receive alerts, and you can use ingestion controls to block-list schemas or tables you don't need.
This document walks through the steps to monitor a Databricks environment with Monte Carlo. The order of operations is important and it is strongly recommended to adhere to the documented sequence. These steps need to be repeated for each Databricks Workspace that you would like to observe with Monte Carlo.
Please note the Table of Contents to the right for the full outline of steps.
Databricks Partner ConnectYou can now connect to Monte Carlo directly through Databricks Partner Connect! To use Databricks Partner Connect, simply do Step 3 (Create a SQL Warehouse for Monte Carlo) and proceed to Partner Connect to connect to Monte Carlo. Return to this document and follow the steps to enable and grant privileges to system tables for lineage, query logs, performance, and workflow observability
1. Create a Personal Access Token or Service Principal
Creating a Personal Access Token is the simplest option to connect to Databricks. Databricks recommends using a Service Principal for API access though but it requires the Databricks CLI in order to create a Token. When using service principals, Monte Carlo supports token-based authentication and OAuth authentication (M2M).
Option 1: Creating a Service Principal (Recommended)
This option only is available if you are using Unity Catalog as Service Principals are a Unity Catalog feature. To create Databricks managed Service Principal:
- As a Databricks account admin, login to the Databricks Account Console, click on User Management, and the Service Principals tab.
- Click Add service principal, enter a Name for the service principal, and click Add.
- Ensure that the Service Principal has Databricks SQL access and Workspace access Entitlements.
- Create a token or a client secret (M2M) for the Service Principal:
- Token-based authentication: Follow the Databricks documentation for creating a Service Principal Token (requires Databricks APIs) and save that Token.
- OAuth based authentication (M2M): Follow the Databricks documentation to create an OAuth Secret for the Service Principal and save the Secret and Client Id.
If you are using Databricks on Azure, you can choose to use an Azure service principal instead:
In Microsoft Entra admin center:
- Follow the Microsoft documentation for creating a Microsoft Entra ID managed service principal. Save the Application (client) ID and Directory (tenant) ID for later.
- Click 'Certificates & secrets' in the service principal app and create a secret. Save the secret value for later.
In Microsoft Azure:
- Find your Azure Databricks service.
- Find the Azure Workspace Resource ID under Settings -> Properties -> Essentials -> Id. It should have the format
/subscriptions/<subscription-id>/resourceGroups/<resource-group>/providers/Microsoft.Databricks/workspaces/<workspace-name>
In Databricks:
- As a Databricks account admin, login to the Databricks Account Console, click on User Management, and the Service Principals tab.
- Click Add service principal, under Management choose Microsoft Entra ID managed and paste the application (client) ID from step 1. Enter a Name for the service principal, and click Add.
- Ensure that the Service Principal has Databricks SQL access and Workspace access Entitlements.
- To be able to access Query Logs, add that user to a group called
databricks_pii_access. Without this, Monte Carlo will not able to collect query logs. For more information, see Databricks Query History Access Change
Option 2: Creating a Personal Access Token (Not recommended)
- You must be an Admin in the Databricks Workspace (admin access is required to generate the resources listed in step 4).
- In your Databricks workspace, click your Databricks username in the top bar, and then select User Settings from the drop down.
- On the Access tokens tab, click Generate new token.
- Enter a comment (
monte-carlo-metadata-collection) that helps you to identify this token in the future and create a token with no lifetime by leaving the Lifetime (days) box empty. Click Generate. - Copy/save the displayed Token, and then click Done.
2. Grant permissions
Configure permissions depending on the type of metastore. If the workspace has catalogs in UC and not UC, both need to be configured. If you want to restrict access to specific schemas, check this out: Usage UI: Configuring Ingestion.
Unity Catalog
Grant permissions to the Service Principal to read the Catalogs. This will cascade to all schemas within:
GRANT USE CATALOG ON CATALOG <CATALOG> TO <monte_carlo_service_principal>;
GRANT USE SCHEMA ON CATALOG <CATALOG> TO <monte_carlo_service_principal>;
GRANT SELECT ON CATALOG <CATALOG> TO <monte_carlo_service_principal>;
For details, see Databricks documentation.
See Troubleshooting & FAQ: Databricks if the command returns a "Privilege SELECT is not applicable" error.
Lineage, query logs, performance, and workflow observability
Monte Carlo uses system tables to collect and present lineage, query logs, and workflow jobs and tasks.
- Follow the Databricks documentation to enable the system tables within Databricks. Execute the instructions for each workspace that has any Unity Catalog.
- Grant permissions to the Service Principal to read the system tables:
GRANT USE SCHEMA ON system;
GRANT SELECT ON system.access.table_lineage TO <monte_carlo_service_principal>;
GRANT SELECT ON system.access.column_lineage TO <monte_carlo_service_principal>;
GRANT SELECT ON system.query.history TO <monte_carlo_service_principal>;
GRANT SELECT ON system.lakeflow.jobs TO <monte_carlo_service_principal>;
GRANT SELECT ON system.lakeflow.job_tasks TO <monte_carlo_service_principal>;
GRANT SELECT ON system.lakeflow.job_run_timeline TO <monte_carlo_service_principal>;
GRANT SELECT ON system.lakeflow.job_task_run_timeline TO <monte_carlo_service_principal>;
Hive metastore
Grant permissions to the Service Principal to read the Catalogs - the most common scenario is that only one catalog is present, hive_metastore. Permissions will cascade to all schemas within. In the Hive mestastore, the SELECT privilege requires USAGE:
GRANT USAGE, READ_METADATA, SELECT ON CATALOG <CATALOG> TO <monte_carlo_service_principal>;For details, see Databricks documentation.
Foreign Catalogs (Private Preview)
If you're using a foreign catalog in Databricks, you can grant USAGE on the connection underlying that foreign catalog. This will allow Monte Carlo to better match federated tables.
GRANT USE CONNECTION ON CONNECTION <CONNECTION> TO <monte_carlo_service_principal>;3. Create a SQL Warehouse for Metadata Collection
Adding the Metadata Connection allows Monte Carlo to gather metadata on a periodic basis. This connection is used to collect the following types of objects:
- Table metadata
- Query logs
- Table and field lineage
- Databricks workflows
- Row count via opt-in volume monitors
- Follow these steps to create a SQL Warehouse.
- For environments with 10,000 tables or fewer Monte Carlo recommends starting with a
2X-Small. - ⚠️If using Glue or the internal Databricks Metastore, the
Serverlesstype is recommended for cost efficiency reasons, butProis also supported. For External Hive MetastoresProis the only supported type -Serverlessis not supported.ClassicSQL Warehouses are not supported (while it will connect, there are significant issues with performance). - Most Metadata operations are executed in the driver, so a
2X-Smallshould be enough, but a larger SQL Warehouse might be required depending on the number and size of Delta tables. - Set auto stop to the minimum: 5 min for Serverless and 10 min for Pro.
- ⚠️ Set minimum and maximum number of clusters to 1 - counterintuitively, autoscaling can cause performance problems for metadata collection.
- Make sure that the service principal or user from step 1 has access to the SQL Warehouse. For that, click the Permissions button at the top right of the screen on the SQL Warehouse configuration page, add the user and give it "Can use" permission.
- Please reach out to your account representative for help right-sizing!
- For environments with 10,000 tables or fewer Monte Carlo recommends starting with a
- Save the Warehouse ID.
- Start the SQL Warehouse.
4. Create a SQL Warehouse for a Query Engine
Adding the SQL Connection allows Monte Carlo to run monitors and root-cause analysis queries.
Can I use the same SQL Warehouse for both connections?While it is possible to use the same SQL warehouse for both metadata and query engine connections, because of the differences in requirements, we recommend using a different SQL Warehouse for each connection.
Metadata collection is composed of many small queries that do not process data, only metadata, so the SQL Warehouse can be small with few workers - a single worker should be enough for most cases.
The SQL Warehouse used as query engine needs to scale with the number and frequency of monitors and the data size.
- Follow these steps to create a SQL Warehouse.
- The size of the SQL Warehouse depends on the number of monitors and data size, Monte Carlo recommends starting with
2X-Smalland scaling afterwards as needed. - ⚠️ The
Serverlesstype is recommended for cost efficiency reasons, butProis also supported.Classicis not supported (while it will connect, there are significant issues with performance). - Set auto stop to the minimum: 5 min for Serverless and 10 min for Pro.
- ⚠️ Set minimum and maximum number of clusters to 1 - counterintuitively, autoscaling can cause performance problems. Autoscaling is useful in few situations, for example when the number of monitors spikes at specific times of the day.
- Make sure that the service principal or user from step 1 has access to the SQL Warehouse. For that, click the Permissions button at the top right of the screen on the SQL Warehouse configuration page, add the user and give it "Can use" permission.
- Please reach out to your account representative for help right-sizing!
- The size of the SQL Warehouse depends on the number of monitors and data size, Monte Carlo recommends starting with
- Save the Warehouse ID.
- Start the SQL Warehouse.
5. Verify data access
Confirm that this SQL Warehouse has access to the catalogs, schemas, and tables that need to be monitored.
To check this, you can run the following commands in the Databricks SQL editor. If all of the commands work and show the objects you expect, this SQL Warehouse is configured correctly for the current user. Note this does not guarantee though the the job will work with the token configured in Monte Carlo if the token is from a different user. If it doesn't show the expected objects, this may be an issue with user permissions or the settings on the SQL Warehouse. Ensure that the SQL Warehouse is connecting to the correct metastore.
SHOW CATALOGS

SHOW SCHEMAS IN <CATALOG>

SHOW TABLES IN <CATALOG.SCHEMA>

DESCRIBE EXTENDED <CATALOG.SCHEMA.TABLE>
6. Add the Connections in Monte Carlo
Create Monte Carlo connections using the credentials previously configured. Please ensure the the SQL Warehouses are turned on in order to add the connections.
Option 1 - Token-based authentication
This step uses the Monte Carlo UI to add the Connections.
- To add the Connections, navigate to the Integrations page in Monte Carlo. If this page is not visible to you, please reach out to your account representative.
- Under the Data Lake and Warehouses section, click the Create button and Databricks.
- Use the Create Databricks metadata collection and querying connections button.
- Under Warehouse Name, enter the name of the connection that you would like to see in Monte Carlo for this Databricks Workspace.
- Under Workspace URL, enter the full URL of your Workspace, i.e.
https://${instance_id}.cloud.databricks.com". Be sure to enter thehttps://. - Under Workspace ID, enter the Workspace ID of your Databricks Workspace. If there is
o=in your Databricks Workspace URL, for example,https://<databricks-instance>/?o=6280049833385130, the number aftero=is the Databricks Workspace ID. Here the workspace ID is6280049833385130. If there is noo=in the deployment URL, the workspace ID is0. - Authentication method: under Personal Access or Service Principal Token, enter the Service Principal or Personal Access Token you created in Step 1.
- For Metadata Collection Jobs, enter the SQL Warehouse ID (Step 3.2).
- Under Query Engine, select the integration type that matches what you set up in Step 4 and enter the SQL Warehouse ID (Step 4.2).
- Click Create and validate that the connection was created successfully.
Option 2a - OAuth authentication (M2M) with a Databricks managed Service Principal
Monte Carlo now supports adding a connection using M2M OAuth via both UI and CLI. This option follows the same steps 1-6, 8-10 option 1 per above, except step 7 - authentication method.
In the Databricks integration editing screen, under "Authentication methods", select "OAuth based authentication" then fill out Client ID and Client Secret following the docs.

Alternatively, OAuth can be set up via CLI,
- Follow the instructions here install the Monte Carlo CLI.
- Run the following commands add-databricks-metastore-sql-warehouse and add-databricks-sql-warehouse using the Client ID and Secret configured in step 1.
Option 2b - OAuth authentication (M2M) with an Entra-ID managed Service Principal
If you are using OAuth with a Microsoft Entra-ID managed service principal you must use the CLI to set up the integration.
- Follow the instructions here install the Monte Carlo CLI.
- Run the following commands add-databricks-metastore-sql-warehouse and add-databricks-sql-warehouse using the Client ID, Client Secret, Tenant ID and Azure Workspace Resource Id configured in step 1.
Recommended: Check the Metadata Job
When the metadata connection is added, Monte Carlo will immediately start running the metadata job. Because of the way the job is constructed, we will try to gather metadata about all of the tables in the environment. It's not uncommon for the permissions on the SQL Warehouse to prevent the metadata job from collecting information from certain tables. It's worthwhile to look at the job logs for the metadata job to see if there are any issues in collection.
7. Databricks Workflows Alerts Setup (recommended)
If you want to receive failures from Databricks Workflows as alerts in Monte Carlo, additional webhook configuration is needed. Follow the docs here to set that up.
Conclusion
You have connected all necessary integration points to get end-to-end observability for Databricks!
Asset Loading TimeAfter completing the Databricks integration setup, it may take between a few minutes to one hour for your Databricks jobs, runs, etc to appear in the Assets page.
Advanced Options
In general, using this Databricks connection type will be sufficient. If your Databricks environment is connecting to an external metastore (Glue or Hive), and you wish to connect Monte Carlo directly to that metastore, we can still gather freshness and volume information on Delta Tables in the Databricks environment. Ask your Monte Carlo representative for more details.
How can I validate Monte Carlo has access to my assets?
After completing the Databricks integration setup, your Databricks assets should appear in the Monte Carlo Assets page between a few minutes and one hour. If you don't see your assets after this time period, you can run a validation test to troubleshoot the connection:
- Navigate to Settings → Integrations
- Find your Databricks integration and click on it
- Select the specific connection you want to test
- Click the Test button from the connection menu
This validation test will help identify any configuration issues that might be preventing your assets from appearing.
When running the validation test, you should see all green checkmarks. If any errors are encountered, the system will provide specific steps to resolve them.
Note: Lineage can take up to 24 hours due to batching.
Updated 9 days ago