AWS: Data Store Deployment
How-to create and register
Prerequisites
- You are an admin in AWS (for step 1).
- You are an Account Owner (for step 2).
This guide outlines how to setup a Data Store for storing troubleshooting (sampling) and temporary data in your AWS cloud.

Steps
1. Provision the Data Store in Monte Carlo
Before deploying any AWS resources, register the data store in Monte Carlo. The backend records the registration and generates the IAM External ID that you'll plug into your CloudFormation parameters or Terraform variables in step 2.
UI
Navigate to settings/deployments and click Add. Choose the "AWS" Platform and "Data store" type, supply a deployment name, then click Provision. Monte Carlo creates the data store and routes you to the Edit page, where the generated External ID is displayed — copy it; you'll need it in step 2.
CLI
montecarlo agents register-s3-storeCalling register-s3-store with no --bucket-name or --assumable-role arguments creates the data store and prints the External ID along with the next-step command:
Agent successfully registered!
AgentId: <AGENT_ID>

ExternalId generated.
AWS ExternalId: <EXTERNAL_ID>

Next steps:
  1. Configure your IAM role trust policy to require this ExternalId (sts:ExternalId condition).
  2. Deploy your IAM role and S3 bucket.
  3. Run `montecarlo agents register-s3-store --agent-id <AGENT_ID> --assumable-role <ROLE_ARN> --bucket-name <BUCKET_NAME>` to complete the registration. The agent is enabled automatically once everything is in place.
2. Deploy
You can deploy the data store either via CloudFormation or Terraform. Supply the External ID from step 1 as a stack parameter (CloudFormation) or input variable (Terraform); the deployment wires it into the assumable role's IAM trust policy.
Before getting started please review the Monte Carlo AWS account your collection service is hosted in.
When provisioning resources for Monte Carlo deployments on the V2 Platform, use the Collection AWS account id provided in the Account information page. Accounts created after April 24th, 2024, will automatically be on the V2 platform or newer.
If you are using an older version of the platform, please contact your Monte Carlo representative for the ID.
CloudFormation
You can deploy the object storage and associated resources in your AWS cloud using the following quick-create link:
And if you need to share with a colleague or first review the template you can download a copy here (source).
Supply the External ID from step 1 as the ExternalId stack parameter when launching the stack; it is wired into the assumable role's IAM trust policy so that only Monte Carlo's collection service can assume the role.
Terraform
This example config illustrates how you can manage data store resources with Terraform.
You can review the full source code here.
Supply the External ID from step 1 as the external_id input variable to the module; it is wired into the assumable role's IAM trust policy so that only Monte Carlo's collection service can assume the role.
3. Complete Registration
After deploying the AWS resources, complete registration by supplying the bucket name and assumable role ARN. Monte Carlo auto-enables the data store on successful completion.
The bucket name and assumable role ARN are available as the ObjectStoreBucketName and ObjectStoreRoleArn outputs of the stack created in step 2 — these are the values you'll supply during registration. The stack may also surface the External ID as an output for reference, but you don't need to re-enter it during registration since Monte Carlo already has it from step 1.
After this step is complete all integrations that you add to this deployment will automatically use this bucket for storing troubleshooting and temporary data. You can add these integrations as you normally would using Monte Carlo's UI wizard or CLI.
UI
If you are onboarding a new account, you can also register by following the steps on the onboarding screen
- Open the data store's Edit page (Monte Carlo will have routed you there after step 1; you can also navigate from settings/deployments).
- Fill in the Bucket name and AWS assumable role, then click Enable. Monte Carlo validates the configuration and enables the data store.
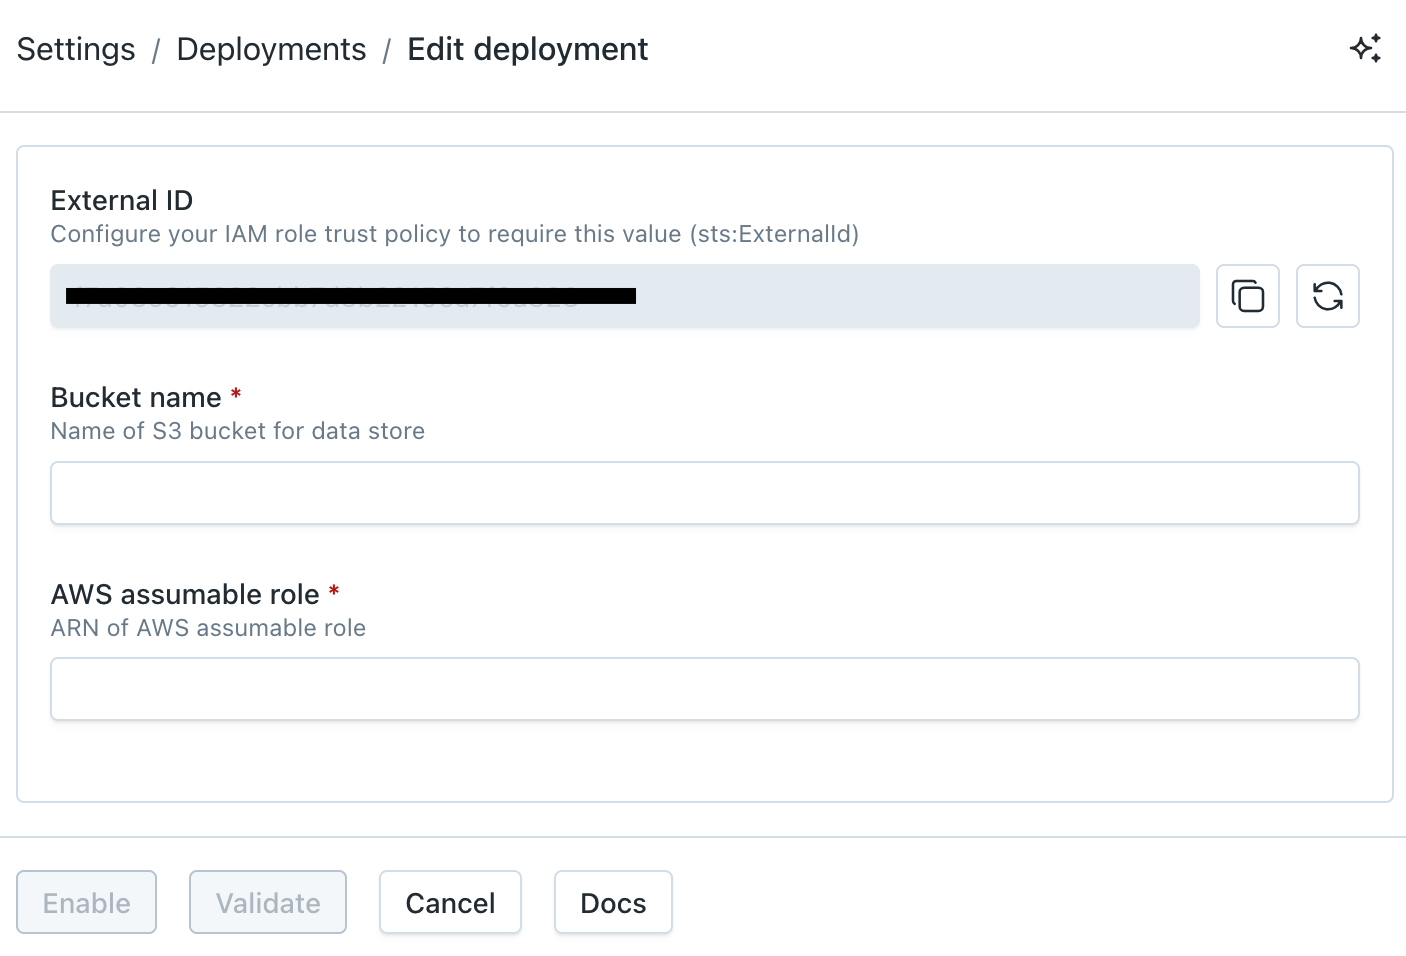
AWS Data Store Registration Wizard
CLI
Re-run register-s3-store with the agent ID from step 1 plus the deployed bucket name and assumable role ARN:
montecarlo agents register-s3-store \
  --agent-id <AGENT_ID> \
  --bucket-name example-bucket \
  --assumable-role arn:aws:iam::123456789:role/mcd-test-apollo-role
For reference on this command please see here. And see here for how to install and configure the CLI.
FAQs
Why am I seeing an "account limit reached" error when I click Provision?
Monte Carlo applies a per-account limit on the number of provisioned deployments to prevent runaway resource allocation. If you hit it, the Provision action fails with an error like:
Could not register deployment
Cannot allocate new resources for a <platform> agent, account limit reached. Please contact support.
If you need to provision more deployments, reach out via our Support Agent or contact your account representative and we'll raise the limit.
Where does the External ID come from?
Monte Carlo generates the IAM External ID server-side during provisioning (step 1) and displays it on the deployment's Edit page and in the CLI output. You supply this value to your CloudFormation stack (as the ExternalId parameter) or Terraform module (as the external_id input variable) so it ends up in the IAM role's trust policy.
If you ever need to rotate the External ID (e.g. for compliance reasons), use the Rotate action on the deployment's Edit page or the montecarlo agents rotate-aws-external-id CLI command. After rotating, redeploy your CloudFormation stack or terraform apply to update the trust policy with the new value.
Can I further constraint access to this Data Store (S3 Bucket)?
For all deployments on the V2 Platform or newer, Monte Carlo uses VPC endpoints to communicate with AWS Object Storage in supported regions. Additional details and limitations can be found here.
If you wish to constrain this you can update the IAM policy permissions to include a aws:SourceVpce condition using the Data Store VPC endpoint ID provided in the Account information page for your desired region.
For instance, you can add the following element to the s3-policy document:
"Condition": {
    "StringEquals": {
        "aws:SourceVpce": "<VPCE_ID>"
    }
}
Note that if you want to use features relying on pre-signed URLs you need to add both of the following statements to the s3-policy document while using this constraint:
{
    "Action": [
        "s3:GetObject"
    ],
    "Resource": [
        "arn:aws:s3:::<BUCKET_NAME>/*"
    ],
    "Effect": "Allow",
    "Condition": {
        "StringEquals": {
            "s3:signatureversion": "AWS4-HMAC-SHA256",
            "s3:authType": "REST-QUERY-STRING"
        }
    }
}
{
"Action": [
"s3:GetObject"
],
"Resource": [
"arn:aws:s3:::<BUCKET_NAME>/*"
],
"Effect": "Allow",
"Condition": {
"StringEquals": {
"s3:signatureversion": "AWS",
"s3:authType": "REST-QUERY-STRING"
}
}
}If your deployment is not on the V2 Platform, you can still further constrain access with the aws:SourceIp condition. Please reach out to your Monte Carlo representative or our Support Agent for an IP Address to allowlist. Then, for instance, you can add the following element to the s3-policy document:
"Condition": {
    "IpAddress": {
        "aws:SourceIp": [
            "<IP>/32"
        ]
    }
}
For more information on connectivity, please refer to our Network Connectivity documentation.
Can I use server-side encryption with AWS KMS (SSE-KMS)?
Yes! By default, AWS data stores use server-side encryption with Amazon S3-managed keys (SSE-S3), but you can change the default encryption of your bucket to SSE-KMS if you prefer.
First, please review the AWS documentation on using a KMS customer managed key (CMK) with S3. Then:
-
Provision a new data store and deploy the AWS resources as documented here. Be sure not to complete registration of your data store yet!
-
Identify (or create) the KMS CMK you wish to use by using the console, CLI, IaC, or a tool of your preference.
-
Update the key policy for the CMK from step 2 to include the following statement:
{
    "Sid": "MCD_KMS_ACCESS",
    "Effect": "Allow",
    "Principal": {
        "AWS": "<MCD_ ASSUMABLE_ROLE>"
    },
    "Action": [
        "kms:Decrypt",
        "kms:GenerateDataKey",
        "kms:DescribeKey",
        "kms:Encrypt",
        "kms:ReEncrypt*"
    ],
    "Resource": "*"
}
Be sure to replace
<MCD_ASSUMABLE_ROLE>with the assumable role ARN (ObjectStoreRoleArn). The relevant value can be retrieved from the CloudFormation outputs for the stack deployed in step 1 of this FAQ. -
Update the default encryption type for the bucket created in step 1 of this FAQ from
SSE-S3toSSE-KMS.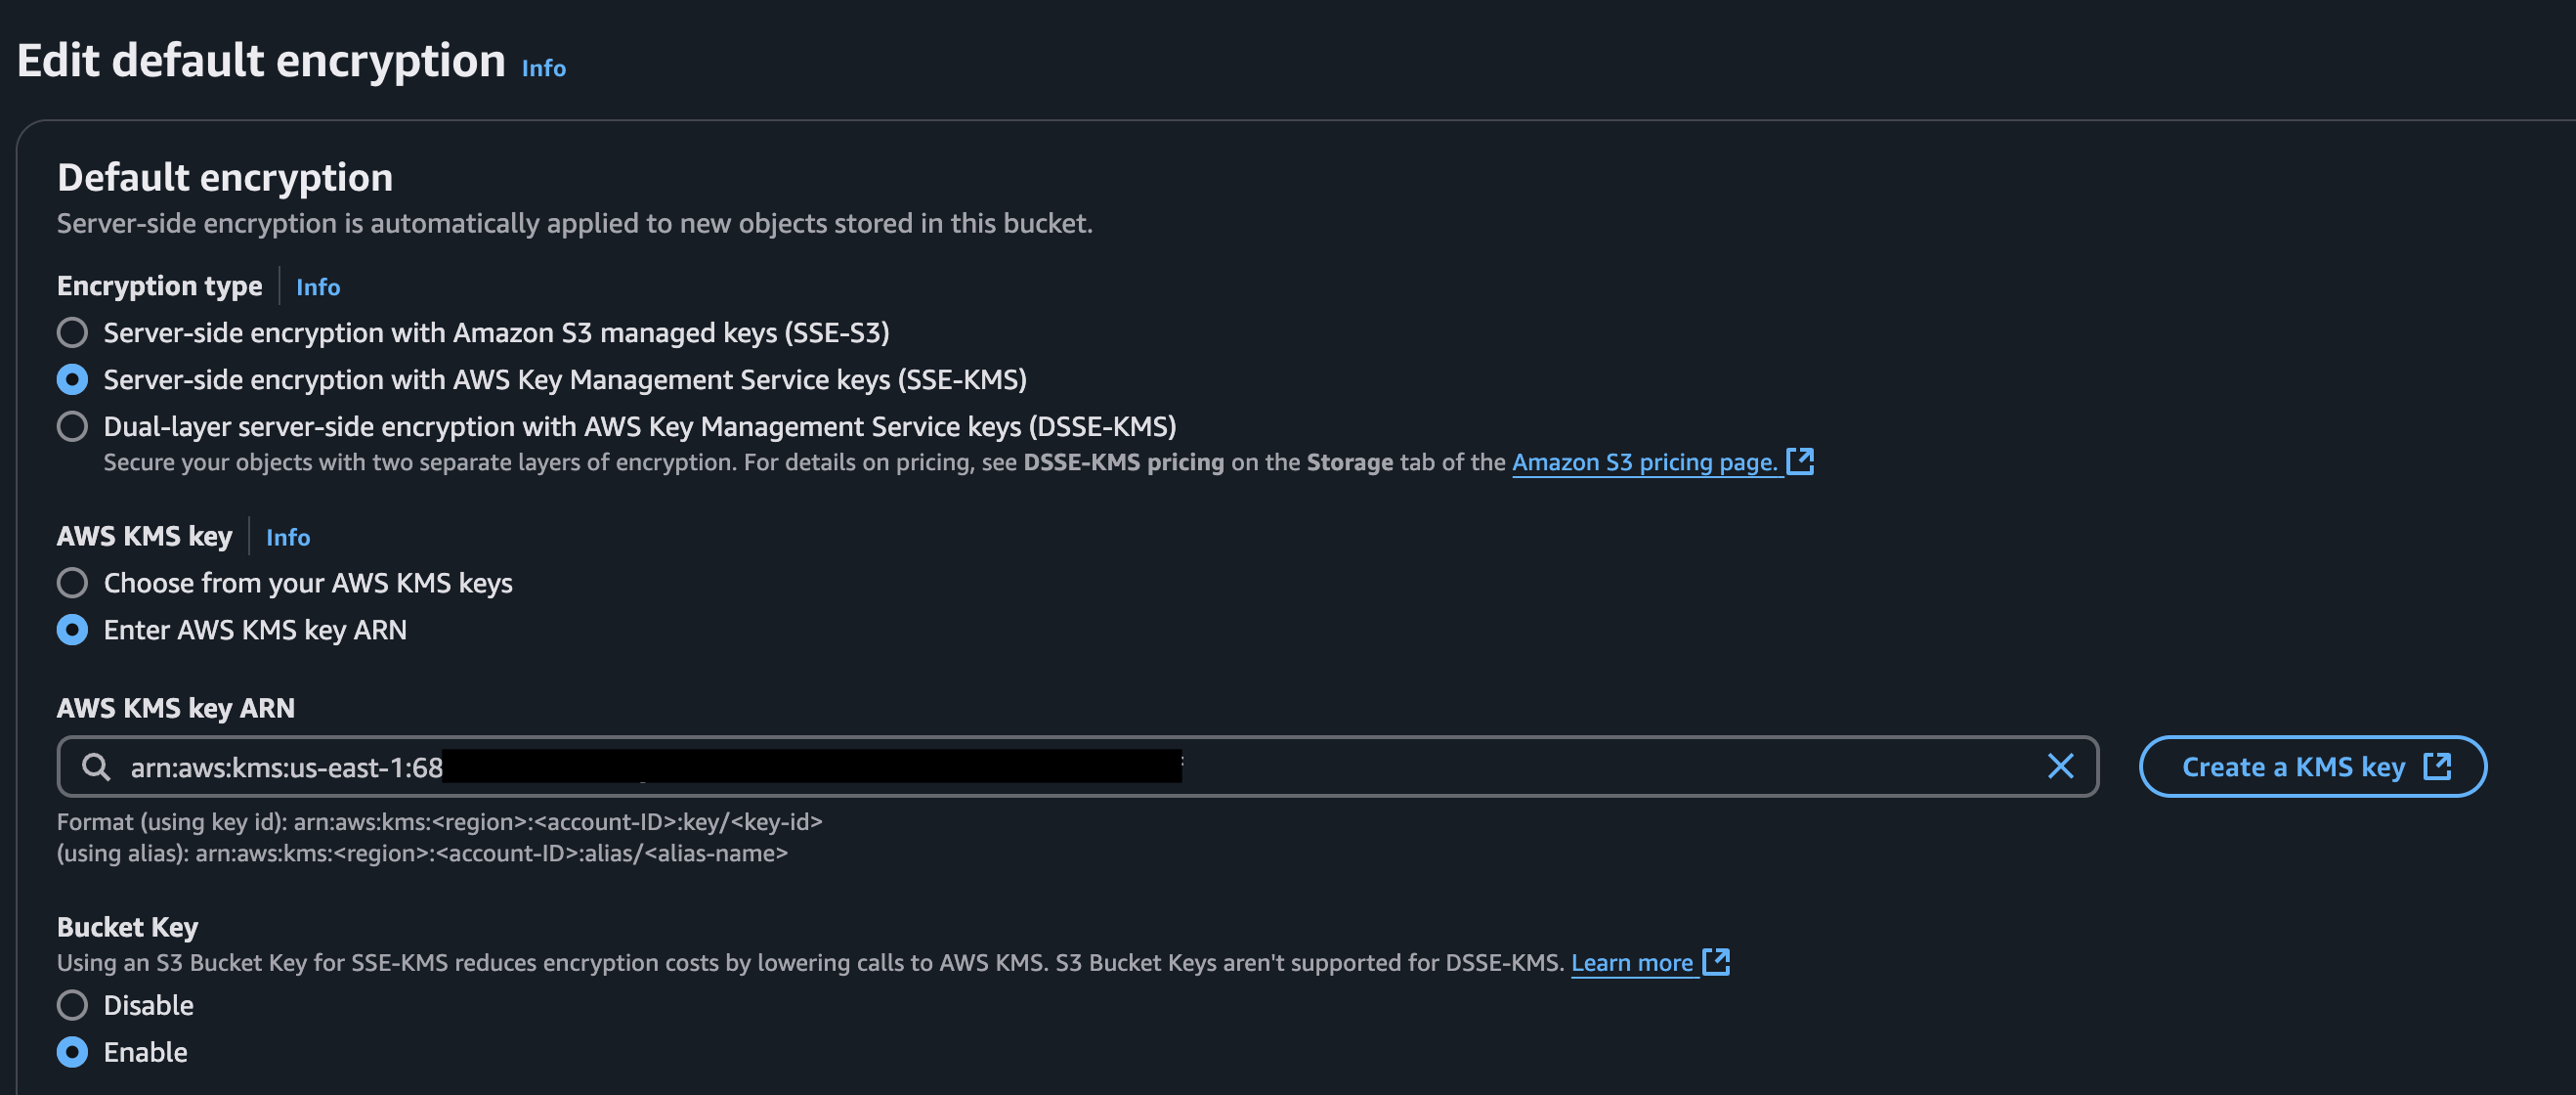
AWS Console Example
The bucket name can be retrieved from the CloudFormation outputs for the stack deployed in step 1 of this FAQ (
ObjectStoreBucketName). You can do this using the console, CLI, IaC, or a tool of your preference. -
Proceed to complete registration of the data store with Monte Carlo as documented here.
How do I check the reachability between Monte Carlo and the Data Store?
Reachability is automatically validated during registration, but you can also use this CLI command or "test" button on the UI to test anytime.
What does the folder structure look like for the data store?
All data store types use a similar folder structure. Below is a high-level overview of the purpose of each folder:
custom-sql-output-samples: Stores custom SQL query results or samples.rca(orrca-results): Stores RCA data samples for other monitor types.idempotent: Stores temporary operational data for the data store.
Updated 18 days ago