Snowflake
What is Snowflake?
Snowflake is a cloud-based data warehouse tool that offers organizations a flexible and scalable storage system. It is great for hosting data that can then be queried and accessed by a business intelligence solution.
Snowflake is provided as a self-managed service that runs completely on cloud infrastructure. This means that all three layers of Snowflake’s architecture (storage, compute, and cloud services) are deployed and managed entirely on a selected cloud platform.
Why Connect Snowflake to Monte Carlo?
Connecting your Snowflake account to Monte Carlo, and giving us access to the data within is essential for Monte Carlo to function. Monte Carlo needs to be able to collect the metadata of your tables in snowflake to enable our Freshness and Volume Table monitors. With access to the query logs of those tables, we will be able to build table and field lineage. With the ability to run SQL queries on those tables, Monte Carlo can run advanced monitors to analyze the data in those tables.
Monte Carlo is a Data + AI Observability tool after all, so the biggest step in getting value from it is letting it observe your data!
After connecting Snowflake here is what you can expect to see:
Freshness and Volume:

Our freshness and volume monitors are active by default. By collecting metadata on your tables, Monte Carlo’s machine learning algorithm can set automatic thresholds to alert when a table has gone too long without an update, and when an abnormal amount of rows are added or deleted.
Query Logs:
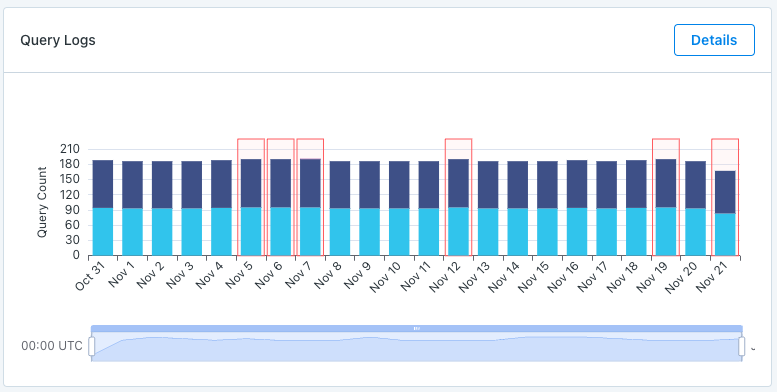
When giving access to query logs Monte Carlo is able to show the amount of read and write queries on a table, and give you access to the details of those queries. Monte Carlo can even highlight when a query appears to have failed.
Table Lineage:
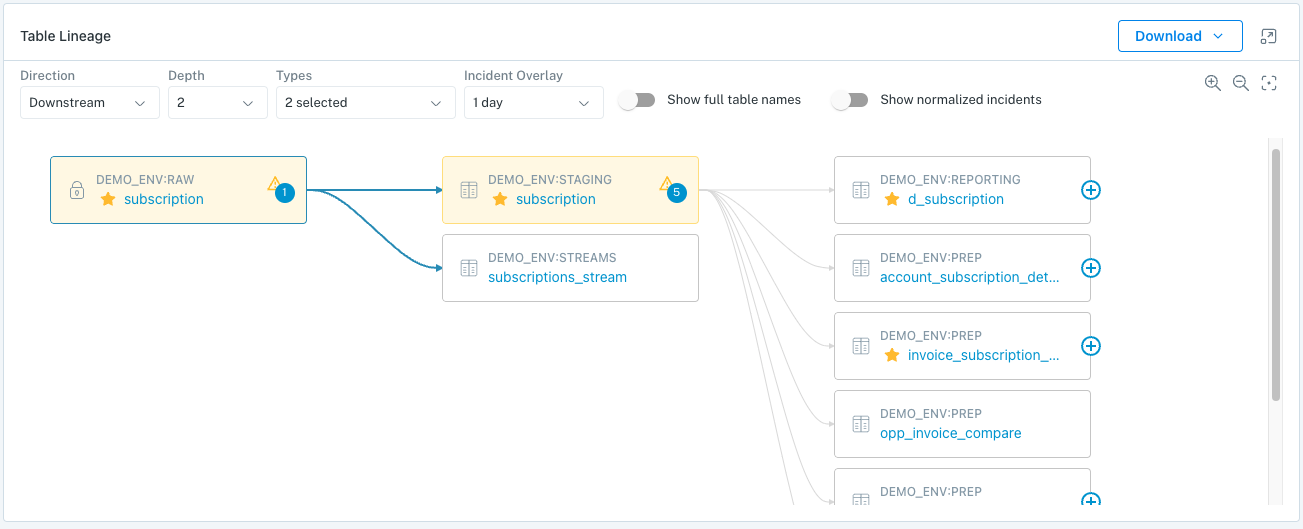
Monte Carlo is able to map the connections between your tables, and can show upstream and downstream connections. We can even connect anomalies that are detected in upstream tables to anomalies in downstream tables.
Tag Ingestion
Monte Carlo has the ability to ingest tags that are placed on Snowflake tables. Tags are displayed on the tables General Information page. By default tag ingestion is not enabled, but can be turned on directly in the UI by enabling "Asset tags collection" on the warehouse integration settings page.
Monitor & Lineage Support
Below are the monitors and lineage support for the Snowflake integration today. Please reach out to your Monte Carlo representative if you have requirements for additional monitors.
| Category | Monitor / Lineage Capabilities | Support |
|---|---|---|
| Table Monitor | Freshness | ✅ |
| Table Monitor | Volume | ✅ |
| Table Monitor | Schema Changes | ✅ |
| Metric Monitor | Metric | ✅ |
| Metric Monitor | Comparison | ✅ |
| Validation Monitor | Custom SQL | ✅ |
| Validation Monitor | Validation | ✅ |
| Job Monitor | Query performance | ✅ |
| Lineage | Lineage | ✅ |
More information on monitors in Monte Carlo.
*We do not support custom monitors on fields and tables named with Snowflake reserved words.
Support for observing Snowflake components
Views: Monte Carlo supports Views -- they show up as assets, have opt-in automatic and custom monitors, and are in lineage
External Tables: Monte Carlo supports External Tables -- they show up as assets, have both automatic and custom monitors, and are in lineage
Dynamic Tables: Monte Carlo supports Snowflake Dynamic Tables -- they show up as assets, have both automatic and custom monitors, and are in lineage
Streams: Monte Carlo supports Snowflake Streams -- they show up as assets, have schema-change and custom monitors, and are in lineage.
Tasks: Monte Carlo does not currently collect or represent Snowflake Tasks. Please reach out for further information.
Connecting Snowflake
Now that we know the value connecting Snowflake to Monte Carlo can bring, here are the necessary steps to set up the integration.
Admin credentials requiredTo make the read only service user for Monte Carlo, you will need permissions to use the
ACCOUNTADMINrole on Snowflake.
This guide explains how to create a read-only service user for Monte Carlo on Snowflake.
To review all steps necessary to integrate a data warehouse with Monte Carlo, please see here.
Creating a service user
Please use the SQL snippet below to create a service user for Monte Carlo. Before using the snippet, you will need to populate the following:
<your_database>: Snowflake database to be monitored by Monte Carlo.
Please note:
- This script will create a Service User that requires a private key for authentication. After running this script to create the user and permissions, you will need to create a private and public key then modify the user to assign the public key.
- If you need to monitor multiple databases in your Snowflake account, please run the snippet multiple times, changing the value of
<your_database>on each run. - Monte Carlo will use an XS warehouse by default. If you expect heavy monitoring workloads, you may consider a larger warehouse, or assigning Monte Carlo's service user to an existing larger warehouse in your account. This setting can be modified later if necessary.
- We recommend using Snowflake's worksheet interface to run the snippet. Please copy the code, make any necessary modifications and use the All Queries option to run it in full.

Running the full snippet using Snowflake worksheets
Row Level SecuritySnowflake allows Row Level Security that can restrict the rows a SELECT query can return. In order to ensure that Monte Carlo monitors are able to work correctly, the Monte Carlo Service user's role needs to be exempt from Row Access Policies. If you notice a monitor's query is failing in the Monte Carlo UI, but succeeding when run by a different user in snowflake, you can use these steps to check for Row Level Security.
Schema vs Database Future GrantsApplying schema level future grants in a Snowflake account where there are only database future grants can break existing roles! From Snowflake's docs:
"When future grants are defined at both the database and schema level, the schema level grants take precedence over the database level grants, and the database level grants are ignored. An important point to note here is that as long as there is a SCHEMA level future grants, ALL DATABASE levels will be ignored, even for the roles that are NOT defined in the SCHEMA level future grants."
The below script checks if there are any SCHEMA level future grants before creating new SCHEMA level grants. If there aren't any we assume you're using DATABASE level future grants, and create the new grants on the DATABASE level instead.
Please see here for more information: https://community.snowflake.com/s/article/DB-Level-Future-Grants-Overridden-by-Schema-Level-Future-Grants
-- Configuration
set mc_username='MONTE_CARLO';
set mc_warehouse_size='XSMALL';
set mc_warehouse_name='MONTE_CARLO_WH';
set mc_role_name='MONTE_CARLO_ROLE';
set database_to_monitor='<your_database>';

-- Set role for grants
USE ROLE ACCOUNTADMIN;

-- Create warehouse for Monte Carlo's monitoring workload
CREATE WAREHOUSE IF NOT EXISTS identifier($mc_warehouse_name) WAREHOUSE_SIZE=$mc_warehouse_size INITIALLY_SUSPENDED=TRUE
    AUTO_SUSPEND = 5 AUTO_RESUME = TRUE;

-- Create the role Monte Carlo will use
CREATE ROLE IF NOT EXISTS identifier($mc_role_name);

-- Create Monte Carlo's service user and grant access to role
CREATE USER IF NOT EXISTS identifier($mc_username) DEFAULT_ROLE=$mc_role_name TYPE=SERVICE;
GRANT ROLE identifier($mc_role_name) TO USER identifier($mc_username);

-- Grant permissions to use the new warehouse
GRANT OPERATE, USAGE, MONITOR ON WAREHOUSE identifier($mc_warehouse_name) TO ROLE identifier($mc_role_name);

-- Grant privileges to allow access to query history
GRANT IMPORTED PRIVILEGES ON DATABASE "SNOWFLAKE" TO ROLE identifier($mc_role_name);

-- Grant metadata privileges to database to be monitored
GRANT USAGE,MONITOR ON DATABASE identifier($database_to_monitor) TO ROLE identifier($mc_role_name);
GRANT USAGE,MONITOR ON ALL SCHEMAS IN DATABASE identifier($database_to_monitor) TO ROLE identifier($mc_role_name);

USE DATABASE identifier($database_to_monitor);
CREATE OR REPLACE PROCEDURE GRANT_REFERENCES_TO_MONTE_CARLO()
    RETURNS VARCHAR
    LANGUAGE javascript
EXECUTE AS CALLER
AS
$$
// If a Snowflake account has only database future grants, applying schema level future grants can break existing roles!
//
// "When future grants are defined at both the database and schema level, the schema level grants take precedence over
// the database level grants, and the database level grants are ignored. An important point to note here is that as
// long as there is a SCHEMA level future grants, ALL DATABASE levels will be ignored, even for the roles that are
// NOT defined in the SCHEMA level future grants."
// See: https://docs.snowflake.com/en/sql-reference/sql/grant-privilege.html#considerations
//
// This is why the following script checks if there are any SCHEMA level future grants before creating new SCHEMA level
// grants. If there aren't any we assume you're using DATABASE level future grants, and create the new grants on the
// DATABASE level instead.
//
// Please see here for more information: https://community.snowflake.com/s/article/DB-Level-Future-Grants-Overridden-by-Schema-Level-Future-Grants
//
snowflake.createStatement({sqlText: `use database identifier($database_to_monitor)`}).execute();
var show_future_grants = snowflake.createStatement({sqlText: `SHOW FUTURE GRANTS IN DATABASE identifier($database_to_monitor)`}).execute();
var schema_future_grants = snowflake.createStatement({sqlText: `select * from TABLE(RESULT_SCAN('${show_future_grants.getQueryId()}')) where "grant_on" = 'SCHEMA'`}).execute();
if (schema_future_grants.getRowCount() > 0) {
    var schemas_to_grant = snowflake.createStatement({ sqlText:`select * from information_schema.SCHEMATA where SCHEMA_NAME <> 'INFORMATION_SCHEMA'`}).execute();
    var granted_schemas = "";
    while(schemas_to_grant.next()) {
      table_schema = schemas_to_grant.getColumnValue("SCHEMA_NAME");

      snowflake.createStatement({ sqlText:`GRANT REFERENCES ON ALL TABLES IN SCHEMA ${table_schema} TO ROLE identifier($mc_role_name)`}).execute();
      snowflake.createStatement({ sqlText:`GRANT REFERENCES ON ALL VIEWS IN SCHEMA ${table_schema} TO ROLE identifier($mc_role_name)`}).execute();
      snowflake.createStatement({ sqlText:`GRANT REFERENCES ON ALL EXTERNAL TABLES IN SCHEMA ${table_schema} TO ROLE identifier($mc_role_name)`}).execute();
      snowflake.createStatement({ sqlText:`GRANT MONITOR ON ALL DYNAMIC TABLES IN SCHEMA ${table_schema} TO ROLE identifier($mc_role_name)`}).execute();

      snowflake.createStatement({ sqlText:`GRANT REFERENCES ON FUTURE TABLES IN SCHEMA ${table_schema} TO ROLE identifier($mc_role_name)`}).execute();
      snowflake.createStatement({ sqlText:`GRANT REFERENCES ON FUTURE VIEWS IN SCHEMA ${table_schema} TO ROLE identifier($mc_role_name)`}).execute();
      snowflake.createStatement({ sqlText:`GRANT REFERENCES ON FUTURE EXTERNAL TABLES IN SCHEMA ${table_schema} TO ROLE identifier($mc_role_name)`}).execute();
      snowflake.createStatement({ sqlText:`GRANT MONITOR ON FUTURE DYNAMIC TABLES IN SCHEMA ${table_schema} TO ROLE identifier($mc_role_name)`}).execute();
      granted_schemas += table_schema + "; "
    }
    return `Granted references for schemas ${granted_schemas}`;
}
snowflake.createStatement({ sqlText: `GRANT REFERENCES ON ALL TABLES IN DATABASE identifier($database_to_monitor) TO ROLE identifier($mc_role_name)`}).execute();
snowflake.createStatement({ sqlText: `GRANT REFERENCES ON ALL VIEWS IN DATABASE identifier($database_to_monitor) TO ROLE identifier($mc_role_name)`}).execute();
snowflake.createStatement({ sqlText: `GRANT REFERENCES ON ALL EXTERNAL TABLES IN DATABASE identifier($database_to_monitor) TO ROLE identifier($mc_role_name)`}).execute();
snowflake.createStatement({ sqlText: `GRANT MONITOR ON ALL DYNAMIC TABLES IN DATABASE identifier($database_to_monitor) TO ROLE identifier($mc_role_name)`}).execute();

snowflake.createStatement({ sqlText: `GRANT REFERENCES ON FUTURE TABLES IN DATABASE identifier($database_to_monitor) TO ROLE identifier($mc_role_name)`}).execute();
snowflake.createStatement({ sqlText: `GRANT REFERENCES ON FUTURE VIEWS IN DATABASE identifier($database_to_monitor) TO ROLE identifier($mc_role_name)`}).execute();
snowflake.createStatement({ sqlText: `GRANT REFERENCES ON FUTURE EXTERNAL TABLES IN DATABASE identifier($database_to_monitor) TO ROLE identifier($mc_role_name)`}).execute();
snowflake.createStatement({ sqlText: `GRANT MONITOR ON FUTURE DYNAMIC TABLES IN DATABASE identifier($database_to_monitor) TO ROLE identifier($mc_role_name)`}).execute();
return `Granted references for database`;
$$;
CALL GRANT_REFERENCES_TO_MONTE_CARLO();

-- Grant read-only privileges to database to be monitored
GRANT SELECT ON ALL TABLES IN DATABASE identifier($database_to_monitor) TO ROLE identifier($mc_role_name);
GRANT SELECT ON ALL VIEWS IN DATABASE identifier($database_to_monitor) TO ROLE identifier($mc_role_name);
GRANT SELECT ON ALL EXTERNAL TABLES IN DATABASE identifier($database_to_monitor) TO ROLE identifier($mc_role_name);
GRANT SELECT ON ALL STREAMS IN DATABASE identifier($database_to_monitor) TO ROLE identifier($mc_role_name);
GRANT SELECT ON ALL DYNAMIC TABLES IN DATABASE identifier($database_to_monitor) TO ROLE identifier($mc_role_name);


GRANT USAGE,MONITOR ON FUTURE SCHEMAS IN DATABASE identifier($database_to_monitor) TO ROLE identifier($mc_role_name);

USE DATABASE identifier($database_to_monitor);
CREATE OR REPLACE PROCEDURE GRANT_SELECT_FUTURES_TO_MONTE_CARLO()
    RETURNS VARCHAR
    LANGUAGE javascript
EXECUTE AS CALLER
AS
$$
// If a Snowflake account has only database future grants, applying schema level future grants can break existing roles!
//
// "When future grants are defined at both the database and schema level, the schema level grants take precedence over
// the database level grants, and the database level grants are ignored. An important point to note here is that as
// long as there is a SCHEMA level future grants, ALL DATABASE levels will be ignored, even for the roles that are
// NOT defined in the SCHEMA level future grants."
// See: https://docs.snowflake.com/en/sql-reference/sql/grant-privilege.html#considerations
//
// This is why the following script checks if there are any SCHEMA level future grants before creating new SCHEMA level
// grants. If there aren't any we assume you're using DATABASE level future grants, and create the new grants on the
// DATABASE level instead.
//
// Please see here for more information: https://community.snowflake.com/s/article/DB-Level-Future-Grants-Overridden-by-Schema-Level-Future-Grants
//
snowflake.createStatement({sqlText: `use database identifier($database_to_monitor)`}).execute();
var show_future_grants = snowflake.createStatement({sqlText: `SHOW FUTURE GRANTS IN DATABASE identifier($database_to_monitor)`}).execute();
var schema_future_grants = snowflake.createStatement({sqlText: `select * from TABLE(RESULT_SCAN('${show_future_grants.getQueryId()}')) where "grant_on" = 'SCHEMA'`}).execute();
if (schema_future_grants.getRowCount() > 0) {
    var schemas_to_grant = snowflake.createStatement({ sqlText:`select SCHEMA_NAME from information_schema.SCHEMATA where SCHEMA_NAME <> 'INFORMATION_SCHEMA'`}).execute();
    var granted_schemas = "";
    while(schemas_to_grant.next()) {
      table_schema = schemas_to_grant.getColumnValue("SCHEMA_NAME");
      snowflake.createStatement({ sqlText:`GRANT SELECT ON FUTURE TABLES IN SCHEMA ${table_schema} TO ROLE identifier($mc_role_name)`}).execute();
      snowflake.createStatement({ sqlText:`GRANT SELECT ON FUTURE VIEWS IN SCHEMA ${table_schema} TO ROLE identifier($mc_role_name)`}).execute();
      snowflake.createStatement({ sqlText:`GRANT SELECT ON FUTURE EXTERNAL TABLES IN SCHEMA ${table_schema} TO ROLE identifier($mc_role_name)`}).execute();
      snowflake.createStatement({ sqlText:`GRANT SELECT ON FUTURE STREAMS IN SCHEMA ${table_schema} TO ROLE identifier($mc_role_name)`}).execute();
      snowflake.createStatement({ sqlText:`GRANT SELECT ON FUTURE DYNAMIC TABLES IN SCHEMA ${table_schema} TO ROLE identifier($mc_role_name)`}).execute();
      granted_schemas += table_schema + ";"
    }
    return `Granted future select for schemas ${granted_schemas}`;
}
snowflake.createStatement({ sqlText:`GRANT SELECT ON FUTURE TABLES IN DATABASE identifier($database_to_monitor) TO ROLE identifier($mc_role_name)`}).execute();
snowflake.createStatement({ sqlText:`GRANT SELECT ON FUTURE VIEWS IN DATABASE identifier($database_to_monitor) TO ROLE identifier($mc_role_name)`}).execute();
snowflake.createStatement({ sqlText:`GRANT SELECT ON FUTURE EXTERNAL TABLES IN DATABASE identifier($database_to_monitor) TO ROLE identifier($mc_role_name)`}).execute();
snowflake.createStatement({ sqlText:`GRANT SELECT ON FUTURE STREAMS IN DATABASE identifier($database_to_monitor) TO ROLE identifier($mc_role_name)`}).execute();
snowflake.createStatement({ sqlText:`GRANT SELECT ON FUTURE DYNAMIC TABLES IN DATABASE identifier($database_to_monitor) TO ROLE identifier($mc_role_name)`}).execute();
return `Granted future select for database`;
$$;
CALL GRANT_SELECT_FUTURES_TO_MONTE_CARLO();
Creating a key-pair for the service user
Follow Snowflake's key-pair authentication guide to create a private and public key for the service user you just created.
- The private key will be needed during onboarding in the Monte Carlo UI.
- Monte Carlo supports using an encrypted or unencrypted private key.
- The public key will be assigned to the service user in Snowflake
Use this SQL command to assign the public key to the service user in Snowflake:
ALTER USER MONTE_CARLO SET RSA_PUBLIC_KEY='<public key>';
Exclude the public key delimiters in the SQL statementWhen you generate the public key the output will be in PEM format and look like:
-----BEGIN PUBLIC KEY-----
MIIBIj...
-----END PUBLIC KEY-----
In the SQL command do not include the delimiters, it will look like:
ALTER USER MONTE_CARLO SET RSA_PUBLIC_KEY='MIIBIj...';
External OAuth
Monte Carlo is also able to use an external OAuth Integration that is set up in your Snowflake environment (https://docs.snowflake.com/en/user-guide/oauth-ext-overview). Monte Carlo is able to use either the Client Credentials or Password OAuth Grant flows. Monte Carlo does not work with Snowflake's built-in OAuth service.
This Method requires you to have an existing external OAuth Integration set up in your Snowflake environment. See https://docs.snowflake.com/en/sql-reference/sql/create-security-integration-oauth-external
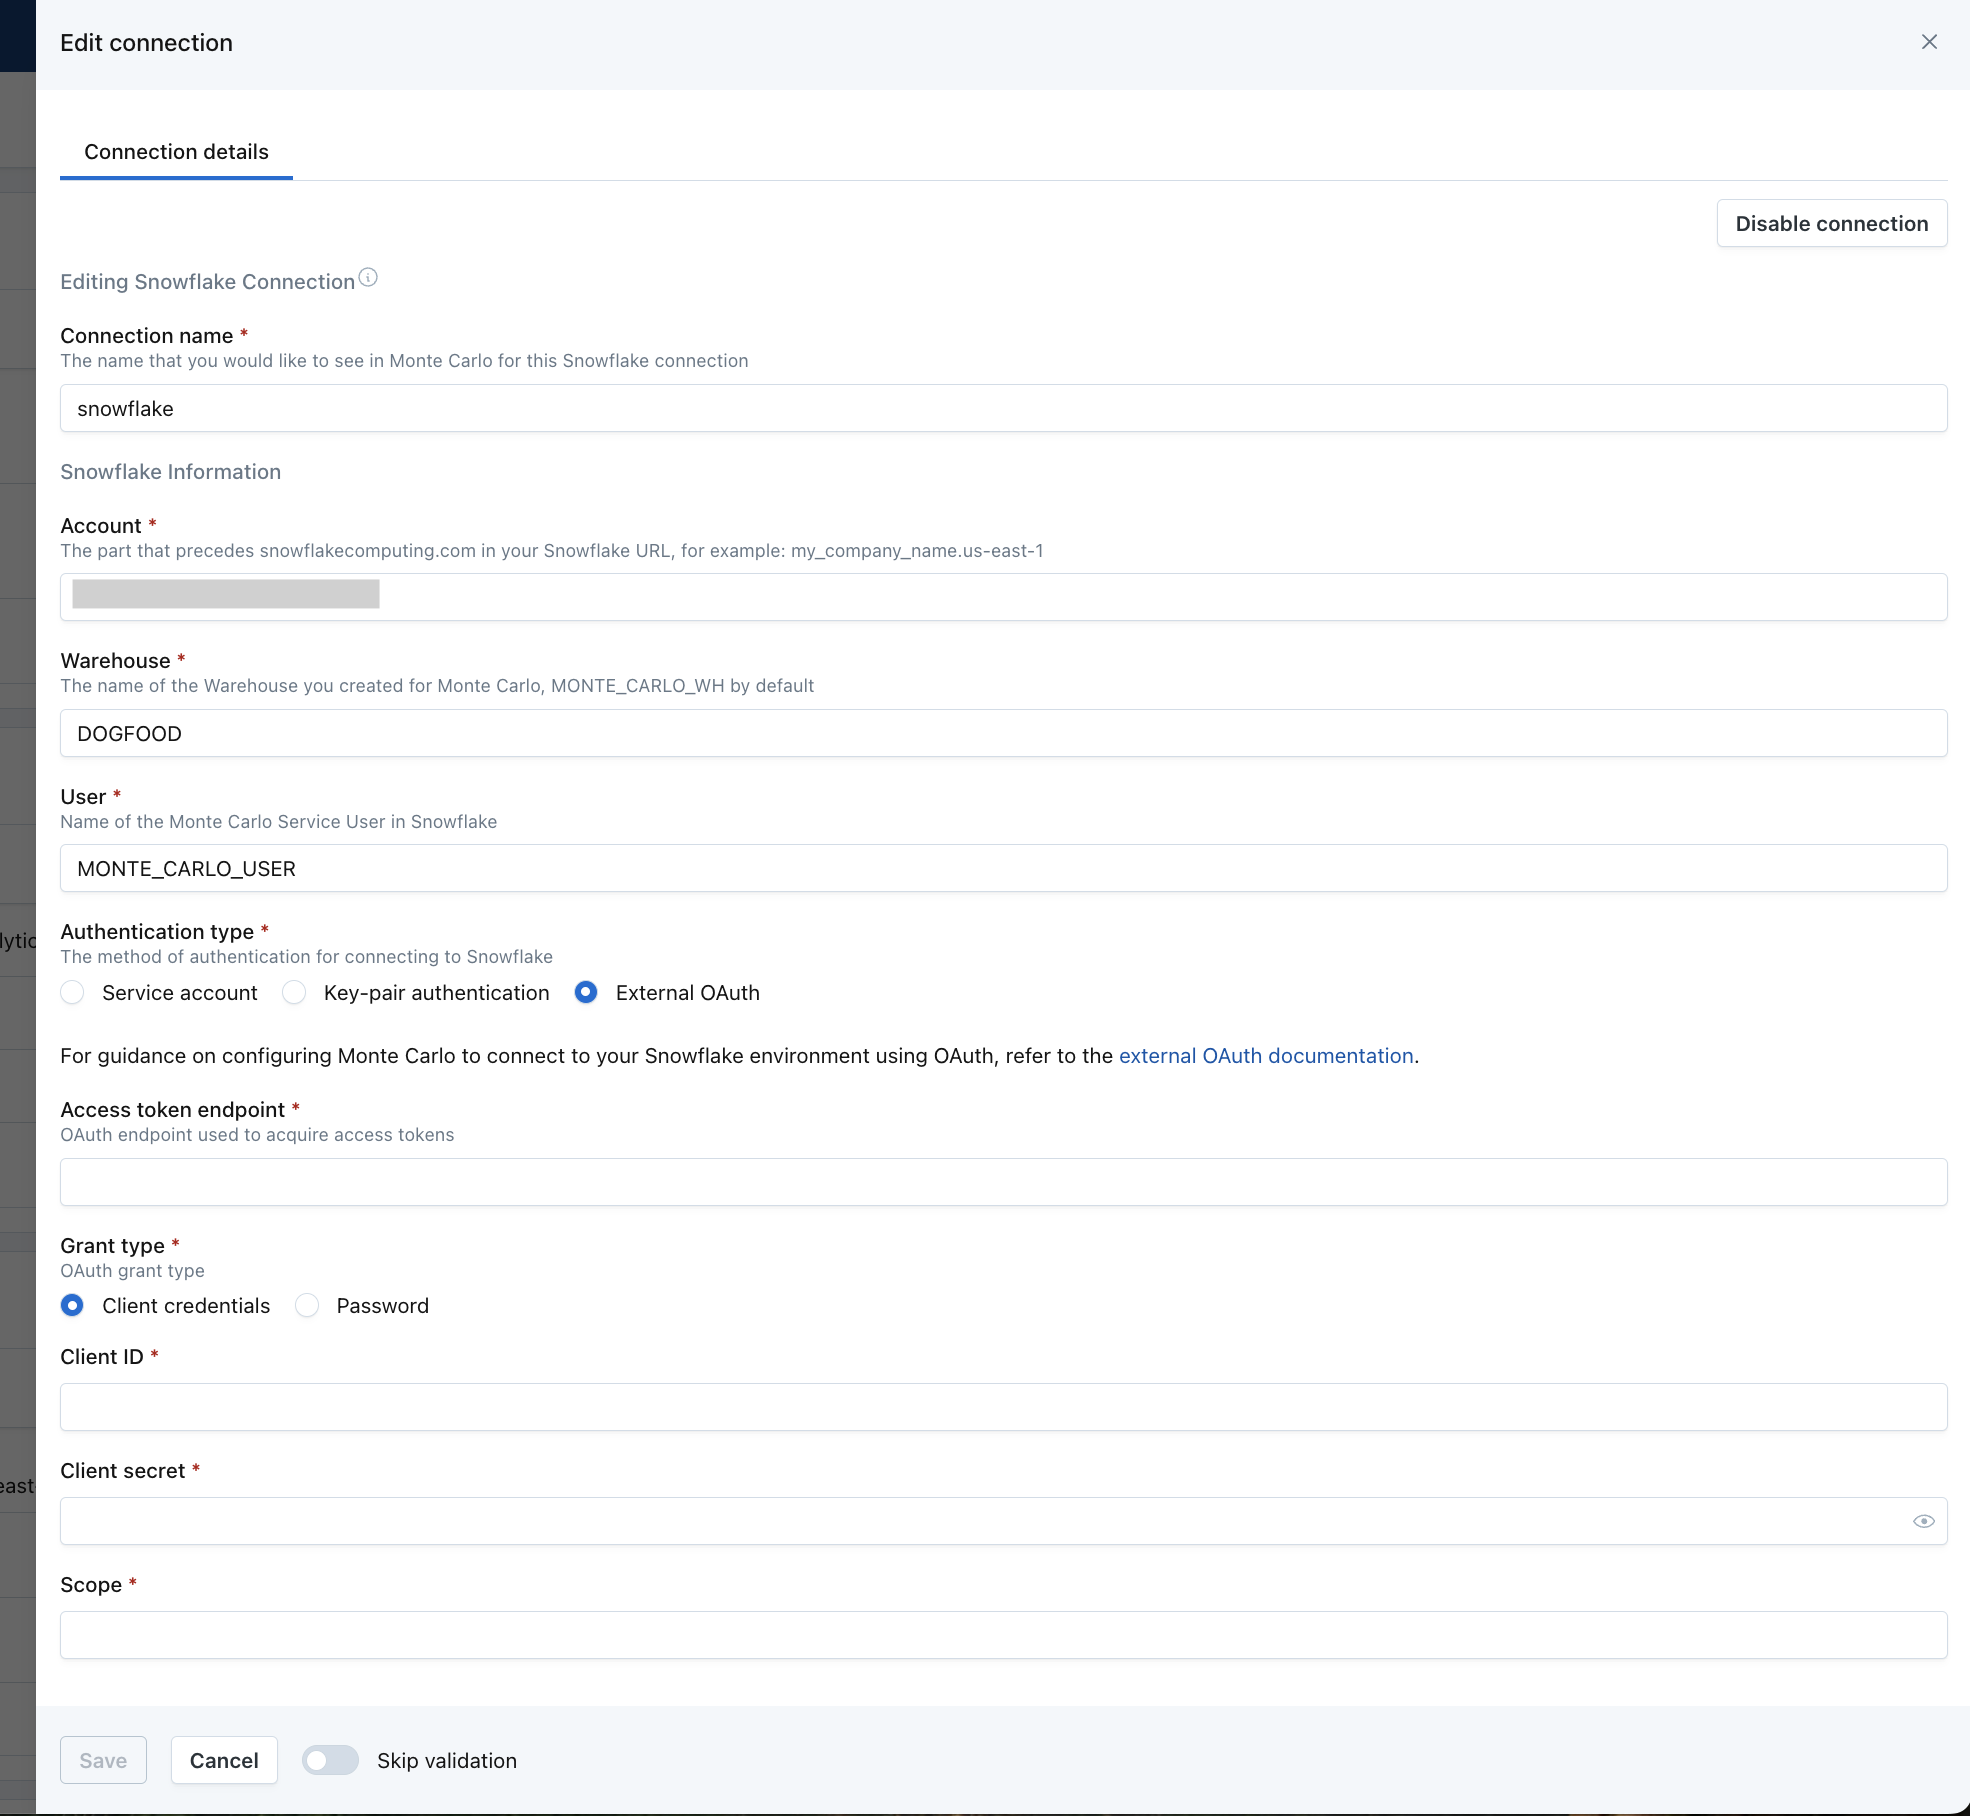
To configure Monte Carlo to use OAuth to connect to your Snowflake environment, under Settings-> Integrations, in the Snowflake integration creation or edit view, you must provide the following
- Access Token Endpoint - This is the endpoint that MC will use to acquire access tokens for Snowflake
- Grant Type - Must be either Client Credentials or Password
- Client ID - The client identifier issued to the client during the OAuth registration process
- Client Secret - The client secret issued to the client during the OAuth registration process
- Scope - For Snowflake OAuth, scope is used to limit the roles that the Snowflake OAuth user can take. Snowflake requires scope to be set. (https://docs.snowflake.com/en/user-guide/oauth-ext-overview#scopes)
If using a Password Grant Type, you must also provide
- Username - Username of the OAuth User
- Password - Password for the OAuth User
The Snowflake user that MC will use depends on matching the attribute set in EXTERNAL_OAUTH_TOKEN_USER_MAPPING_CLAIM to the attribute set in EXTERNAL_OAUTH_SNOWFLAKE_USER_MAPPING_ATTRIBUTEin your Snowflake External OAuth Integration. See https://docs.snowflake.com/en/sql-reference/sql/create-security-integration-oauth-external
To test that Snowflake is properly configured to use your OAuth Credentials, you can acquire an access token, and validate it in Snowflake.
Acquire an Access Token using cURL
Example acquiring a token using a client_credentials grant type
curl -X POST -H "Content-Type: application/x-www-form-urlencoded;charset=UTF-8" \
  --data-urlencode "client_id=<client_id>" \
  --data-urlencode "client_secret=<client_secret>" \
  --data-urlencode "grant_type=client_credentials" \
  --data-urlencode "scope=<scope>" \
  '<access_token_endpoint>'
Example acquiring a token using a password grant type
curl -X POST -H "Content-Type: application/x-www-form-urlencoded;charset=UTF-8" \
  --data-urlencode "client_id=<client_id>" \
  --data-urlencode "client_secret=<client_secret>" \
  --data-urlencode "grant_type=password" \
  --data-urlencode "username=<username>" \
  --data-urlencode "password=<password>" \
  --data-urlencode "scope=<scope>" \
  '<access_token_endpoint>'
Validate Access Token in Snowflake
SELECT SYSTEM$VERIFY_EXTERNAL_OAUTH_TOKEN('<access_token>')Providing service user credentials during onboarding
When using Monte Carlo's onboarding wizard, please provide the following details to validate and complete the integration:
- User: The name of the service user created, MONTE_CARLO by default.
- Private key and optional Private key passphrase for the encrypted private key.
- Account: This would be the part that precedes snowflakecomputing.com in your Snowflake console URL. For example, if you use the URL https://xyz12345.us-east-1.snowflakecomputing.com/ to access Snowflake, your account name will be xyz12345.us-east-1.
- Warehouse: Please provide the name of the warehouse you chose while creating the service user, MONTE_CARLO_WH by default.
Adding a new query-engine connection
Querying connections enable the creation of custom monitors that leverage multiple different connections. For example, you can now use a larger Snowflake warehouse for resource-intensive field health checks or SQL queries without increasing overall costs or placing additional load on other queries. By default, both the dashboard and APIs will use the primary query engine (i.e., the first query engine added to a warehouse) for all operations.
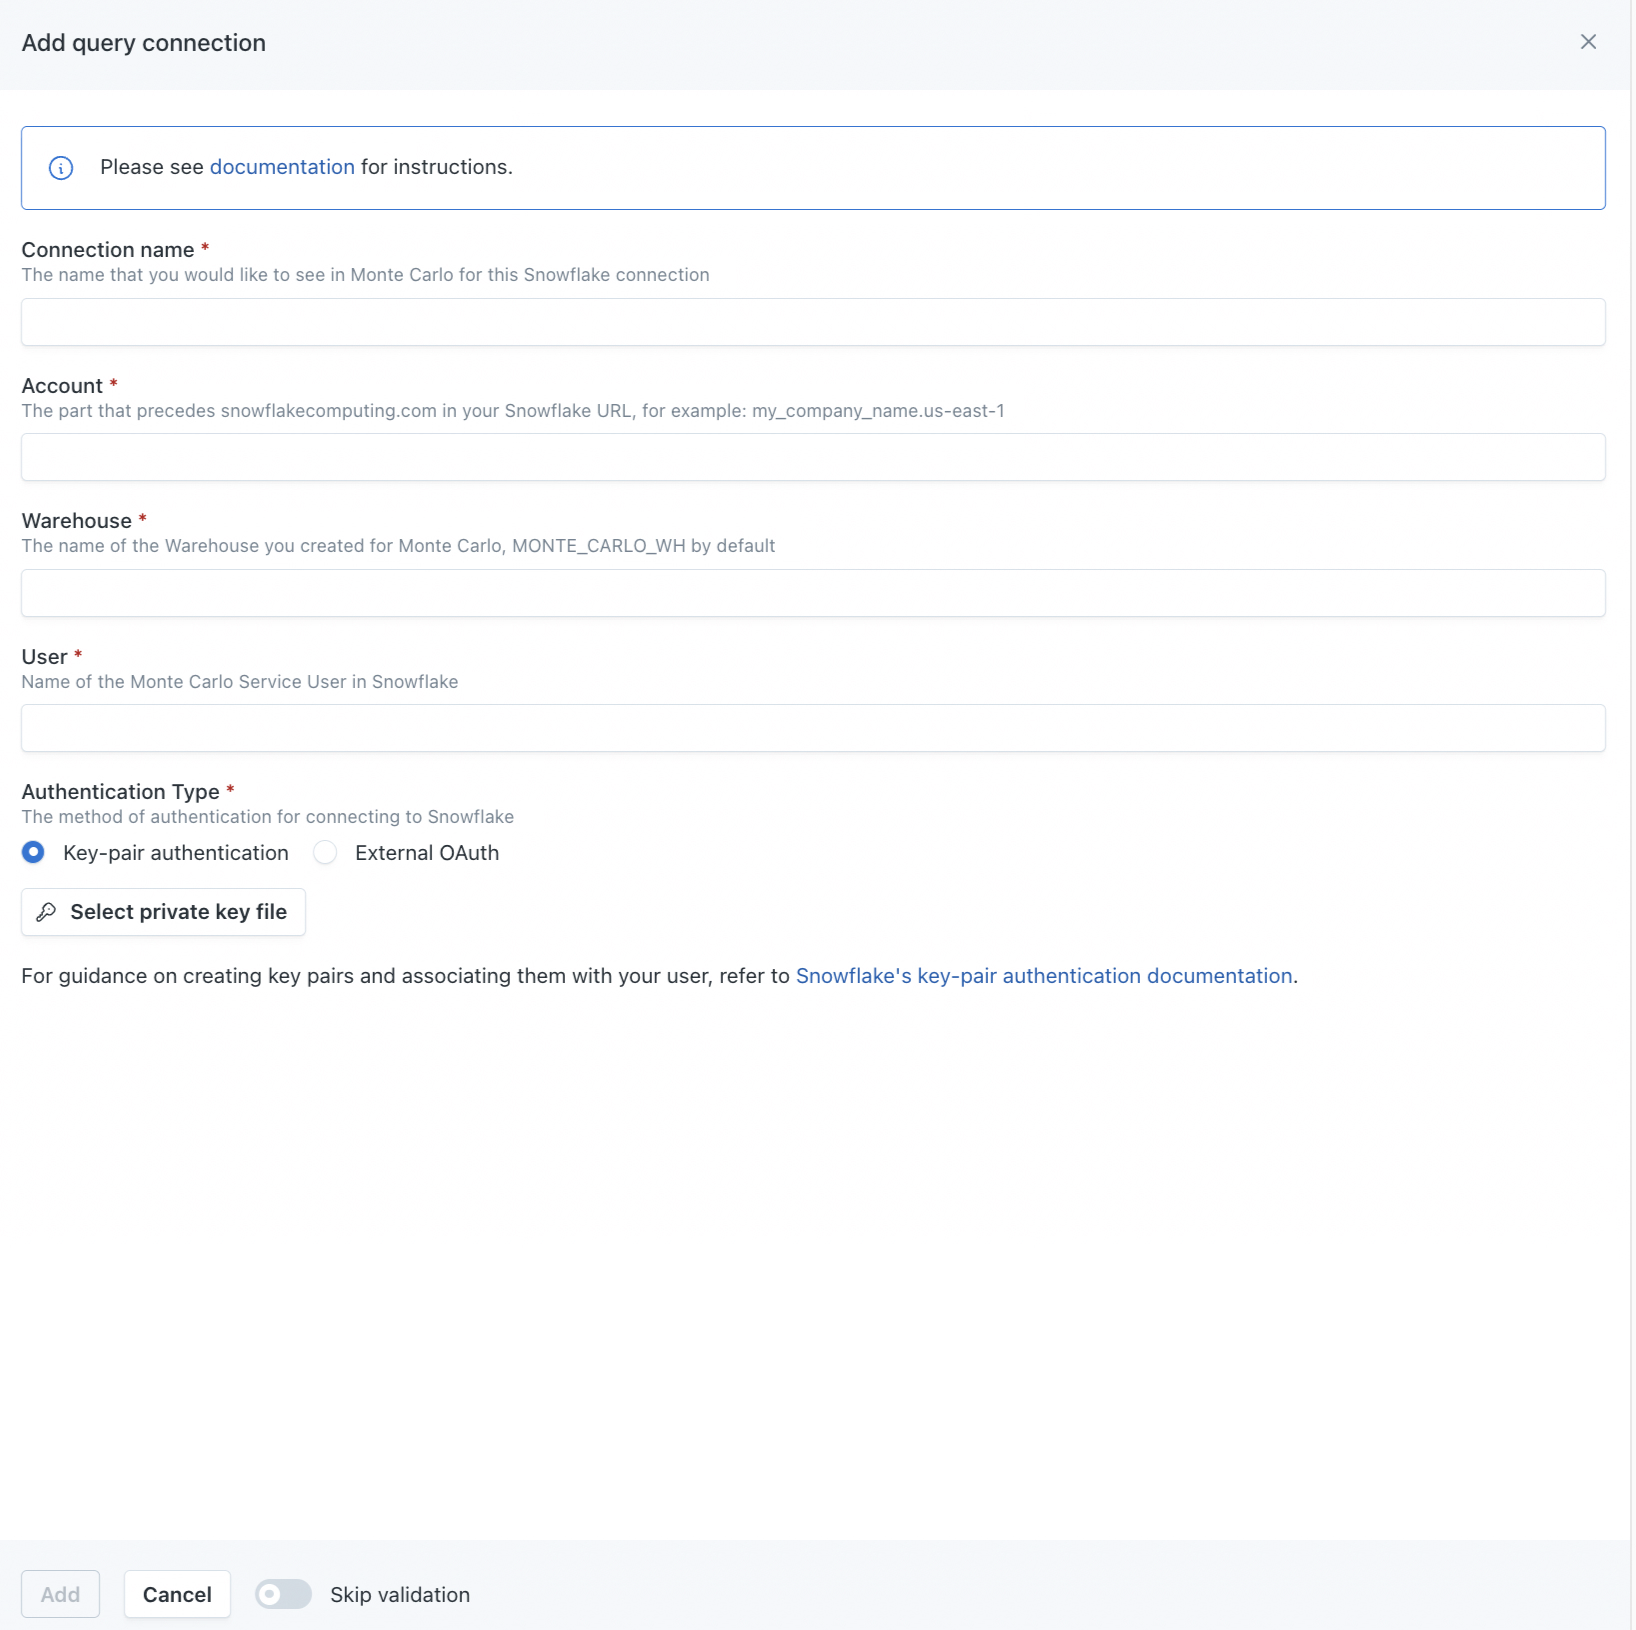
To add a new querying engine to a Snowflake warehouse, navigate to the Settings > Integrations page, click into the target Snowflake integration, and then click the "Add" button on the right-hand side of the Connections list.
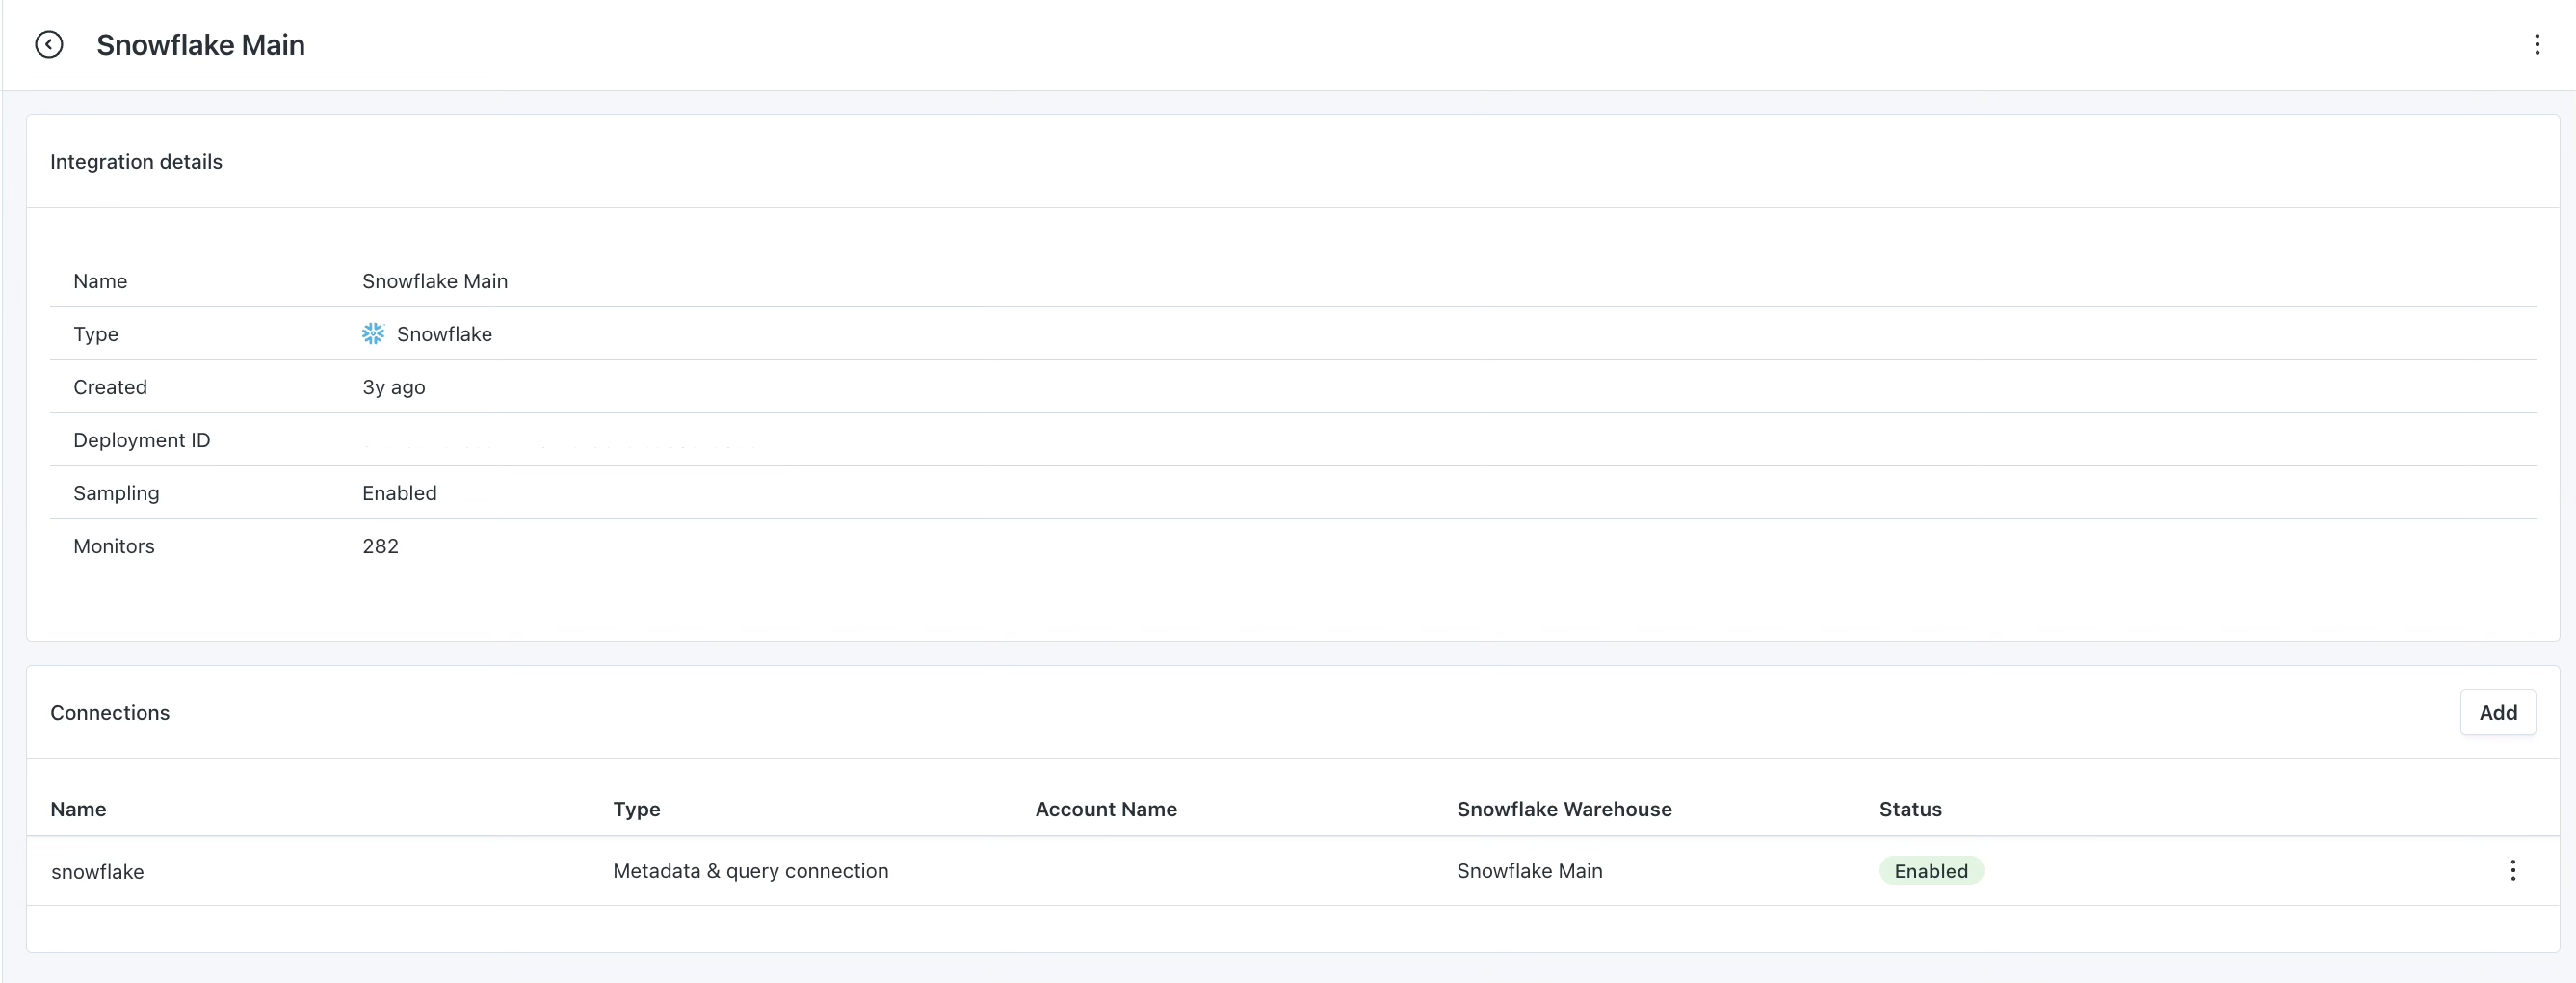
Integration details view, add a new querying engine here
A drawer will open, prompting you to input details for setting up the querying connection. This process is similar to setting up a new connection, so refer to the documentation above for more information.
FAQ
How can I monitor multiple databases with Monte Carlo?
To monitor multiple databases, you will grant Monte Carlo's service user the necessary permissions to each of them. Monte Carlo will automatically monitor all databases to which it has access.
To grant permissions, please run the snippet in the previous section for each of the databases you would like to monitor. You will modify the database_to_monitor parameter in each run.
Can I Remove Permissions from the Monte Carlo User?
If you want to remove permissions from a subset of warehouses, schemas, or tables, run the following commands in the appropriate database, replacing <DATABASE> with the database name and <SCHEMA> with the schema name.
To revoke permissions for a schema:
REVOKE ALL PRIVILEGES ON SCHEMA <DATABASE>.<SCHEMA> FROM MONTE_CARLO_ROLE;
REVOKE ALL PRIVILEGES ON ALL TABLES IN SCHEMA <DATABASE>.<SCHEMA> FROM MONTE_CARLO_ROLE;
REVOKE ALL PRIVILEGES ON ALL VIEWS IN SCHEMA <DATABASE>.<SCHEMA> FROM MONTE_CARLO_ROLE;
REVOKE ALL PRIVILEGES ON FUTURE TABLES IN SCHEMA <DATABASE>.<SCHEMA> FROM MONTE_CARLO_ROLE;
REVOKE ALL PRIVILEGES ON FUTURE VIEWS IN SCHEMA <DATABASE>.<SCHEMA> FROM MONTE_CARLO_ROLE;
As this script removes the USAGE permission from the schema, that's enough to prevent our service user from accessing any objects (tables, views, etc.) in the schema.
To revoke permissions to specific table:
REVOKE ALL PRIVILEGES ON TABLE <DATABASE>.<SCHEMA>.<TABLE> FROM MONTE_CARLO_ROLETo revoke access to the entire database:
REVOKE ALL PRIVILEGES ON DATABASE <DATABASE> FROM MONTE_CARLO_ROLE;
REVOKE ALL PRIVILEGES ON ALL SCHEMAS IN DATABASE <DATABASE> FROM MONTE_CARLO_ROLE;
REVOKE ALL PRIVILEGES ON ALL TABLES IN DATABASE <DATABASE> FROM MONTE_CARLO_ROLE;
REVOKE ALL PRIVILEGES ON ALL VIEWS IN DATABASE <DATABASE> FROM MONTE_CARLO_ROLE;
REVOKE ALL PRIVILEGES ON FUTURE TABLES IN DATABASE <DATABASE> FROM MONTE_CARLO_ROLE;
REVOKE ALL PRIVILEGES ON FUTURE VIEWS IN DATABASE <DATABASE> FROM MONTE_CARLO_ROLE;
REVOKE ALL PRIVILEGES ON FUTURE TABLES IN SCHEMA <DATABASE>.<SCHEMA> FROM MONTE_CARLO_ROLE;
REVOKE ALL PRIVILEGES ON FUTURE VIEWS IN SCHEMA <DATABASE>.<SCHEMA> FROM MONTE_CARLO_ROLE;
MONTE_CARLO_ROLEis usually the role assigned to the user used by Monte Carlo but it might need to be updated too
Can I Update the Service User from Username/Password To Key-Pair Authentication?
Follow these steps if you need to switch your Monte Carlo service user from user/password to key-pair authentication.
- Follow Snowflake's key-pair authentication guide to create a private and public key for the service user to use.
- Generating a private key
- The private key will be needed during onboarding in the Monte Carlo UI.
- Monte Carlo supports using an encrypted or unencrypted private key.
- Generating a public key
- The public key will be assigned to the service user in Snowflake
- Generating a private key
- Using the public key created above, alter the service user in snowflake with this command:
ALTER USER MONTE_CARLO SET TYPE = SERVICE, RSA_PUBLIC_KEY='MIIBIj...';- Edit your Snowflake connection through the UI Go to Settings -> Integration, find the snowflake connection, click on the three dots per docs here. Under "authentication type", switch the toggle from "Service account" to "Key pair authentication", then upload the private key you created in step 1.
How can I validate Monte Carlo has access to my assets?
After completing the Snowflake integration setup, your Snowflake assets should appear in the Monte Carlo Assets page between a few minutes and one hour. If you don't see your assets after this time period, you can run a validation test to troubleshoot the connection:
- Navigate to Settings → Integrations
- Find your Snowflake integration and click on it
- Select the specific connection you want to test
- Click the Test button from the connection menu
This validation test will help identify any configuration issues that might be preventing your assets from appearing.
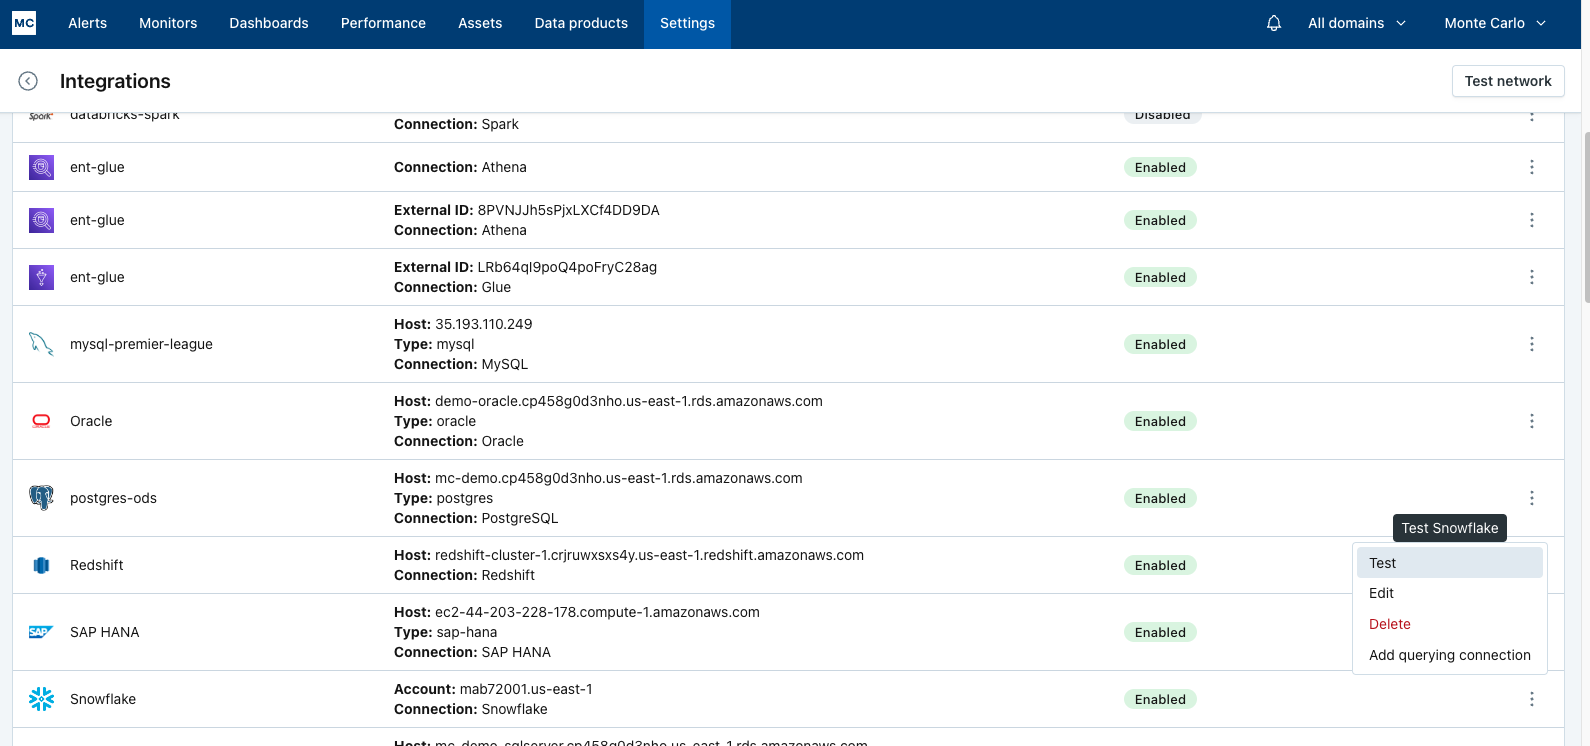
When running the validation test, you should see all green checkmarks. If any errors are encountered, the system will provide specific steps to resolve them.
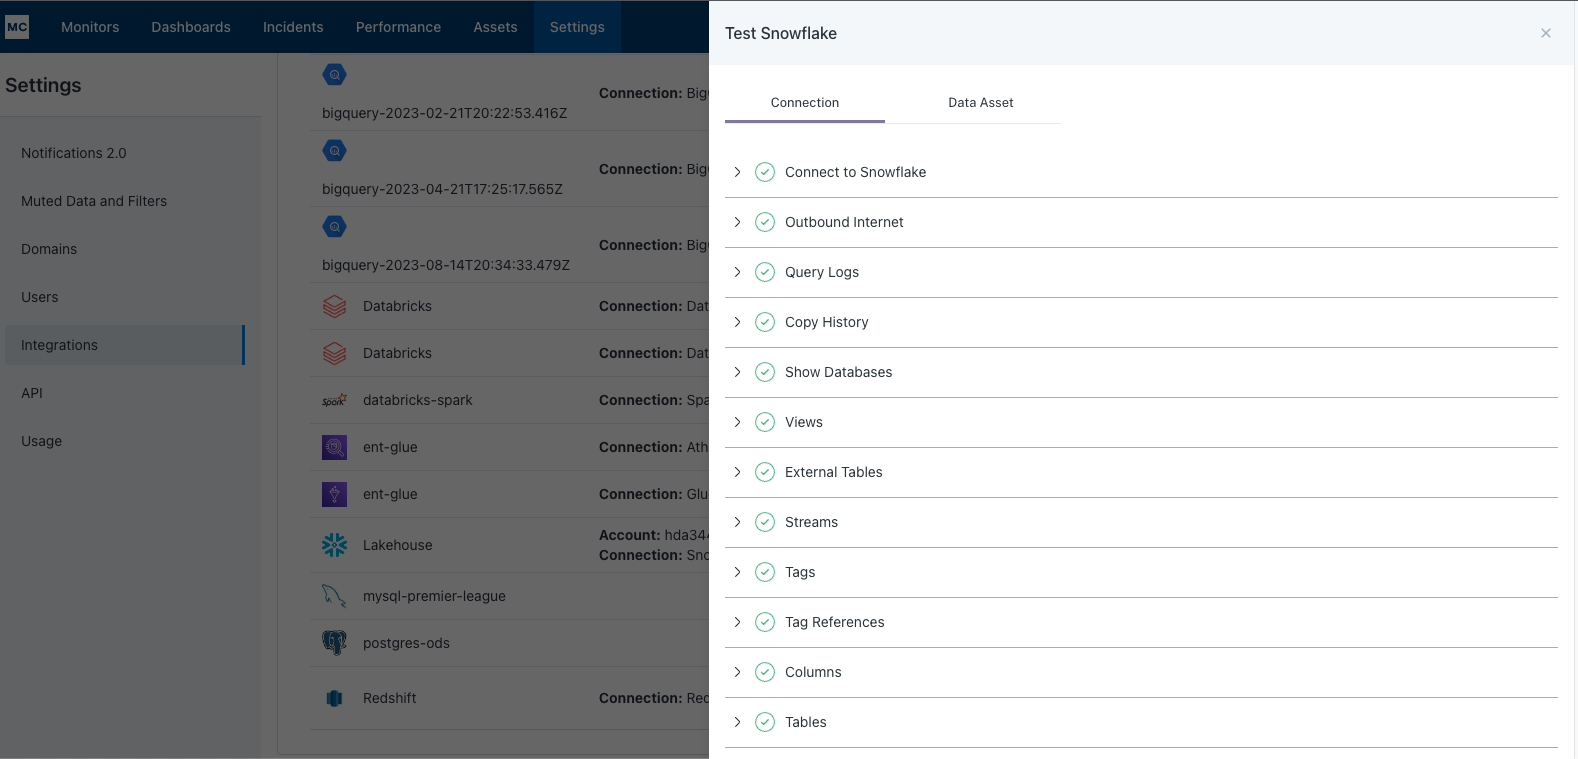
If assets from a specific database or schema are missing you can use the Data Asset validation to test our ability to access them.
Note: Lineage can take up to 24 hours due to batching.
Why am I seeing freshness updates when I only tagged my table or changed its schema?
Monte Carlo retrieves freshness information from Snowflake’s INFORMATION_SCHEMA. Snowflake updates the last altered time of a table when it is tagged, or modified via DDL operations. As a result, Monte Carlo interprets these changes as freshness events, even though the table’s content hasn’t actually changed.
Updated 16 days ago
