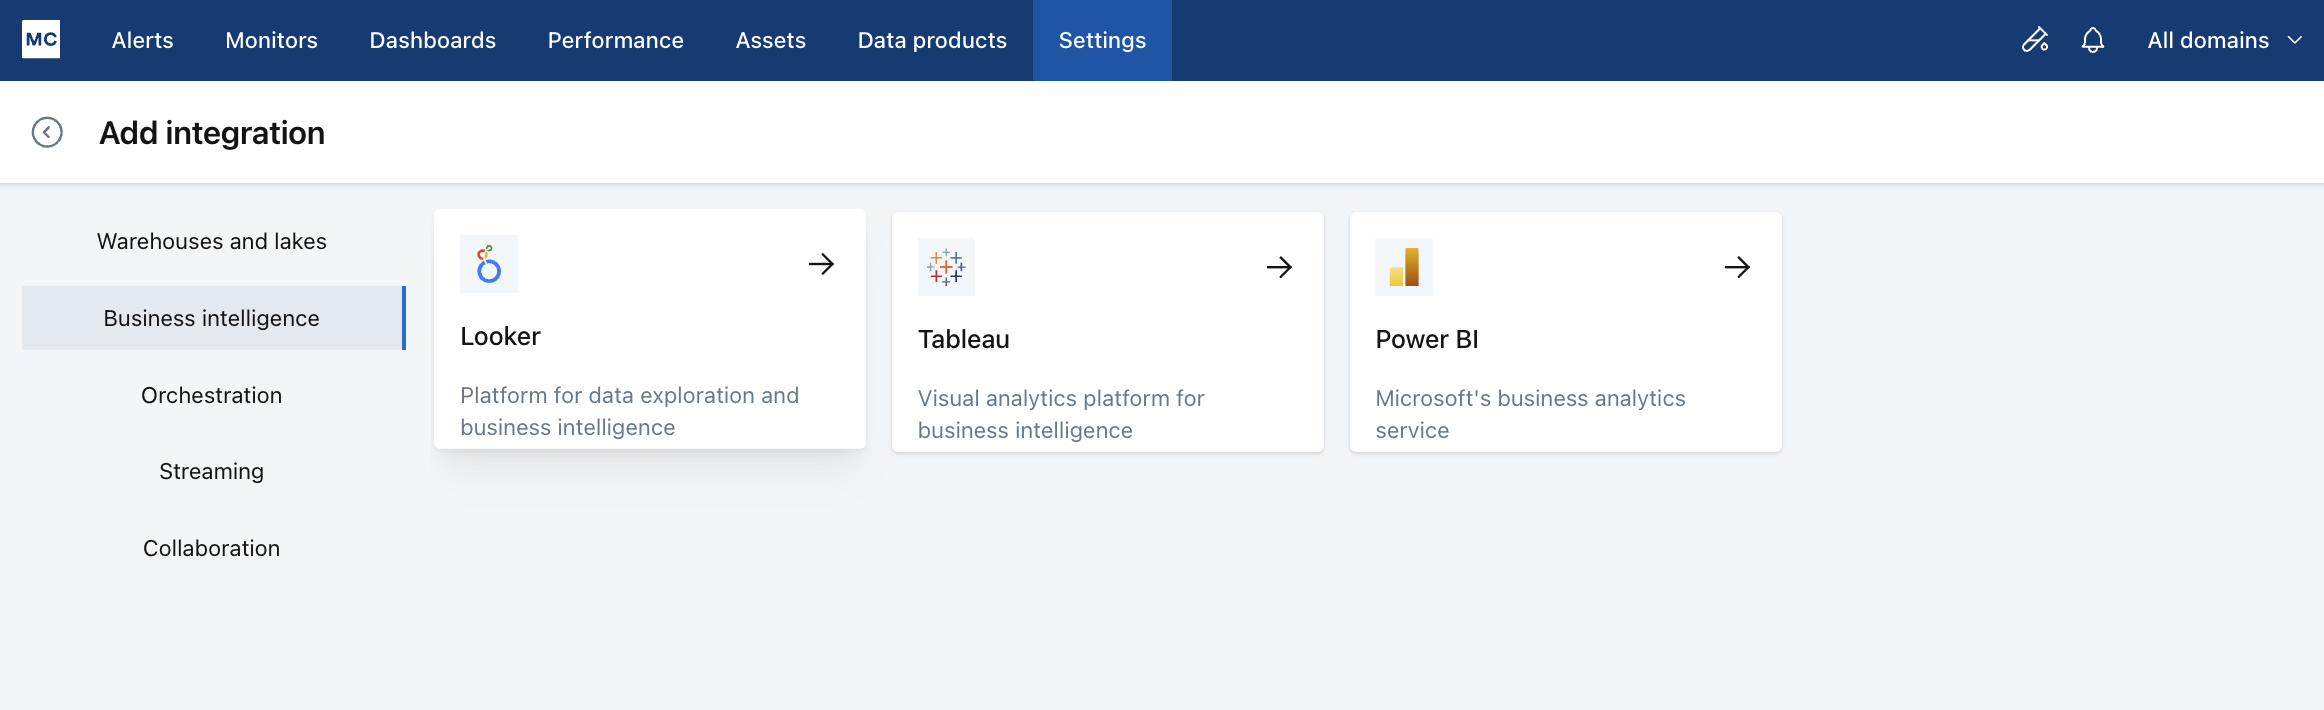
Looker
Integrating Monte Carlo with Looker lets you track metadata and lineage for your dashboards, looks, dashboard-tiles, explores, and views.
This guide explains how to create service accounts for Monte Carlo on Looker and on your LookML code repository. To review all steps necessary to integrate a BI tool with Monte Carlo, please see here.
Admin credentials requiredTo make the read only role and key for Monte Carlo, you will need Looker admin credentials as well as admin privileges for the code repository that hosts your LookML code.
Looker in LineageFor full end-to-end lineage in Looker, you must connect both the Looker API and the Looker Git integrations. The Looker API integration provides Looker-to-Looker lineage, while the Git Repository for LookML is required to establish warehouse-to-Looker lineage.
There are two connections required to fully access Looker: the Looker API and the service hosting your LookML files. In this guide, you will:
- Create an API key on Looker, allowing Monte Carlo to access metadata about your Dashboards, Looks and other Looker objects.
- Connect Monte Carlo with your LookML code repository, allowing Monte Carlo to map dependencies between Looker objects and data warehouse tables. You have two options to connect: private/public keys which provides more granular control and connectivity, or HTTPS which is recommended if you have many repos to connect to MC.
The "Looker" Integration - Creating a Looker API Key
The following steps are to connect to your Looker API, allowing Monte Carlo to access metadata about your Dashboards, Looks and other Looker objects.
Looker integration
To create a read-only Looker API key for Monte Carlo, please follow the steps below in Looker.
First, create a permission set:
- In the top navigation bar, go to Admin > Roles and click New Permission Set.
- Name your permission set "montecarlops".
- Check the necessary permissions (see list below), and click New Permission Set to save.
see_datagroups
access_data
access_data.see_lookml_dashboards
access_data.see_looks
access_data.see_looks.see_user_dashboards
access_data.see_looks.explore
access_data.see_looks.see_lookml
Then, create a role:
- In the top navigation bar, go to Admin > Roles and click New Role.
- Name your role "montecarlorole".
- Select the permission set you created ("montecarlops").
- Select the appropriate Model Set (typically, All).
- Click New Role to save.
Then, create a user:
- In the top navigation bar, go to Admin > Users and click Add Users.
- Choose an email address, for example [email protected]. You are not required to use a valid email address.
- Uncheck the Send setup emails option.
- Select the role you created ("montecarlorole").
- Click Add Users to save.
Then, set what content Folders the Monte Carlo User has access to see.
- In the top navigation bar, go to Admin > Content Access.
- Note: At this point, you can decide which folders to give access to Monte Carlo. Monte Carlo simply uses this content for Lineage and does not actually read the content in the Dashboards/Looks. We recommend starting with all Content (Shared + Users), as you can always revoke permissions to remove them from Lineage later on.
- With the Shared folder selected, click Manage Access. If All Users does not already have View or Manage/Edit Access, add the Monte Carlo user you just created with View access.
- Click Save.
- Repeat with the Users folder.
Then, create an API key
- In the top navigation bar, go to Admin > Users and click Edit on the new user you created for Monte Carlo.
- Click Edit Keys and then New API3 Key.
- Copy Client ID, and paste into Monte Carlo's integration wizard.
- Unhide and copy Client Secret, and paste into Monte Carlo's integration wizard.
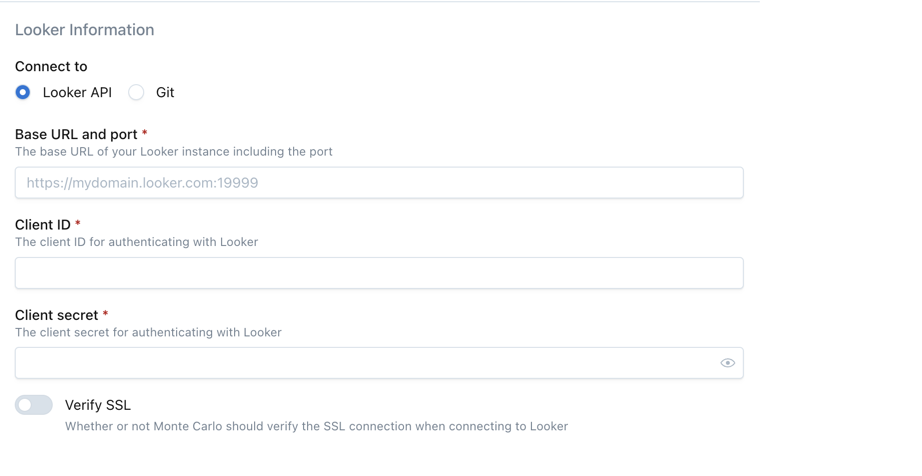
Finally, get your Looker host URL:
- In the top navigation bar, go to Admin > Settings.
- Copy Host URL, and paste into Monte Carlo's integration wizard.
- Add the suffix :19999 to the URL, e.g. if your host is https://mydomain.looker.com, then you should provide the value https://mydomain.looker.com:19999 on Monte Carlo's integration wizard.

Port :19999This is looker.com's port, so if you are cloud hosted or not located at looker.com, you should use your own port. That means the information you give Monte Carlo can look like: https://looker.<your_domain>.com:443.
Please note that if you use a self-signed certificate for Looker's SSL connection, you will need to uncheck the Verify SSL on Monte Carlo's integration wizard:

Click the blue "CONNECT" button, and you should be all set! You will see a module pop up testing the connection. On successful connection, the module will show a green check mark saying the connection was successful; if there was an error connecting using the details provided, the error will surface for further debugging.
Looker API usage frequencyIn order to keep Looker API usage minimal, Monte Carlo will collect Looker metadata every 4 days. This means you may have to wait 4 days for your latest user permission changes to be reflected in Monte Carlo. For more details, please contact your Monte Carlo representative.
The "Looker Git SSH" Integration - Connecting to your LookML Code Repository
The following steps are to connect to your repository hosting your LookML files, allowing Monte Carlo to map dependencies between Looker objects and data warehouse tables.
Connect to Looker API FirstYou will need to complete setting up Looker's API key on Monte Carlo prior to performing this section.
To enable LookML access to Monte Carlo, you will create an SSH key to access your LookML code repository.
Creating an SSH key
To enable Monte Carlo access to hosted Git repositories, you can provide a read-only SSH key.
First, create an SSH key on your local machine:
- In your terminal, please use the following command, using your own email address.
ssh-keygen -t rsa -b 4096 -C "[email protected]"
Email Doesn't MatterYou do not have to be an admin or use an admin's email to generate this key. The email provided in the command is only for record keeping purposes on your own computer so it is recommended you use your own.
- Please follow the prompts and do not provide a passphrase (leave empty).
This process saved two keys: one private and one public. During the process, you were asked to provide a file in which to save the keys; you can now find these keys under that file name in your main directory's .ssh/id_rsa folder. For example:
work@Katies-MacBook-Pro % ssh-keygen -t rsa -b 4096 -C [email protected]
Generating public/private rsa key pair.
Enter file in which to save the key (/Users/work/.ssh/id_rsa): testing
Enter passphrase (empty for no passphrase):
Enter same passphrase again:
Your identification has been saved in testing.
Your public key has been saved in testing.pub.
The key fingerprint is:
<revoked>
The key's randomart image is:
<revoked>
work@Katies-MacBook-Pro % ls -a
...			.ssh			...
work@Katies-MacBook-Pro % cd .ssh
work@Katies-MacBook-Pro .ssh % ls
config	 testing	 testing.pub	 known_hosts
As you can see, there are two files: testing which contains the private key you will provide Monte Carlo with, and testing.pub which contains the public key you will give to Github. Once in the .ssh folder, you can run open <file_name> to access the key information. When copying this, use pbcopy to ensure no extra characters are included which will cause authentication to fail:
work@Katies-MacBook-Pro % cd .ssh
work@Katies-MacBook-Pro .ssh % open testing
Next, use the public key (found within the .pub file you generated earlier, called testing.pub in the above example) to configure read-only SSH access on your repo using the following instructions:
- Gitlab
- You can bypass error "your git repo is not accessible" or "please provide an SSH key with read-only access" by setting up your Gitlab connection via CLI.
- Bitbucket
- Github
- Others: please consult with your Monte Carlo representative for assistance.
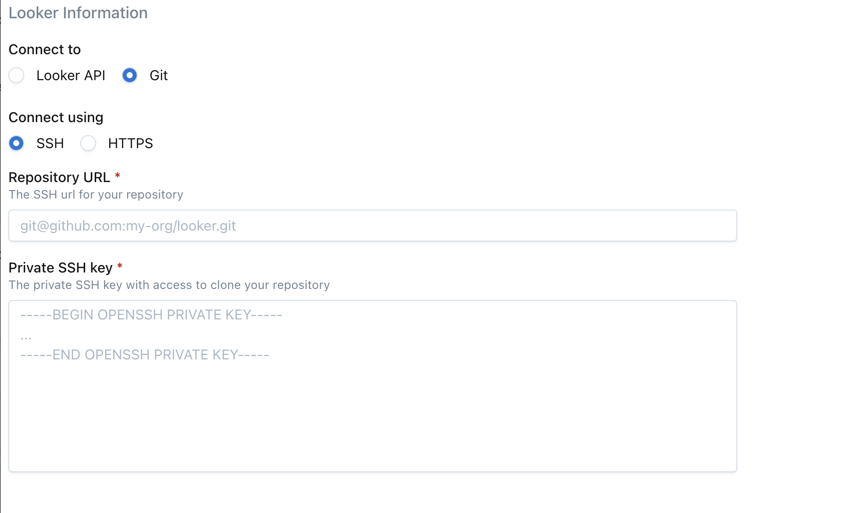
Finally, go to your existing Looker integration, click "view details" to land on the integration details page, click "Add" to start creating a new connection, select "Git", "SSH", and provide the following details to validate and complete the connection:
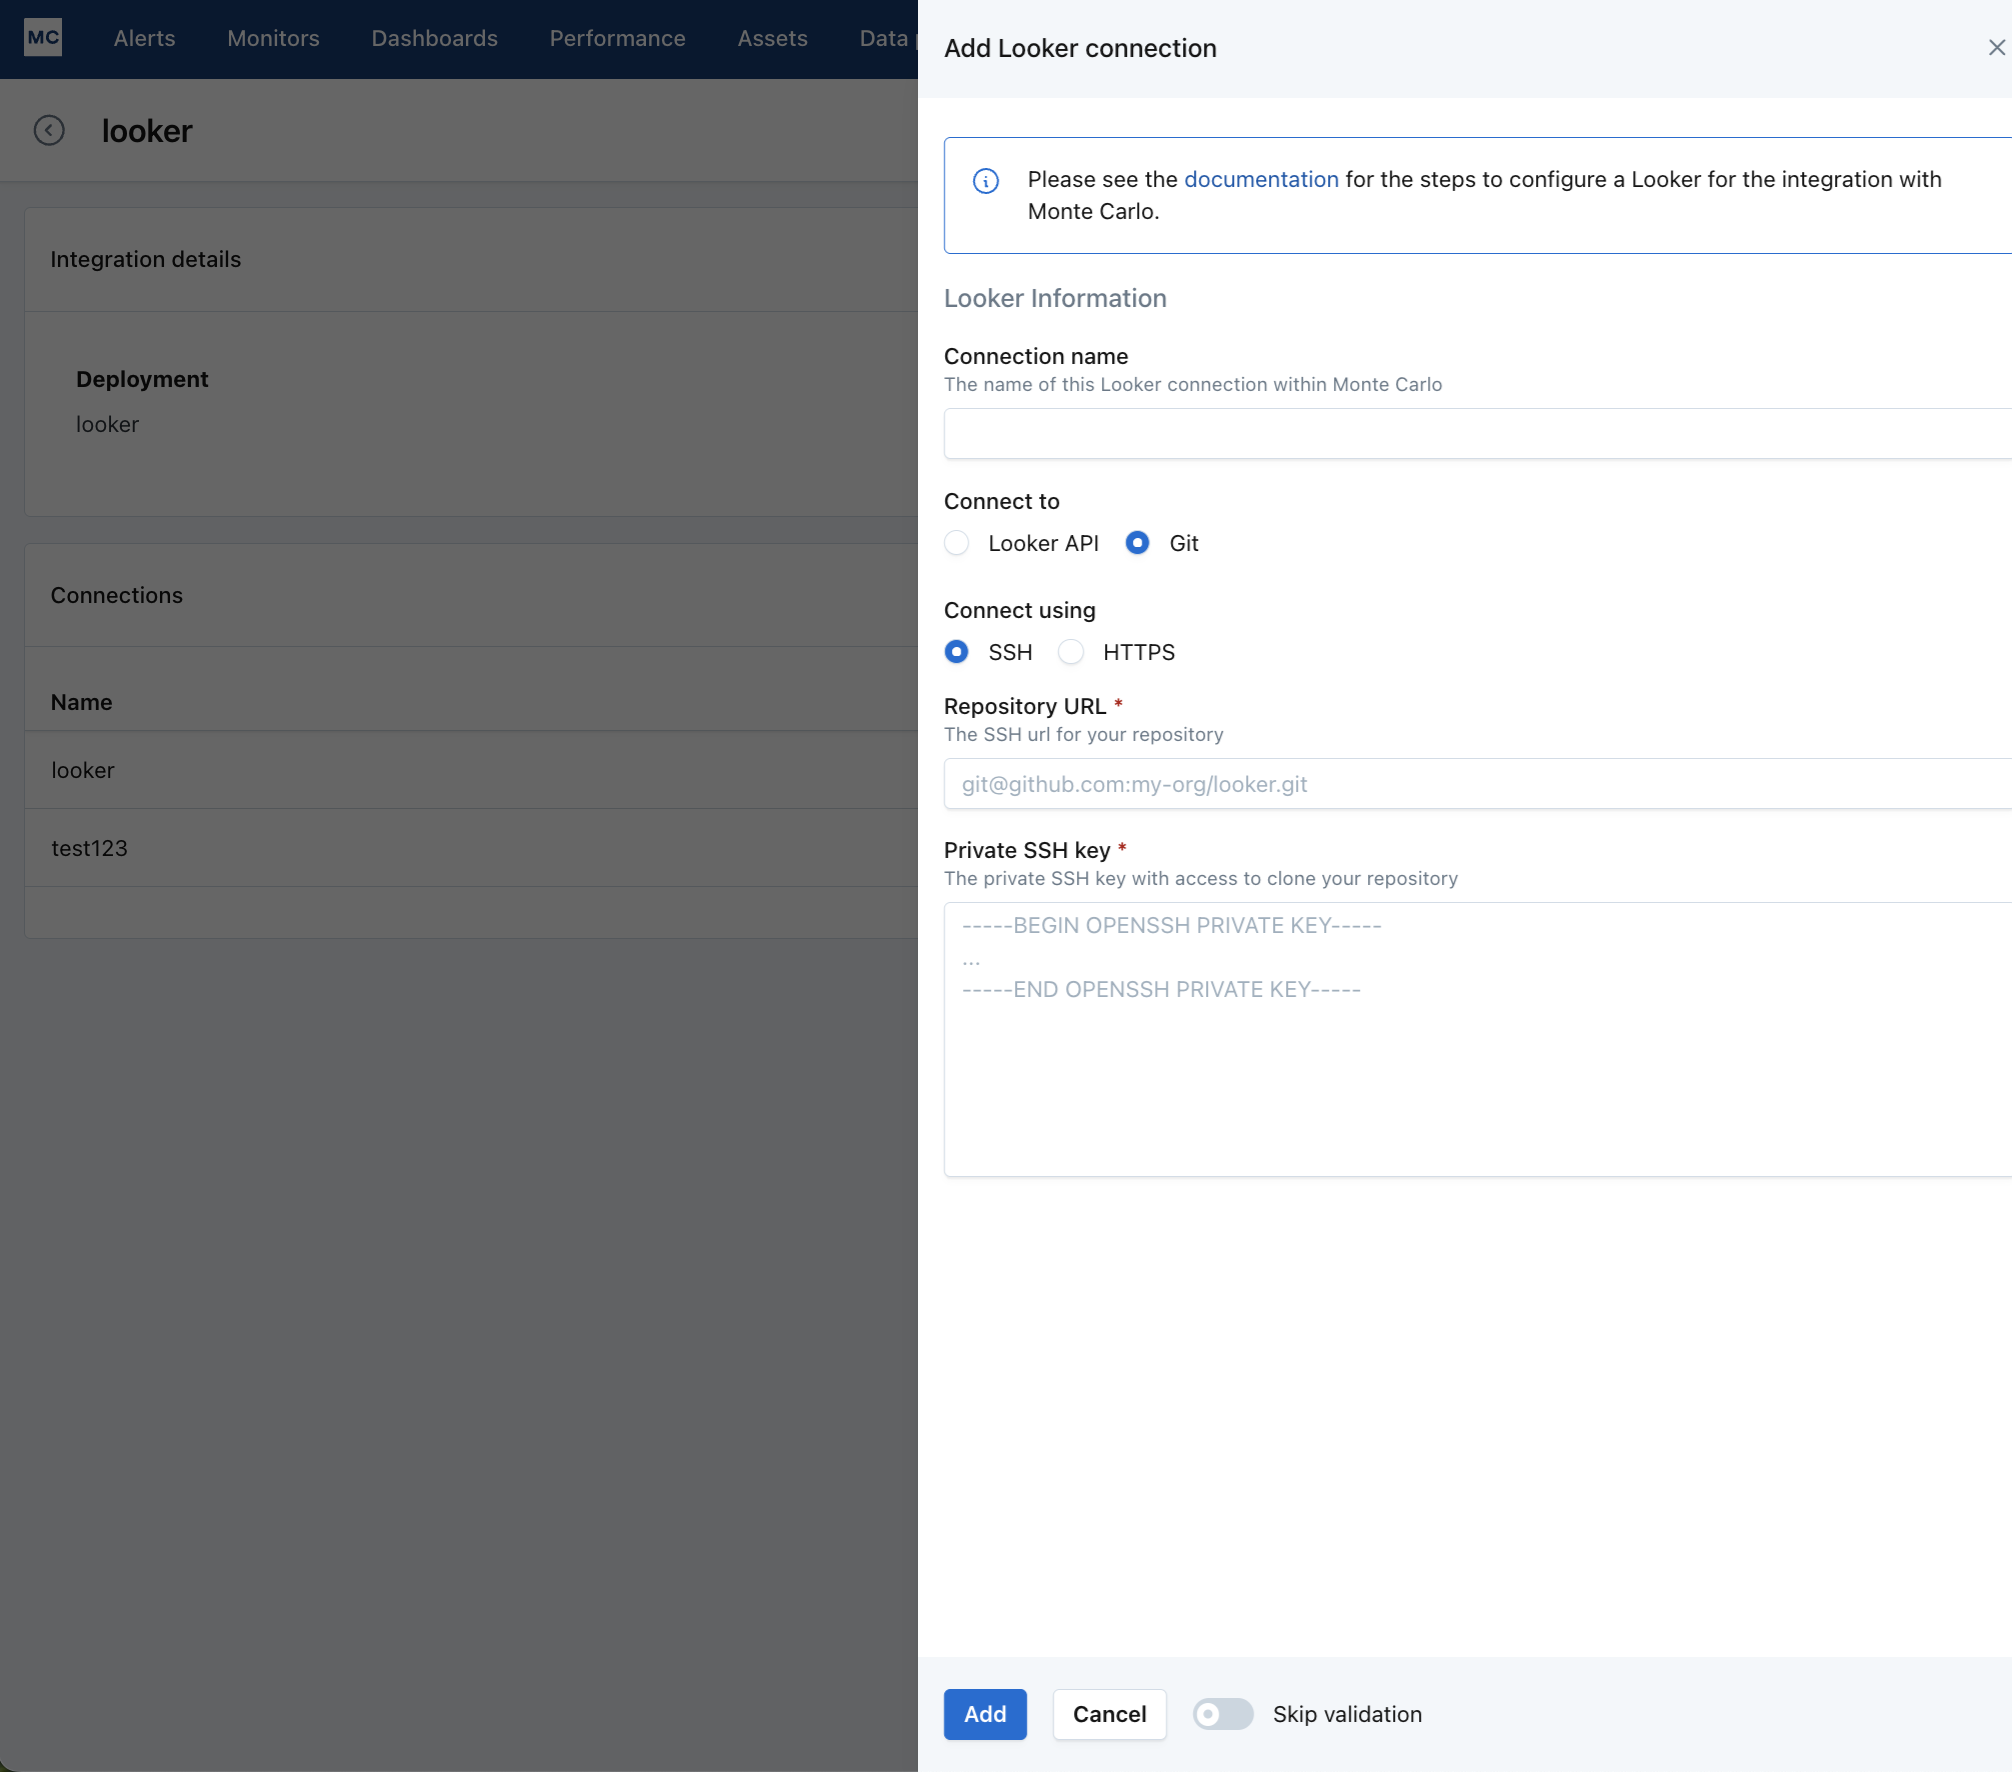
- Your private key (found within the file that has no extension you generated earlier, called
testingin the above example). - Your repository URL. Most hosting services will provide the SSH cloning URL on the repository's main page. It typically looks like so: [email protected]:USERNAME/REPOSITORY.git_.
Click the blue "Create" button, and you should be all set! You will see a module pop up testing the connection. On successful connection, the module will show a green check mark saying the connection was successful; if there was an error connecting using the details provided, the error will surface for further debugging.
Placeholder ValuesThe placeholder values are an exact formatting match to what the integration expects. If you have an error connecting, please verify what you put in the wizard looks similar to what the placeholder value shows. For example, your Private SSH Key should begin with
-----BEGIN OPENSSH PRIVATE KEY -----.
Repeat this process for every repo you want Monte Carlo to read from. Too many repos? See instructions below to connect to Github using HTTPS.
The "Looker Git HTTPS" Integration - Connecting to your LookML Code Repository
You can also connect to your repository hosting your LookML files using personal access tokens and Https, allowing Monte Carlo to map dependencies between Looker objects and data warehouse tables.
First, you will need to make a personal access token for your GitHub account. See instructions here for information on how to do so: creating a personal access token (classic).
For Github repos, Monte Carlo needsrepo access (available scopes). This access is the only access that provides read privileges to your repos.
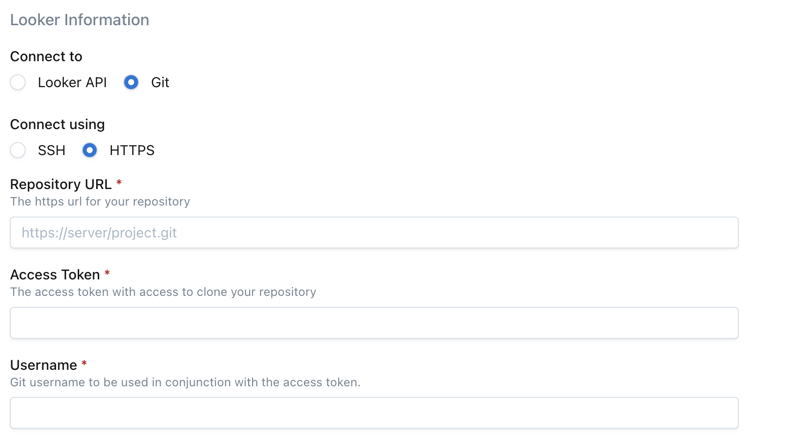
Finally, go to your existing Looker integration, click "Add" new connection under that integration, then provide the following details on Monte Carlo's integration wizard to validate and complete the integration:
- Your repository URL.
- Your access token
- Your username associated with the access token
IMPORTANT: To ensure lineage is displayed correctly, both the Git and API connections must be configured under the same Looker integration. If they are set up under different integrations, lineage may not display as expected.
How can I validate Monte Carlo has access to my assets?
After completing the Looker integration setup, your BI assets should appear in the Monte Carlo Assets page within 1 to 5 hours. If you don't see your assets after this time period, you can run a validation test to troubleshoot the connection:
- Navigate to Settings → Integrations
- Find your Looker integration and click on it
- Select the specific connection you want to test
- Click the Test button from the connection menu
This validation test will help identify any configuration issues that might be preventing your assets from appearing.
When running the validation test, you should see all green checkmarks. If any errors are encountered, the system will provide specific steps to resolve them.
Note: Lineage can take up to 24 hours due to batching.
Updated 3 months ago
What’s Next
Adding another Looker connection or want to modify an existing one?