ServiceNow
Integrate Monte Carlo with ServiceNow
This integration supports:
- Converting a Monte Carlo alert into a ServiceNow incident, or linking an existing incident. Multiple ServiceNow incidents may be linked or created from a single alert in Monte Carlo.
- Automatically sending notifications directly to ServiceNow via audiences.
- Bidirectional status syncing between Monte Carlo alerts and ServiceNow incidents:
- Syncing status updates from Monte Carlo alerts to the corresponding ServiceNow incidents
- Syncing status updates from ServiceNow incidents to the corresponding alert in Monte Carlo
Integration setup
To set up this integration, an Account Owner must go to Settings > Integrations and click the Add button. In the Collaboration tab, select ServiceNow. You can authenticate using OAuth client credentials or with a username and password. You will need:
- Instance name: this is the
yourcompanypiece of as https://yourcompany.service-now.com. - Display name: this gives a superficial name to the integration within Settings, e.g. “ServiceNow production”.
- Client ID: client ID for authorizing requests to ServiceNow if authenticating via OAuth.
- Client secret: client secret for authorizing requests to ServiceNow if authenticating via OAuth.
- Username: user name to log in to ServiceNow. Incidents in ServiceNow will be created with this user.
- Password: password for that User ID. Here is how to set a password in ServiceNow.
You can integrate multiple ServiceNow environments if desired.
User permissions
In order for the integration to work properly, the ServiceNow users must have the following permissions:
- incident (read, write, create)
- sys_dictionary (read)
- sys_dictionary.* (read)
- sys_dictionary_override (read)
- sys_dictionary_override.* (read)
- sys_choice (read)
- sys_choice.* (read)
- sys_glide_object (read)
- sys_glide_object.* (read)
Note: If there are mandatory fields on the incident table that reference records from another table, it may attempt to read from that table in order to list the possible values when configuring incidents to be created via the integration.
Configuring Inbound OAuth Client Credentials Grant
Please follow this guide when configuring ServiceNow to support Inbound OAuth Client Credentials grant. Double check that:
glide.oauth.inbound.client.credential.grant_type.enabledproperty exists and is set totrue- The OAuth Application is configured with an
OAuth Application Userwhich will be used as the user that creates the incident and has the required permissions for the integration.
You can verify your setup is correct by running the following command on the command line:
curl -X POST https://<instance name>.service-now.com/oauth_token.do \
     -d 'grant_type=client_credentials' \
     -d 'client_id=<client ID>' \
     -d 'client_secret=<client secret>'
Creating a ServiceNow incident from a Monte Carlo alert
To create a ServiceNow incident from the alert page, click the Linked issues button in the alert page navigation bar, then click Add ServiceNow incident.
Once clicked, a drawer opens. If creating a new ServiceNow incident, you can input the Summary and Description. Summary and Description are pre-populated with information about the alert and a URL to link back to the alert in Monte Carlo.
Click Create and you should be given a confirmation that an incident has been created. This process can be repeated to link multiple ServiceNow incident to the alert.
Support for Event Management
Monte Carlo supports ServiceNow Event Management. To send Monte Carlo alerts as ServiceNow Events:
- Install the "Event Management Core" plugin to your ServiceNow instance
- Ensure the ServiceNow user configured in the Monte Carlo integration settings has the
evt_mgmt_integrationrole or equivalent permissions - Toggle on 'Monte Carlo alerts will create ServiceNow Events instead of Incidents' when creating or editing the ServiceNow integration
- Once enabled, Monte Carlo alerts will generate ServiceNow Events instead of Incidents when automated via Audiences (see Automating ServiceNow incident or event creation with Audiences). Manually linked alerts will continue to create Incidents, giving you the option to escalate specific alerts to Incidents when needed.
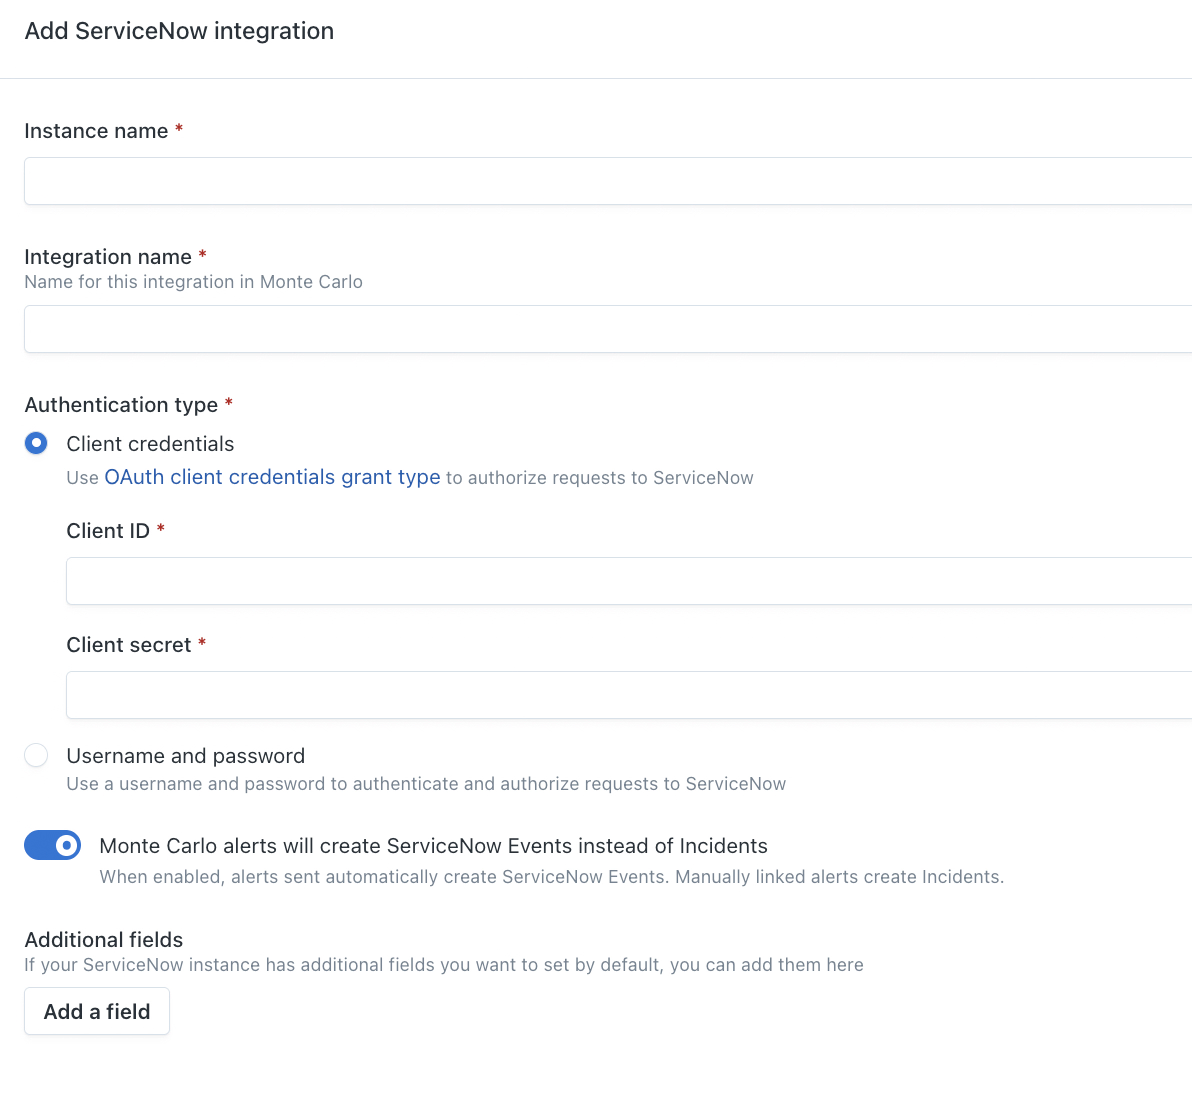
In Monte Carlo, enable the 'Monte Carlo alerts will create ServiceNow Events instead of Incidents' toggle when adding a ServiceNow integration or when editing an existing ServiceNow integration.
Automating ServiceNow incident or event creation with Audiences
You can add ServiceNow as an audience recipient. Any alert that is sent to that audience will automatically create a ServiceNow incident, or a ServiceNow event when Event Management is enabled.
To get started, navigate to Notifications and click Create audience. Add a recipient and integrate it with your ServiceNow account.
When configuring ServiceNow notifications, you have the ability to configure default values for any fields that are required to create an incident. If you do not provide default values for all of your required fields, then a ServiceNow incident will not be created successfully.
When configuring default values for any required fields, format them as:
- Field names: lower case with spaces as underscores. Example: input
Service offeringasservice_offering - Field values: for dropdowns, input an exact match to the desired value. However, if the desired value is a reference to another table, you may need to include a reference id, like
8fa3bbe947713110cf43ad8b136d4316
You can click Test Notification to send a sample payload to ServiceNow. If the test is successful, it will create an example ServiceNow incident. If it fails, the test will return an error describing which required fields need to be populated or which field values were not accepted. Note: if you've provided default values for any non-required fields, the test may still be successful even if values for the non-required fields are rejected.
Bidirectional status sync
Monte Carlo supports bidirectional status syncing between ServiceNow incidents and Monte Carlo alerts. This feature is optional and requires additional configuration.
Enable bidirectional sync
- Within the integration create/edit page, toggle Sync status between Monte Carlo and ServiceNow (bidirectional) to
on - This enables syncing in both directions:
- Monte Carlo → ServiceNow: When Monte Carlo alert statuses are updated, corresponding ServiceNow incident states are updated
- ServiceNow → Monte Carlo: When ServiceNow incident states are updated, corresponding Monte Carlo alert statuses are updated
- Both mapping directions are optional - unmapped statuses will not trigger updates.
Map Monte Carlo statuses
Configure which Monte Carlo alert statuses should update ServiceNow incident states:
- Click Add mapping in the Monte Carlo section
- Select one or more Monte Carlo statuses from the dropdown
- Enter the corresponding ServiceNow incident state value
- Note: Since states in ServiceNow are highly customizable, you must manually type the specific ServiceNow incident state values.
Map ServiceNow statuses
Configure which ServiceNow incident states should update Monte Carlo alert statuses:
- Click Add mapping in the ServiceNow section
- Enter one or more ServiceNow incident state values
- Select the corresponding Monte Carlo status from the dropdown
- Note: Since states in ServiceNow are highly customizable, you must manually type the specific ServiceNow incident state values. If you intend to use the default Business Rule script (see webhook configuration below), you must specify the incident state value (an integer ID) and not the label (text).
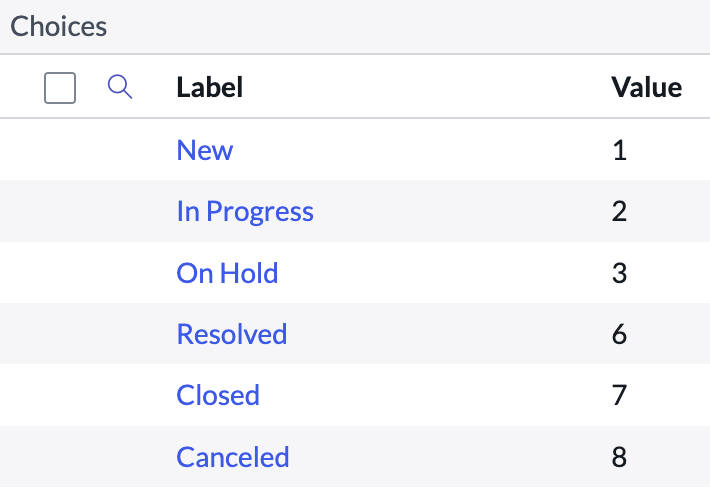
An example of the default choices for the incident.incident_state system definition table from a demo ServiceNow instance. The options in your instance may be different.
Important notes:
- If a Monte Carlo alert has multiple ServiceNow incidents associated with it, then status syncing is disabled for that alert to avoid conflicting status updates.
- Only incidents created after the webhook is configured in ServiceNow will be synced to Monte Carlo.
Configure a webhook to send ServiceNow incident updates back to Monte Carlo
ServiceNow does not provide webhook functionality by default, so you must create a Business Rule running custom JavaScript to send incident state updates to the Monte Carlo webhook.
- When you first save your ServiceNow integration after enabling bidirectional sync, you will get a webhook URL. You will also be able to see this URL if you go back to edit the ServiceNow integration.
- In the ServiceNow UI, click the
Alltab and then navigate toBusiness Rules - Click New and select the table
Incident - Check the
Advancedbox to enable additional required options - In the
When to runtab selectWhen: after, check just theUpdatebox, then clickAdd Filter Conditionand selectIncident statewithchanges - In the Advanced tab
Scriptbox, either paste the script included at the end of this session, or write a custom script that sends the same payload structure. The"webhook_event": "servicenow:incident_updated"entry is required. Make sure to update the webhook URL in the script to match the webhook URL you configured earlier.- If you write a custom script, you can define your own logic for passing ServiceNow incident states to Monte Carlo. If you implement custom state strings, make sure to use those in the status mapping you configured on the ServiceNow integration above.
- Create the webhook Business Rule
- Expect latency of 30-60 seconds between ServiceNow and Monte Carlo.
(function executeRule(current, previous /*null when async*/ ) {
  try {
    var r = new sn_ws.RESTMessageV2();
    // TODO: Update this URL to your unique webhook URL --------------------------\/\/\/\/\/\/\/\/
    r.setEndpoint("https://integrations.dev.getmontecarlo.com/webhooks/servicenow/your-webhook-url");
    r.setHttpMethod("post");

    var payload = {
      "webhook_event": "servicenow:incident_updated",
      "current": {
        "sys_id": current.getValue("sys_id"),
        "sys_updated_by": current.getValue("sys_updated_by"),
        "sys_updated_on": current.getValue("sys_updated_on"),
        "incident_state": current.getValue("incident_state")
      },
      "previous": {
        "sys_id": current.getValue("sys_id"),
        "incident_state": previous.getValue("incident_state")
      }
    };
    var body = JSON.stringify(payload);

    gs.info(body);
    r.setRequestBody(body);

    var response = r.execute();
    var httpStatus = response.getStatusCode();
  } catch (ex) {
    var message = ex.message;
    gs.error("Error message: " + message);
  }

  gs.info("Webhook target HTTP status response: " + httpStatus);
})(current, previous);
Updated 6 months ago