Azure: Agent Deployment
How-to create and register
Prerequisites
- You are an admin in Azure and have installed Terraform (>= 1.12.2) with Azure Auth (for step 2).
- You are an Account Owner (for steps 1 and 3).
- If using Service Principal auth (optional): The identity running
terraform applyneeds Entra ID permissions to create app registrations (Application.ReadWrite.Allor the "Application Developer" directory role), create service principals, and assign app roles. See auth type details in step 2.
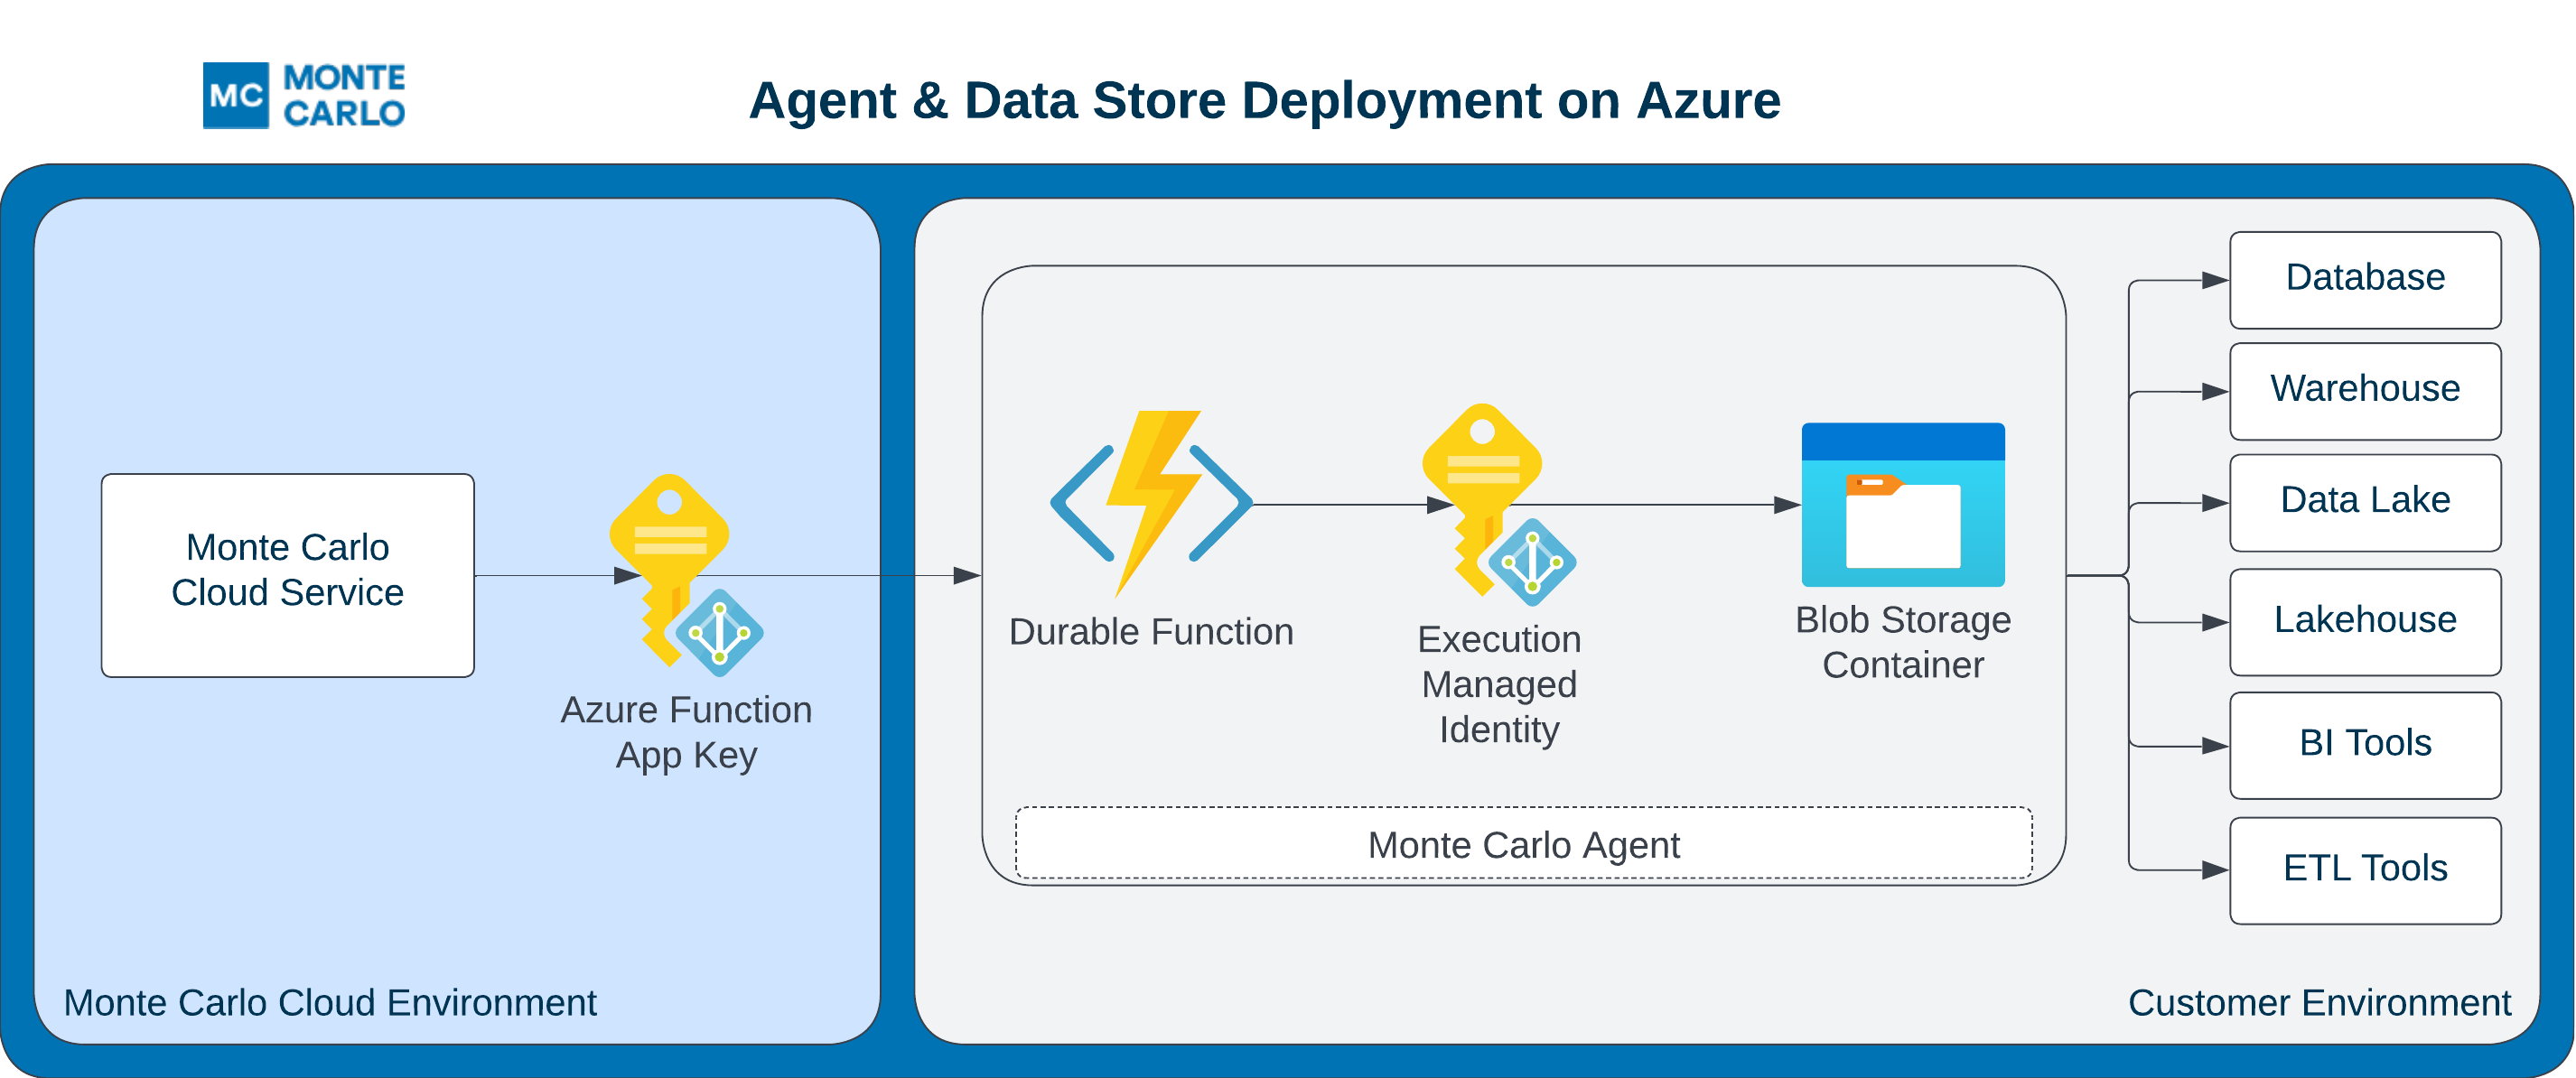
This guide outlines how to setup an Agent (with object storage) in your Azure cloud.
The FAQs answer common questions like how to review resources and what integrations are supported.
Steps
1. Provision the Agent in Monte Carlo
Before deploying any Azure resources, register the agent in Monte Carlo. The backend records the registration and auto-provisions the collection node that this agent will pair with; you'll complete registration in step 3 after the Azure resources are up.
UI
Navigate to settings/deployments and click Add. Choose the "Azure" Platform and "Data store + agent" type, supply a deployment name, then click Provision. Monte Carlo creates the agent and routes you to the Edit page, which you'll return to in step 3.
CLI
The CLI registers an Azure agent in a single command — there's no separate provision step. After deploying the Azure resources in step 2, you'll run register-azure-agent once in step 3 with the deployed Function URL and Application Key.
Using Private Link?If you want the Monte Carlo Platform to connect to this agent privately, now is the time to request the Private Link — provisioning above creates the collection node that will connect to your private endpoint. Follow the Azure Private Link guide for the full flow (deploy with
disable_public_inbound = true, request the endpoint, approve it, then complete registration) instead of continuing with the steps below.
2. Deploy the Agent
After provisioning the agent above, deploy the Azure resources. You can use the mcd-agent Terraform module to deploy the Agent and manage resources as code (IaC).
Choosing an auth type
The Terraform module supports two authentication methods, controlled by the auth_type variable:
| Auth type | Variable value | How it works |
|---|---|---|
| Function App Key (default) | AZURE_FUNCTION_APP_KEY | Monte Carlo authenticates to the agent using the Azure Function App's host key, passed via x-functions-key header. No Entra ID configuration needed — this is the simpler option. |
| Service Principal | AZURE_FUNCTION_SERVICE_PRINCIPAL | Monte Carlo authenticates using OAuth 2.0 client credentials with an Entra ID service principal. The module automatically creates the necessary Entra ID app registrations, enables Easy Auth on the Function App, and grants the caller a scoped app role. No shared keys — token-based auth with scoped app roles. |
| Custom Auth Headers | N/A (configured in Monte Carlo UI) | Monte Carlo includes user-defined HTTP headers on every request to the agent. Use this when the agent is deployed behind a reverse proxy or API gateway that requires custom authentication headers (e.g. API keys, bearer tokens, or other proprietary headers). The agent itself and any proxy in front of it must validate these headers. See Custom Auth Headers in step 3. |
Choose the option that best fits your security requirements and deploy using the corresponding Terraform config below. If you're using Custom Auth Headers, deploy with either Function App Key or Service Principal first, then switch the auth type to Custom Auth Headers in step 3.
Option A: Function App Key (default)
No additional permissions beyond what's needed to deploy Azure resources (Contributor on the subscription/resource group).
module "apollo" {
  source  = "monte-carlo-data/mcd-agent/azurerm"
}

output "function_url" {
  value       = module.apollo.mcd_agent_function_url
  description = "The URL for the agent."
}

output "function_name" {
  value       = module.apollo.mcd_agent_function_name
  description = "Agent function name."
}

output "resource_group" {
  value       = module.apollo.mcd_agent_resource_group_name
  description = "Agent service resource group."
}
Option B: Service Principal
The deploying identity (whoever runs terraform apply) additionally needs Entra ID permissions to:
- Create app registrations (
Application.ReadWrite.Allor the "Application Developer" directory role) - Create service principals
- Assign app roles
The Terraform Azure AD provider (azuread) must also be configured. The module already declares this provider in its provider.tf.
The caller's client secret is stored in Terraform state. Use a secure remote backend (e.g., Azure Storage with encryption) to protect it.
module "apollo" {
  source    = "monte-carlo-data/mcd-agent/azurerm"
  auth_type = "AZURE_FUNCTION_SERVICE_PRINCIPAL"
}

output "function_url" {
  value       = module.apollo.mcd_agent_function_url
  description = "The URL for the agent."
}

output "function_name" {
  value       = module.apollo.mcd_agent_function_name
  description = "Agent function name."
}

output "resource_group" {
  value       = module.apollo.mcd_agent_resource_group_name
  description = "Agent service resource group."
}

output "auth_type" {
  value       = module.apollo.mcd_agent_auth_type
  description = "The auth type configured for this agent deployment."
}

# These values are provided to Monte Carlo when registering the agent
output "sp_credentials" {
  value = {
    tenant_id     = module.apollo.mcd_agent_sp_tenant_id
    client_id     = module.apollo.mcd_agent_sp_client_id
    client_secret = module.apollo.mcd_agent_sp_client_secret
    audience      = module.apollo.mcd_agent_sp_audience
  }
  sensitive = true
}
Deploy
You can build and deploy via:
terraform init && terraform applyPlease note that this module is configured to delete all resources when the resource group is deleted (e.g., when executing terraform destroy). Ensure you review your resources and take appropriate measures before proceeding. For more information, see here.
When deploying an agent, if you wish to connect to a VNet, please see the details here. Specifying a VNet is not strictly required to run the agent, but it enables certain connectivity scenarios, such as when you have an IP allowlist for your resource, want to peer, use PrivateLink for egress, or deploy within your existing network.
Additional module inputs, options, and defaults can be found here. Other details can be found here.
Post-deploy: Retrieving credentials
For Function App Key auth, retrieve the function URL and application key as described in the FAQ below.
For Service Principal auth, retrieve the SP credentials after terraform apply:
terraform output -json sp_credentialsThis returns tenant_id, client_id, client_secret, and audience — all four values are needed when registering the agent with Monte Carlo in step 3.
What the module creates for Service Principal auth
When auth_type = "AZURE_FUNCTION_SERVICE_PRINCIPAL" is set, the module additionally creates:
- An Entra ID app registration for the Function App with an
api://identifier URI (the audience) - A service principal for that app registration
- A second Entra ID app registration for the caller (Monte Carlo's identity)
- A service principal and client secret for the caller
- An app role assignment granting the caller the
FunctionApp.Callrole - Easy Auth (
auth_settings_v2) configuration on the Function App that validates bearer tokens against the app registration
All of this is fully managed by Terraform — you don't need to manually configure anything in the Azure portal or Entra ID.
When deploying with Service Principal auth, Monte Carlo validates that Easy Auth has been correctly configured on the Function App. If the validation fails, the deployment will raise an exception — ensuring that auth is never left in a partially configured state.
3. Complete Registration
After deploying the Azure resources, complete registration by supplying the required credentials. The inputs differ depending on the auth type you chose in step 2. Monte Carlo auto-enables the agent on successful completion.
After this step is complete all supported integrations using this deployment will automatically use this agent (and object store for troubleshooting and temporary data). You can add these integrations as you normally would using Monte Carlo's UI wizard or CLI.
Function App Key auth
See here for examples on how to retrieve Terraform output (i.e. registration input). Note that the Application Key is the "Default Host Key" in Azure Function Apps.
UI
If you are onboarding a new account, you can also register by following the steps on the onboarding screen
- Open the agent's Edit page (Monte Carlo will have routed you there after step 1; you can also navigate from settings/deployments).
- Fill in the Endpoint (function URL) and Application key, then click Enable. Monte Carlo validates the configuration and enables the agent.
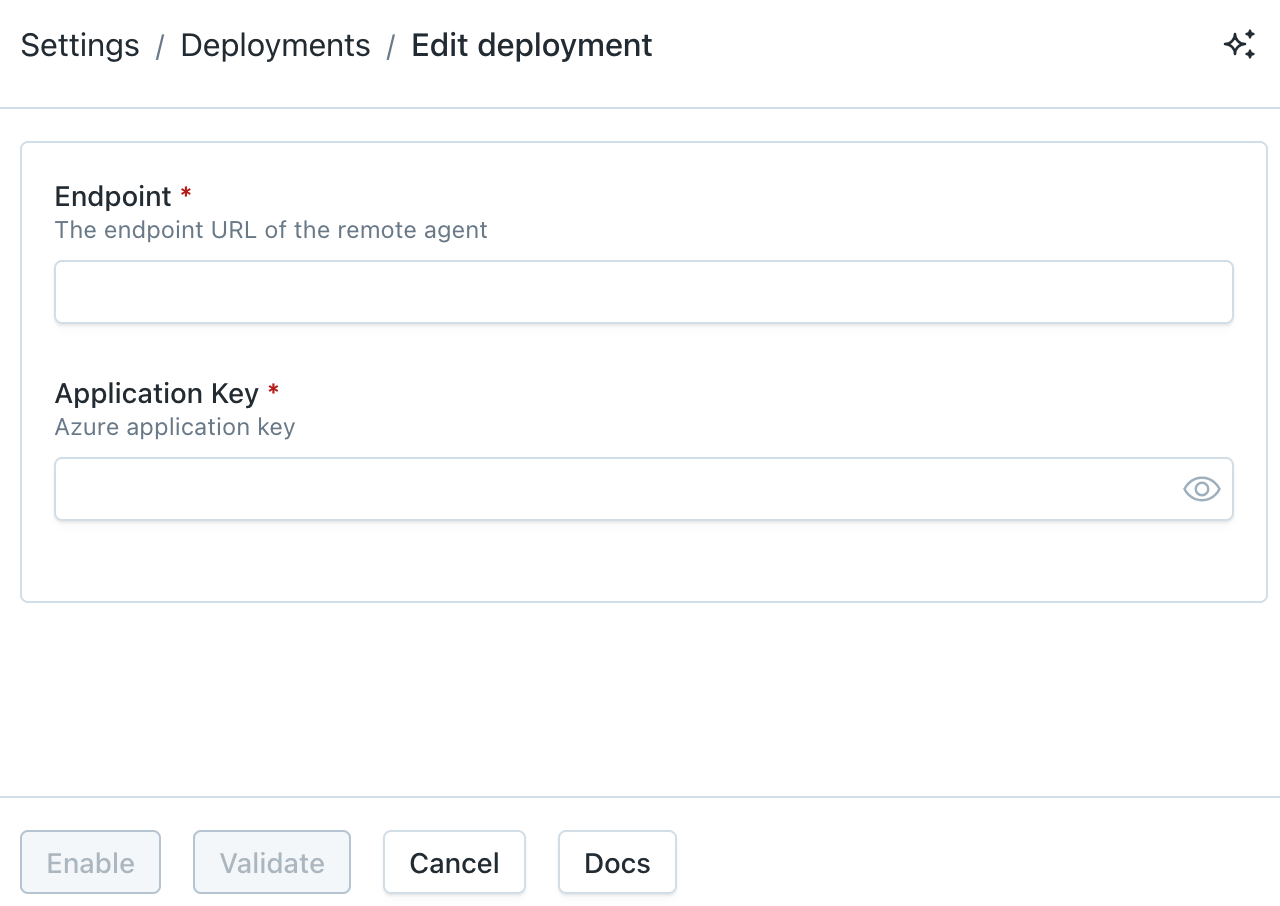
Azure Agent Registration Wizard
CLI
Register the agent with the deployed Function URL and Application Key:
montecarlo agents register-azure-agent \
  --url <function-url> \
  --app-key <function-app-key>
See reference documentation here. And see here for how to install and configure the CLI.
Service Principal auth
Retrieve the SP credentials from Terraform output (terraform output -json sp_credentials) and the function URL (terraform output function_url).
UI
If you are onboarding a new account, you can also register by following the steps on the onboarding screen
- Open the agent's Edit page (Monte Carlo will have routed you there after step 1; you can also navigate from settings/deployments).
- Fill in the Endpoint (function URL), Tenant ID, Client ID, Client Secret, and Audience from the SP credentials output, then click Enable. Monte Carlo validates the configuration and enables the agent.
CLI
Register the agent with the deployed Function URL and Service Principal credentials:
montecarlo agents register-azure-agent \
  --url <function-url> \
  --auth-type AZURE_FUNCTION_SERVICE_PRINCIPAL \
  --sp-tenant-id <tenant-id> \
  --sp-client-id <client-id> \
  --sp-client-secret <client-secret> \
  --sp-audience <audience>
See reference documentation here. And see here for how to install and configure the CLI.
Custom Auth Headers
Use this option when the agent is deployed behind a reverse proxy or API gateway that requires specific HTTP headers for authentication. Monte Carlo will include these headers on every request it makes to the agent endpoint.
Custom Auth Headers is an advanced option intended for agents behind proxies or API gateways. In most deployments, Function App Key or Service Principal auth is recommended.
UI
- Open the agent's Edit page from settings/deployments.
- Under Authentication method, select Custom auth headers.
- Enter the Endpoint URL (the proxy or gateway URL that fronts the agent).
- Click Add header and provide the header name and value for each header your proxy requires. Header names must conform to RFC 7230 token syntax (e.g.
X-Api-Key,Authorization). Values are treated as secrets and masked in the UI. - Click Enable. Monte Carlo validates connectivity by sending a health check with the configured headers.
When running a health check, the response includes an
auth_infofield showing the custom header key names (not values) that were sent — useful for confirming the correct headers are being passed to your proxy.
FAQs
Why am I seeing an "account limit reached" error when I click Provision?
Monte Carlo applies a per-account limit on the number of provisioned deployments to prevent runaway resource allocation. If you hit it, the Provision action fails with an error like:
Could not register deployment
Cannot allocate new resources for a <platform> agent, account limit reached. Please contact support.
If you need to provision more deployments, reach out via our Support Agent or contact your account representative and we'll raise the limit.
What integrations does the Agent support?
The agent supports all integrations except for the following:
- Data Lake Query Logs from S3 Buckets are not supported: Learn more.
- Tableau requires using the connected app authentication flow: Learn more.
Note that onboarding (connecting) any supported integration using this deployment will use the agent if one is provisioned. Otherwise, any other integrations will use the cloud service to connect directly.
Some integrations, such as dbt Core, Atlan, and Airflow, either leverage our developer toolkit or are managed by a third party and do not require an agent. These integrations natively push data to Monte Carlo, so an agent is not needed.
Can I use more than one Agent?
Yes, please reach out via our Support Agent or contact your account representative if you would like to use more than one.
Can I review agent resources and code?
Absolutely! You can find details here:
How do I retrieve registration input from Terraform?
The endpoint (url) can be retrieved via: terraform output function_url.
The application key (default) can be fetched via the az functionapp keys list command using the function name and resource group from terraform output. For instance:
az functionapp keys list -g $(terraform output -raw resource_group) -n $(terraform output -raw function_name) | jq -r '.functionKeys.default'If you prefer this value can also be retrieved from the Azure portal from Function Apps service page. For instance:
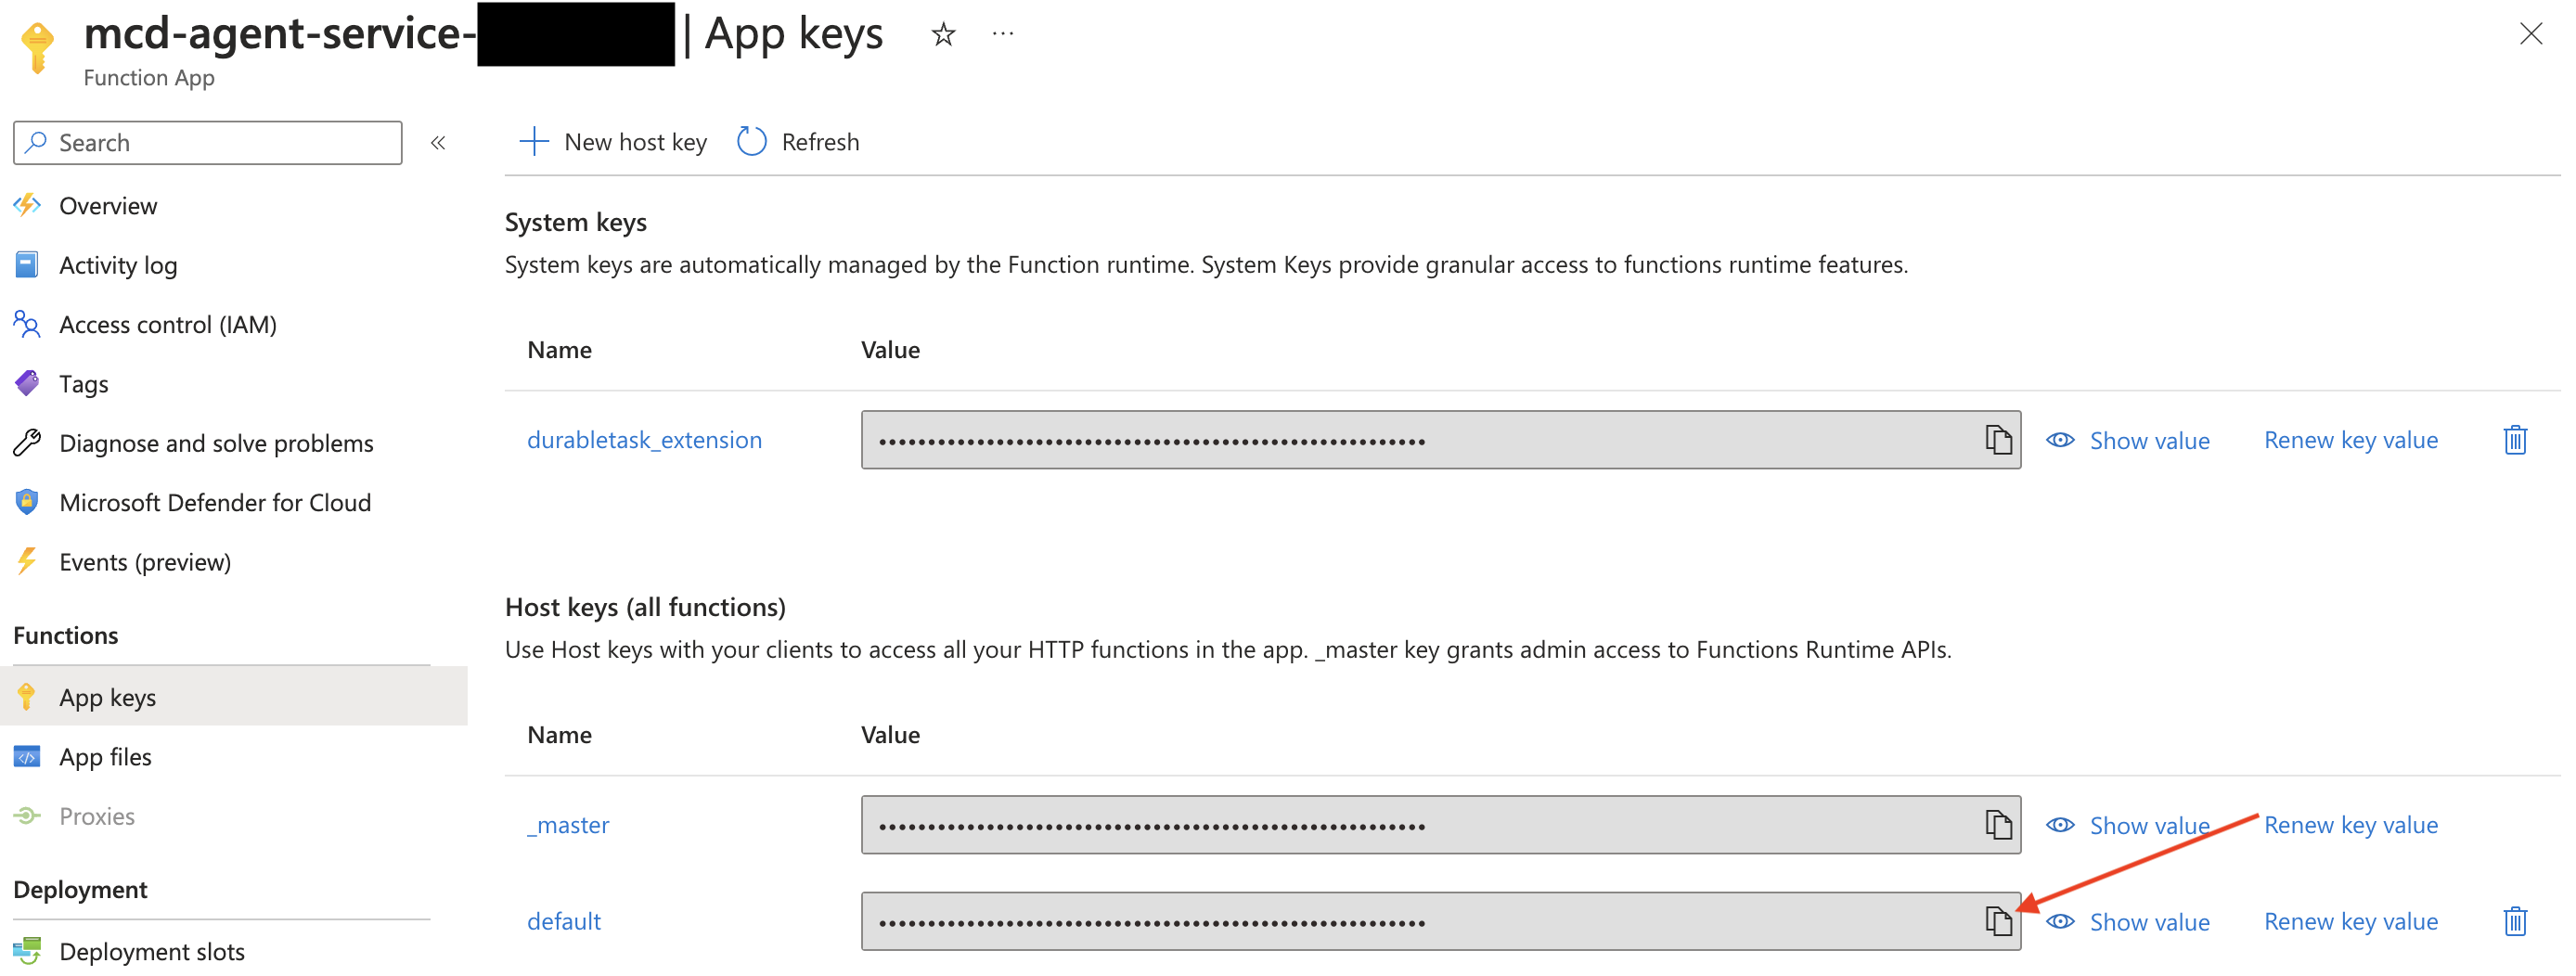
Azure portal example
How do I monitor the Agent?
Please refer to the documentation here.
How do I upgrade the Agent?
Please refer to the documentation here.
Does the Agent run as root?
No. Since version 1.8.0 the agent container runs as a non-root user (mcdagent, UID/GID 1000) inside the Azure Functions runtime. The Functions host (ASP.NET Core Kestrel) binds to port 8080 instead of 80 — non-root processes can't bind to privileged ports (below 1024). App Service auto-discovers the port from the image's EXPOSE directive, so no configuration change is required for most deployments.
If your App Service has WEBSITES_PORT explicitly set to 80, the upgrade will fail with ContainerTimeout: Container did not start within expected time limit of 230s. To fix this, either remove the WEBSITES_PORT app setting (so App Service auto-discovers 8080 from the image) or update it to WEBSITES_PORT=8080. If you have never set WEBSITES_PORT manually, no action is required.
Can I further constraint inbound access (ingress) to the Agent?
Absolutely! By default (Function App Key auth) this is done via the function app key. You can also use Service Principal auth for token-based authentication with scoped app roles — no shared keys required.
If you prefer, you can further restrict requests via an IP allowlist. For instance you can:
- Please refer to the documentation for the list of IP addresses that need to be allowlisted for your platform version.
- Update the configuration for the agent's function app. For instance on the Azure portal*:
- Navigate to the Networking setting and select the "Public network access" configuration.
- Update the network access to "Enabled from select virtual networks and IP addresses" and add a rule for the IP address from step #1. Save your configuration.
*Note that changes made on the Azure portal might be reverted via Terraform. You might want to consider using the ip_restriction block to manage as code.
For more information on connectivity, please refer to our Network Connectivity documentation.
Can I use private endpoints to configure inbound access (ingress) to the agent?
Yes, please refer to the documentation for more details.
Can I further constraint outbound access (egress) from the Agent?
Absolutely! As with any Azure Function, you can control egress in multiple ways. You can find more details here.
Some scenarios where you might want to do this can include:
- You want to allowlist IP connectivity between the agent and your resource.
- You want to deploy the agent in a new VNet with peering and/or set up a Private Link between services.
- You want to deploy the agent in your existing VNet.
Depending on your integration, this might be necessary to establish connectivity.
To connect the agent to a VNet, specify a subnet using the subnet_id variable in the module (version 0.1.3 or newer required). If needed, you can use this Azure CLI command to fetch the subnet ID.
Note that the subnet must already be delegated to Microsoft.Web/serverFarms, or the deployment will fail.
Can I use an existing resource group?
Yes, you can specify the name of an existing resource group by using the existing_resource_group_name variable in the module (version 1.0.3 or newer required).
Please note that we strongly recommend not sharing resource groups with other jobs, as Monte Carlo may overwrite existing data.
Can I use existing storage accounts and private endpoints to access them?
Please note that certain features requiring pre-signed URLs are not supported with private storage accounts. For the Azure agent, this mainly impacts the following scenarios:
- Large results:
- You can either request a Private Link to the storage account from the Monte Carlo Cloud, or reach out via our Support Agent to increase the result size limit so that pre-signed URLs are not needed for larger results.
- If you do not take one of these actions, the agent may not operate as expected, and jobs may be affected—even if you follow the example provided below.
- If you choose to enable a Private Link for the storage account, you may also want to establish a Private Link for general communication between Monte Carlo and the agent. Please note that this would require two separate Private Link requests:
- Downloading breach and query results as a CSV:
- This is not supported when using private storage accounts.
Yes, you can create the required storage accounts and configure the Terraform module to use them. When creating the storage accounts, you can disable public access and create private endpoints to allow access from the VNet used by the agent.
Please note that version 1.0.3 or newer of the agent module is required and that we strongly recommend not sharing storage accounts with other jobs, as Monte Carlo may overwrite existing data.
See an example of this here of how this can be done using Terraform. You can find the general requirements for using this feature below, in case you wish to create the storage accounts by another method.
Please note the following requirements when using this feature:
-
VNet with at least two subnets:
- One subnet for the agent, delegated to
Microsoft.Web/serverFarms, as described in the example above. - Another subnet for the private endpoints.
- One subnet for the agent, delegated to
-
Two storage accounts:
- First, create a storage account for Durable Functions:
- You must create a share in this account. The name of this share is one of the variables you need to pass to the agent module.
- You need to create private endpoints for the following sub-resources in the subnet to be used for private endpoints:
blob,table,file, andqueue. - For each private endpoint, you must enable "Private DNS Zone" integration. For example, for the
blobsub-resource, the private endpoint must be available as<storage_account_name>.privatelink.blob.core.windows.netin the VNet where the agent is deployed.
- Second, create a storage account for Agent data (i.e., the data store):
- You must create a container in this account. The name of this container is one of the variables you need to pass to the agent module.
- You need to create a single private endpoint for the
blobsub-resource in the subnet designated for private endpoints. - "Private DNS Zone" integration must be enabled. The private endpoint should be accessible as
<storage_account_name>.privatelink.blob.core.windows.netin the VNet where the agent is deployed.
- First, create a storage account for Durable Functions:
-
Use the following configuration for the agent, specifying these variables:
existing_storage_accounts = { agent_durable_function_storage_account_name = <name of the durable functions storage account> agent_durable_function_storage_account_access_key = <access key to access the durable functions storage account> agent_durable_function_storage_account_share_name = <name of the share created in the durable functions storage account> agent_data_storage_account_name = <name of the storage account used for agent data> agent_data_storage_container_name = <name of the container created in the storage account used for agent adata> private_access = true } subnet_id = <ID of the subnet for the agent> -
Either request a Private Link to the storage account from Monte Carlo Cloud or reach out via our Support Agent to increase the result size limit, so that pre-signed URLs are not required for larger results.
You can find additional documentation about restricting access to storage accounts from Azure Functions here.
Can I use managed identities instead of access keys for the storage account used for Durable Functions?
Managed identities for the storage account used by Azure Durable Functions are not officially supported or certified by Monte Carlo. While Azure allows this configuration, it has not been tested by Monte Carlo and is not supported by our Terraform module. Enabling this configuration is considered a customization and may limit Monte Carlo’s ability to provide support.
Managed identities are supported for the storage account used for agent data (data sampling).
How do I check the reachability between Monte Carlo and the Agent?
Please refer to the documentation here.
How do I debug connectivity between the Agent and my integration?
Please refer to the documentation here.
How do I set additional environment variables on the agent?
Some optional agent features are enabled with environment variables (for example, Oracle Thick mode via MCD_ORACLE_THICK_MODE).
The mcd-agent Terraform module accepts an additional_env_vars input — a map of environment variable name to value that is passed through to the agent. Add it to your module "apollo" block:
  additional_env_vars = {
    MCD_ORACLE_THICK_MODE = "true"
  }
Then re-run terraform apply. This is an advanced option used to enable optional agent features (for example, Oracle Thick mode).
Updated 9 days ago