Updating an Integration
About
The page outlines how to update integrations after you've added them. This can entail updating users, and other connection information.
Note that this does not apply if you are using self-hosted credentials, for which you will need to update the secret directly. See details on that scenario here.
Importantly, when updating any integration information, please ensure that the previous user credentials, etc. remain valid for at least 3 hours after changing them in Monte Carlo.
Otherwise, any in-flight jobs will fail, which can cause gaps, failed monitors, and might impact models.
How-to Guide
You can update integrations either with the Monte Carlo UI or API.
The easiest and most recommended way is via the UI, as that will automatically run all connection validators for you.
Via the UI
-
Navigate to the Monte Carlo settings page:
From there, select to the integrations tab in the Monte Carlo portal. -
Find the integration you want to update:
From there, select the "More Options" icon (vertical ellipsis/kebab), and then select "Edit."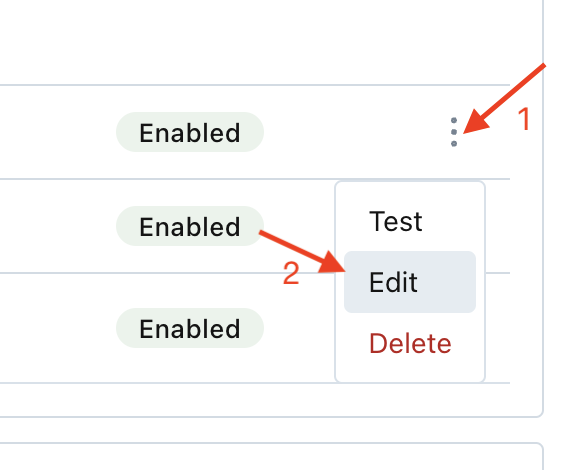
-
Update any relevant connection details:
From there, select "Save" and follow the wizard's recommendations to review any validations or continue.
Via the API
To quickly get started experimenting or testing with any Monte Carlo APIs, you can use the API Explorer!
Alternatively, you can generate an API key and use tools such as cURL or Postman to make API calls.
-
Start an update:
Using the update API that corresponds to your integration, submit the changes you want to make. This API varies by integration and will return a key ID that you will use in subsequent steps. Popular ones are listed below:Additional APIs can be found by searching for the
update*CredentialsV2pattern in our API docs here.Note that you can use this API to find the connection ID needed as input for the the above APIs.
query getPlatformServices { getPlatformServices { connections { name uuid connectionType } } } mutation updateSnowflakeCredentialsV2 { updateSnowflakeCredentialsV2( changes: {user: "EXAMPLE_USER_NAME", password: "EXAMPLE_PASS"} connectionId: "<Connection uuid from getPlatformServices>" ) { result { key success } } } -
Test the updated credentials:
Using the temporary key ID returned in the previous step and the relevant connection type, use the testUpdatedCredentialsV2 API to validate your changes. There are many available validations per integration, but at a minimum, you should use thevalidate_connectionvalidation.mutation testUpdatedCredentialsV2 { testUpdatedCredentialsV2( connectionType: "snowflake" tempCredentialsKey: "<Key returned in updateSnowflakeCredentialsV2>" validationName: "validate_connection" ) { validationResult { success validationName description errors { cause stackTrace friendlyMessage resolution } warnings { cause stackTrace friendlyMessage resolution } } } } -
Save the updated credentials:
Using the temporary key ID returned in step #1 and the relevant connection ID, use the updateCredentialsV2 API to submit your changes.mutation UpdateCredentialsV2 { updateCredentialsV2( connectionId: "<Connection uuid used in updateSnowflakeCredentialsV2>", tempCredentialsKey: "<Key returned in updateSnowflakeCredentialsV2>" ) { success updatedAt } }
Updated 8 days ago