MCP Server (Public Preview)
How AI agents can interact with your Monte Carlo data
Overview
The Monte Carlo MCP Server provides AI agents and assistants with direct access to Monte Carlo's data observability platform through the Model Context Protocol (MCP). This integration enables seamless interaction with Monte Carlo's monitoring, alerting, and data quality capabilities directly from supported AI environments like Cursor, Claude Desktop, and Visual Studio Code.
Available Use-cases and Tools
- APIs to help users understand alerts: getAlerts
- APIs to help users manipulate alerts: updateAlerts, setAlertOwner, createOrUpdateAlertComment
- APIs to answer questions about assets: search, getTable, getQueriesForTable, getQueryData
- API to understand asset dependencies: getTableLineage
- Other APIs to ensure smooth interaction with the MCP server: testConnection, getDomains, getUser, getCurrentTime
Users can leverage it to ask questions such as:
- "Are there any alerts assigned to me in the past day?"
- "How's the health status of table X?"
- "What are some trends and patterns in my alerts?"
- "What tables should I add monitors for?"
- "When was my table Y last updated?"
- "what assets and reports would this data issue impact?"
- "Can I deprecate table X?", and many more.
| Category | Tool Name | Description | Example Use Cases |
|---|---|---|---|
| Alerts | getAlerts | Retrieve alerts and incidents from Monte Carlo with filtering options | • Get recent data quality alerts for a specific time period • Filter alerts by severity, status, or data assets • Generate reports on incident trends and patterns |
| Alerts | updateAlert | Update alert status, severity, or metadata | • Mark alerts as acknowledged or resolved • Declare incidents by setting severity levels • Add custom names to alerts for tracking |
| Alerts | setAlertOwner | Assign or remove alert ownership | • Assign alerts to team members for investigation • Clear ownership when transferring responsibility • Manage alert assignment workflows |
| Alerts | createOrUpdateAlertComment | Add comments to alerts for collaboration | • Document investigation findings and next steps • Share context with team members on alert resolution • Track alert resolution progress and decisions |
| Data operations | getQueriesForTable | Retrieve query logs for a table, showing reads or writes over time | • Analyze table usage patterns and frequency • Identify which queries are updating specific tables • Investigate data lineage through query analysis |
| Data operations | getQueryData | Get full query text and metadata for specific query occurrences | • Review complete SQL for truncated query snippets • Analyze query performance and execution details • Debug data pipeline issues |
| Data operations | createValidationMonitorMac | Generate YAML configuration for validation monitors | • Create data quality rules using monitors-as-code • Define custom validation logic for specific tables • Automate monitor deployment through CI/CD pipelines |
| Data operations | getValidationPredicates | List available predicates for creating validation monitors | • Discover supported validation rule types • Understand predicate syntax and parameters • Build complex validation conditions |
| Assets/Catalog | getTable | Get detailed table information including schema, statistics, and metadata | • Understand table structure and data types • Review table statistics and monitoring capabilities • Explore table metadata and tags |
| Assets/Catalog | search | Search the Monte Carlo catalog for tables, views, dashboards, and other assets | • Find tables by name or description across warehouses • Discover related data assets and BI reports • Locate specific datasets within large data catalogs |
| Assets/Catalog | getDomains | List available domains in your Monte Carlo workspace | • Understand data organization and ownership • Filter other operations by domain • Navigate domain-based access controls |
| Dependencies | getTableLineage | Explore upstream and downstream data dependencies | • Map data flow between tables and systems • Understand impact analysis for schema changes • Visualize end-to-end data pipelines |
| Other | testConnection | Verifies connectivity and authentication with the Monte Carlo API | • Test MCP setup during initial configuration • Validate credentials and network connectivity • Troubleshoot connection issues |
| Other | getUser | Get current user information and permissions | • Verify authentication and user context • Check user permissions and access levels • Validate user-specific configurations |
| Other | getCurrentTime | Get current time in ISO format for API compatibility | • Generate time ranges for other API calls • Ensure consistent timestamp formatting • Calculate relative time periods |
See a quick demo below on the MCP server in action:
How to set up
1. Create MCP Server keys
First, you will need to create MCP server keys for authenticating into your own Monte Carlo API access. Note that MCP Server keys are scoped credentials that grant access only to the Monte Carlo MCP Server. They are not the same as standard API keys, and API keys will not work with the MCP Server. Only users with roles: Editors, Monitor Editors, Domain Managers and Account Owners will be able to create MCP Server keys (same as for API keys).
Why separate keys for MCP server?
- Least privilege: MCP keys can’t be reused against other Monte Carlo APIs.
- Operational clarity: Easier to rotate/revoke without affecting other integrations.
Security tips: Treat the Key secret like any other credential. Store it securely (e.g., a secrets manager, 1Password, etc). If it’s lost or exposed, create a new key and revoke the old one.
You can create MCP Server keys via the UI, the CLI, or the GraphQL API.
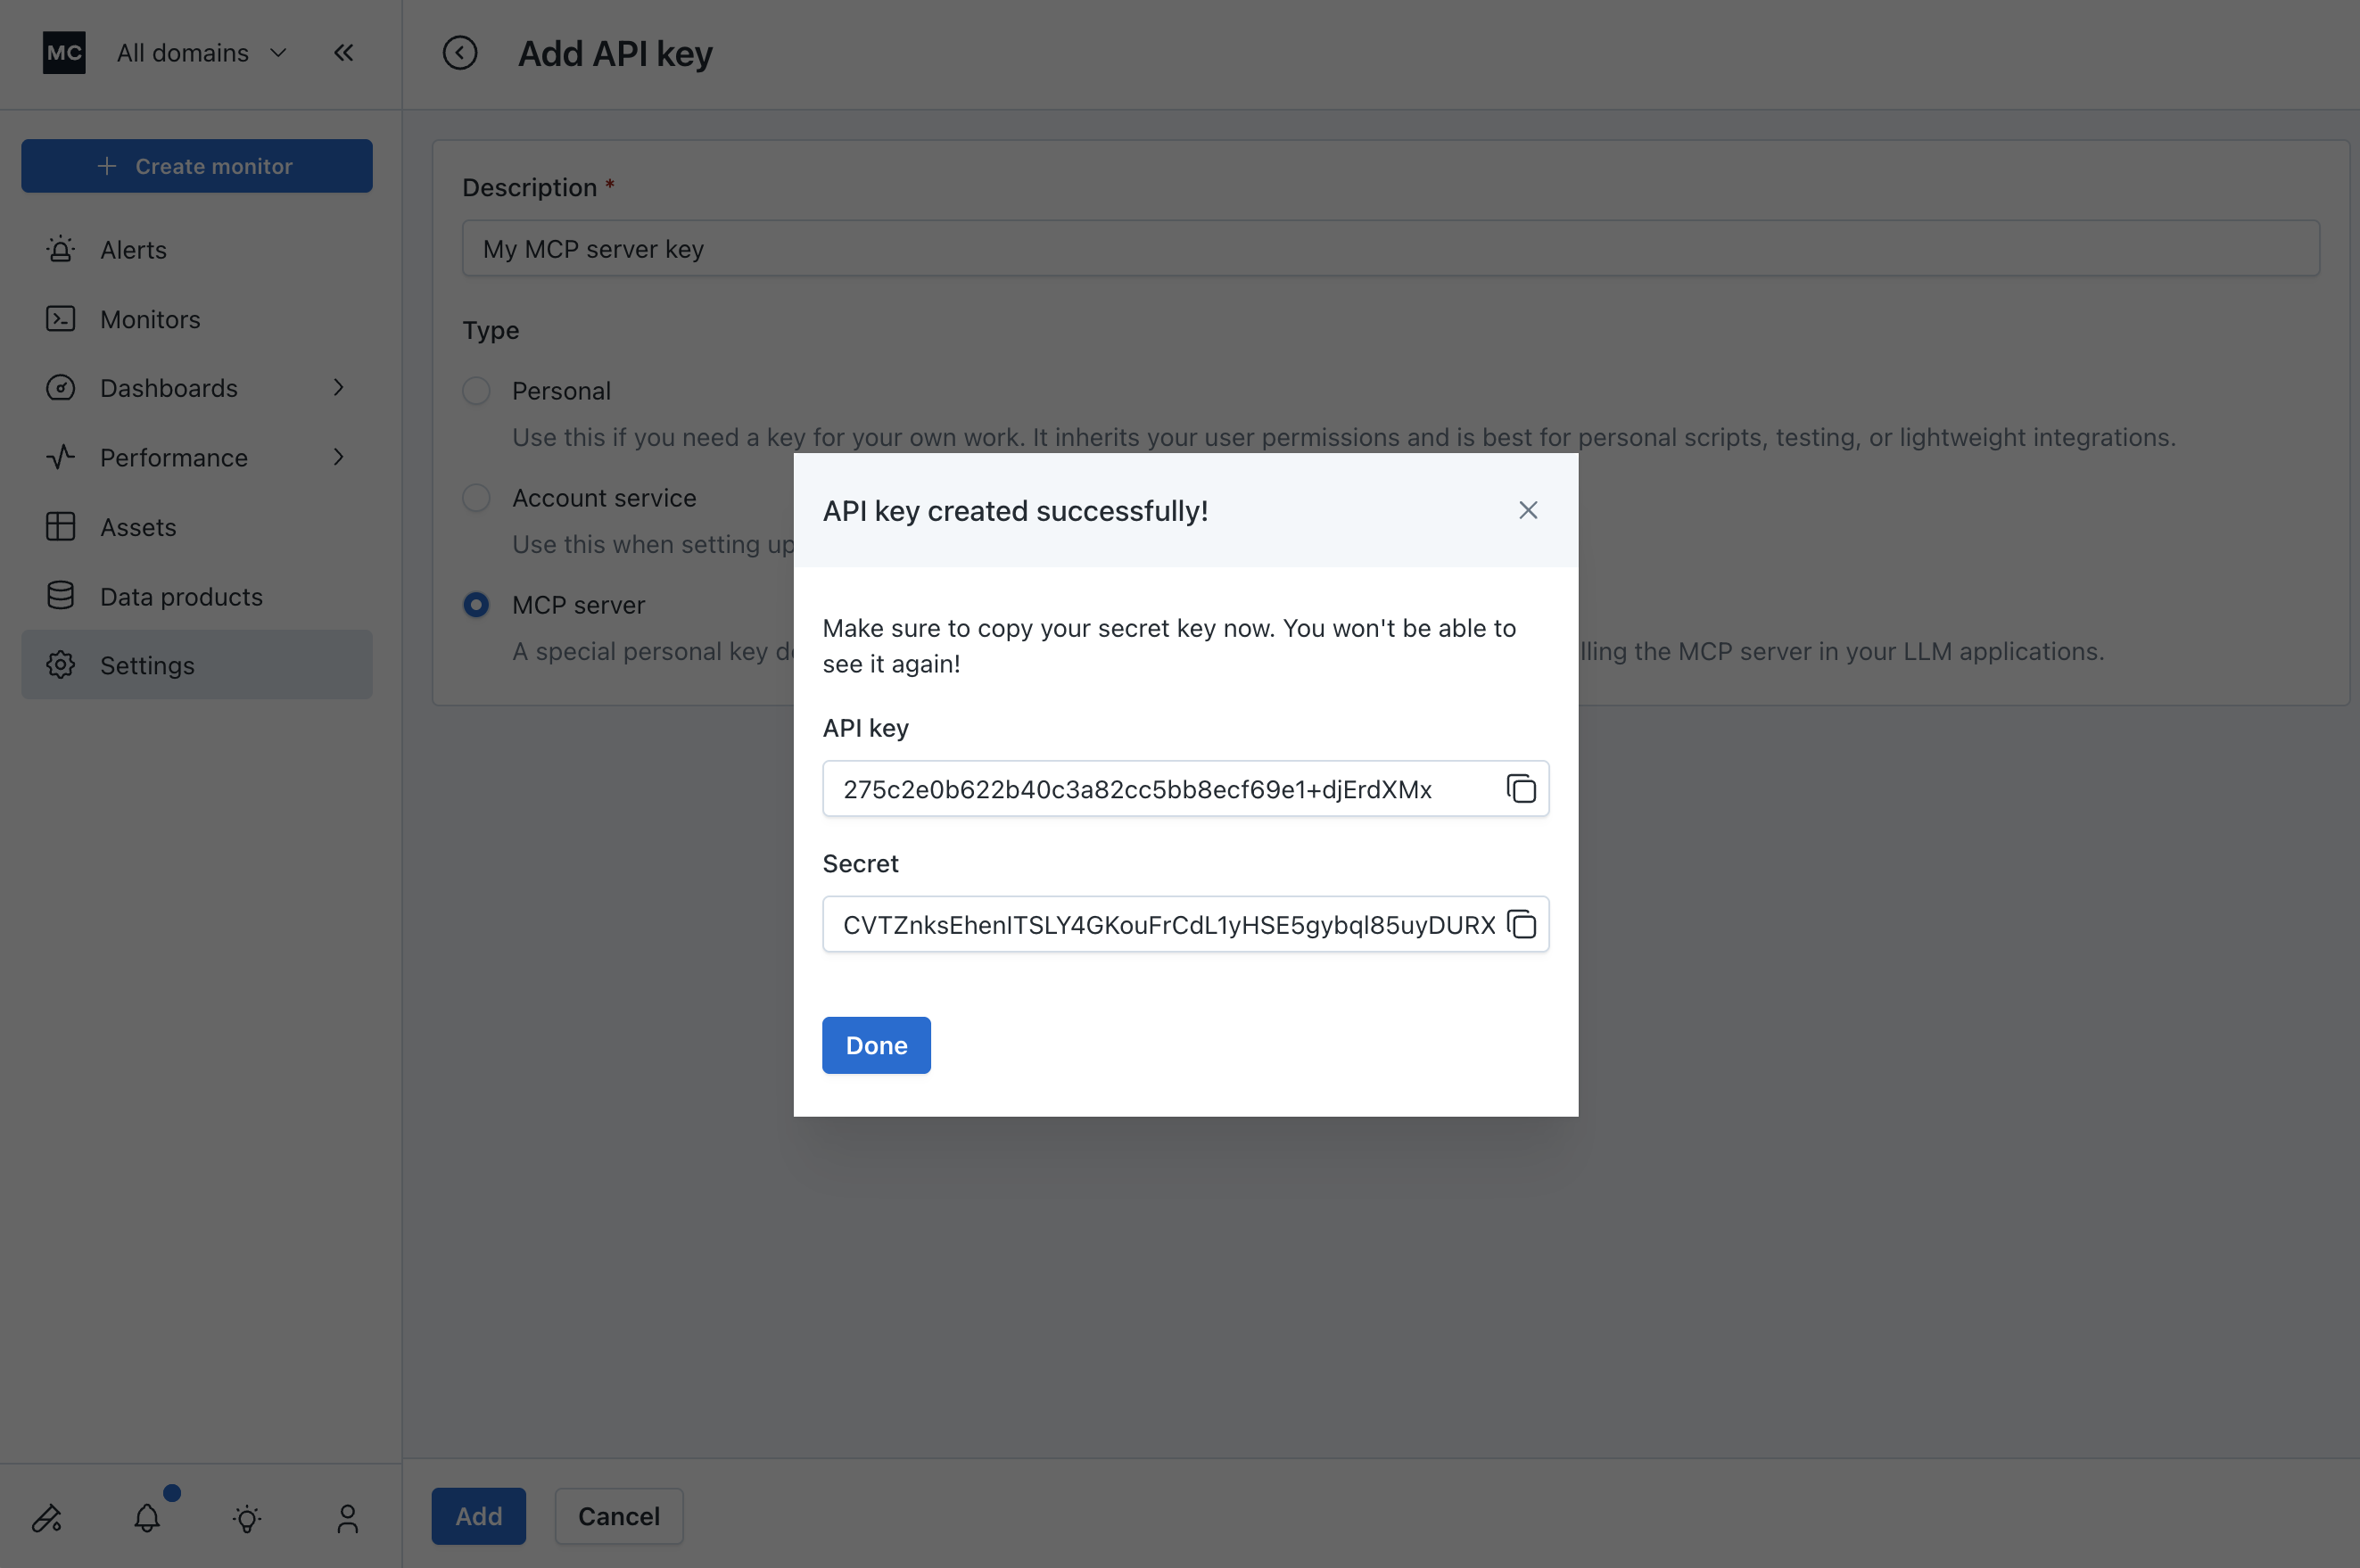
Option A: via UI
Go to Settings -> API Keys in the Monte Carlo UI, click on the blue "Add" button to start creating a MCP server key.

Select "MCP server" as the API key type, add a description to the key, then hit "Add".

Copy your API key and secret. You will use these to install the MCP server in your LLM app.
Option B: via CLI
Prerequisite: You’re logged in to the Monte Carlo CLI with permissions to create integration keys.
montecarlo mcp create-key --description "Local test key"The command returns a Key id and Key secret:
Key id: XXX
Key secret: YYY
Copy both values and store them securely.
Option C: via GraphQL API
Use the createMcpIntegrationKey mutation:
mutation CreateMcpIntegrationKey($description: String) {
    createMcpIntegrationKey(description: $description) {
      key {
        id
        secret
      }
    }
  }
Variables:
{
  "description": "Local test key"
}
Notes:
- The response includes both
idandsecret. Store them securely.
2. Install the MCP Server in your LLM Apps
Prerequisites
- Cursor Version: 1.7.17+ (if you use Cursor)
- VSCode Version: 1.99.3+ (if you use VS Code)
- Claude Desktop Version: 0.13.19+ (if you use Claude)
- Node.js (LTS) + npm installed (this includes
npx) - Network access to your Monte Carlo MCP endpoint (prod or dev).
- Your Key id and Key secret ready.
- MC Cli v0.141.4+ (if you want to create the MCP Server keys using the Cli)
Once you have your Key id and Key secret, add the Monte Carlo MCP Server to your IDE.
Monte Carlo's MCP Server should work for all LLM apps that support MCP. Below are the specific installation instruction for the common LLM applications.
Setup in Cursor
- Open Cursor → Settings.
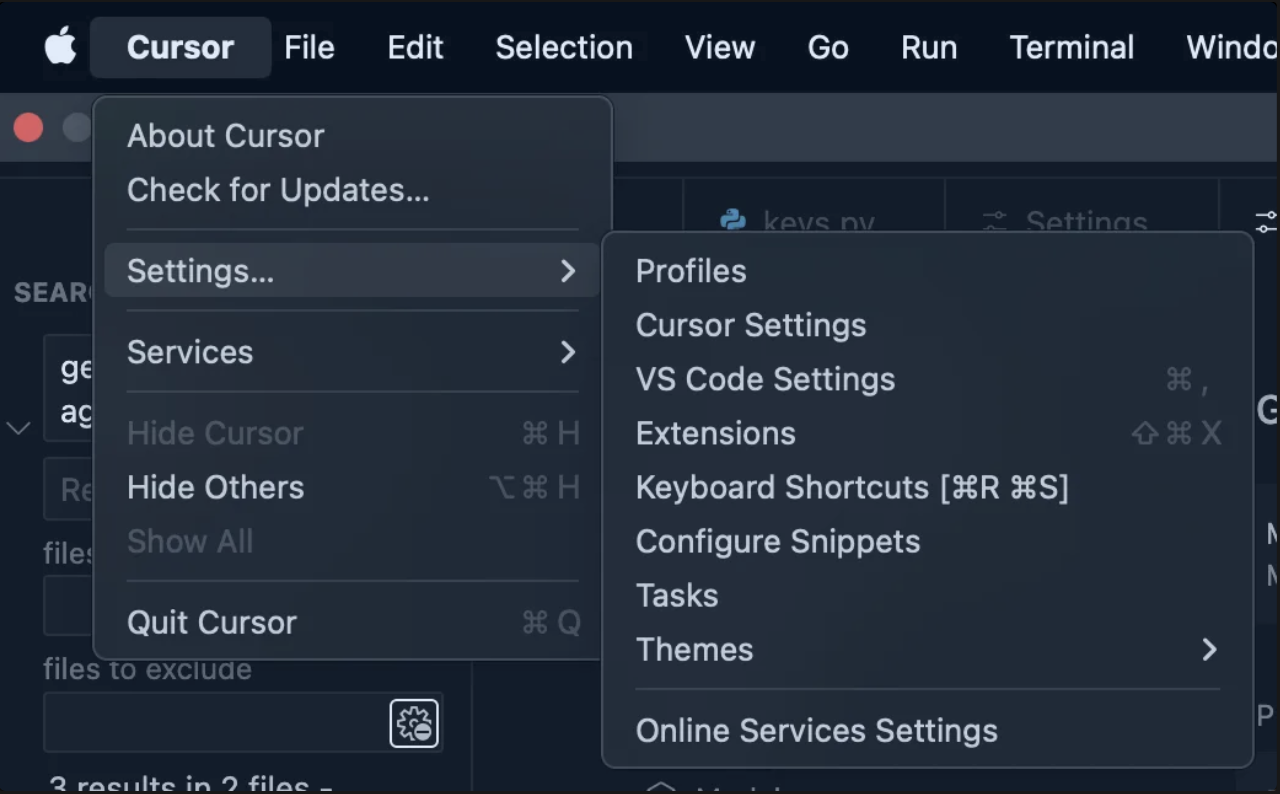
- Select MCP & Integrations.
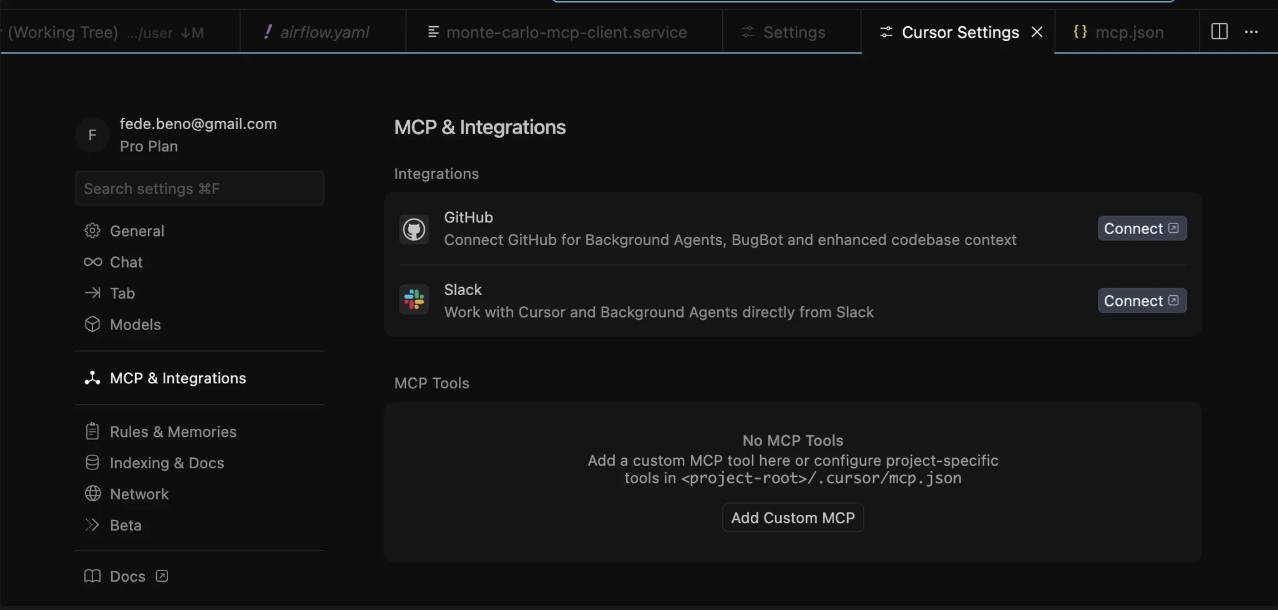
- Click Add Custom MCP. Cursor will open your
mcp.json. If you have no MCPs yet, it looks like:
{
  "mcpServers": {
  }
}- Add the Monte Carlo entry inside
mcpServers(replace<KEY_ID>and<KEY_SECRET>with your values obtained from the previous step. The URL should be:https://integrations.getmontecarlo.com/mcp/):
{
  "mcpServers": {
    "monte-carlo": {
      "command": "npx",
      "args": [
            "-y",
            "mcp-remote",
            "https://integrations.getmontecarlo.com/mcp/",
            "--header",
            "Authorization: Bearer <Key Id>:<Key Secret>"
      ]
    }
  }
}
Alternatively, we also support using custom headers instead of Authorization, so you can use the following:
{
  "mcpServers": {
    "monte-carlo": {
      "command": "npx",
      "args": [
        "-y",
        "mcp-remote",
        "https://integrations.getmontecarlo.com/mcp/",
        "--header",
        "x-mcd-id: <KEY_ID>",
        "--header",
        "x-mcd-token: <KEY_SECRET>"
      ]
    }
  }
}- Save
mcp.jsonand return to Settings → MCP & Integrations. You should see a monte-carlo toggle.

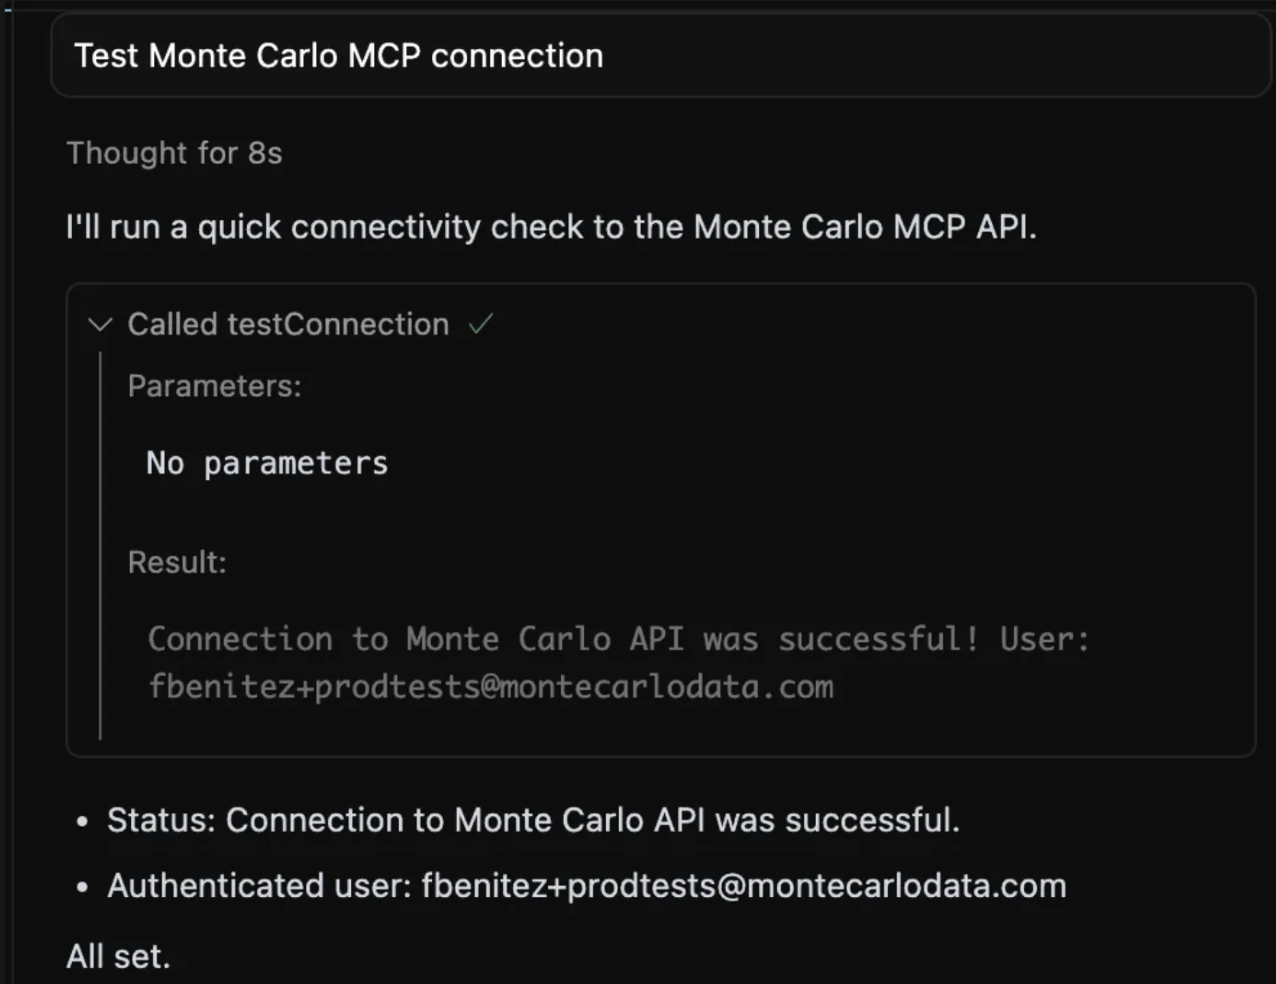
- Turn it on. Open an Agent Chat in Cursor and type:
Test Monte Carlo MCP connection. You should see it call thetestConnectiontool (in some versions it may appear astest_connection).
Setup in Visual Studio Code
- Open “Show and Run Commands” (SHIFT+CMD+P in Mac or SHIFT+Ctrl+P in Windows)
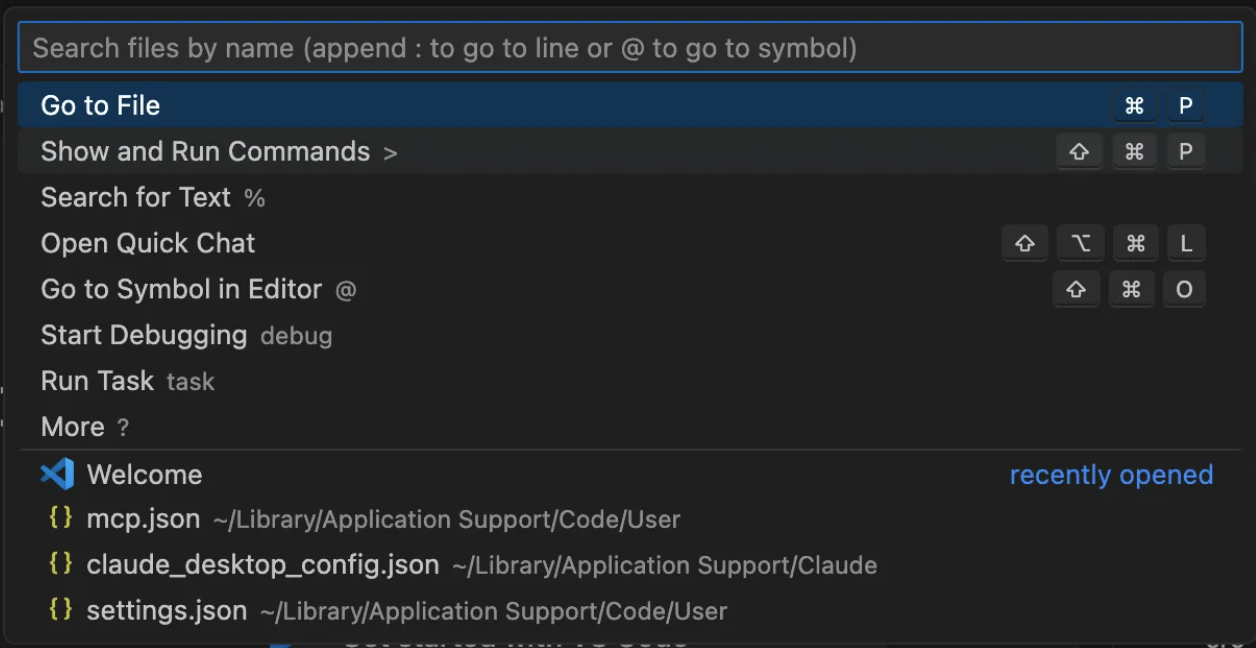
- Type “MCP: Open User Configuration”
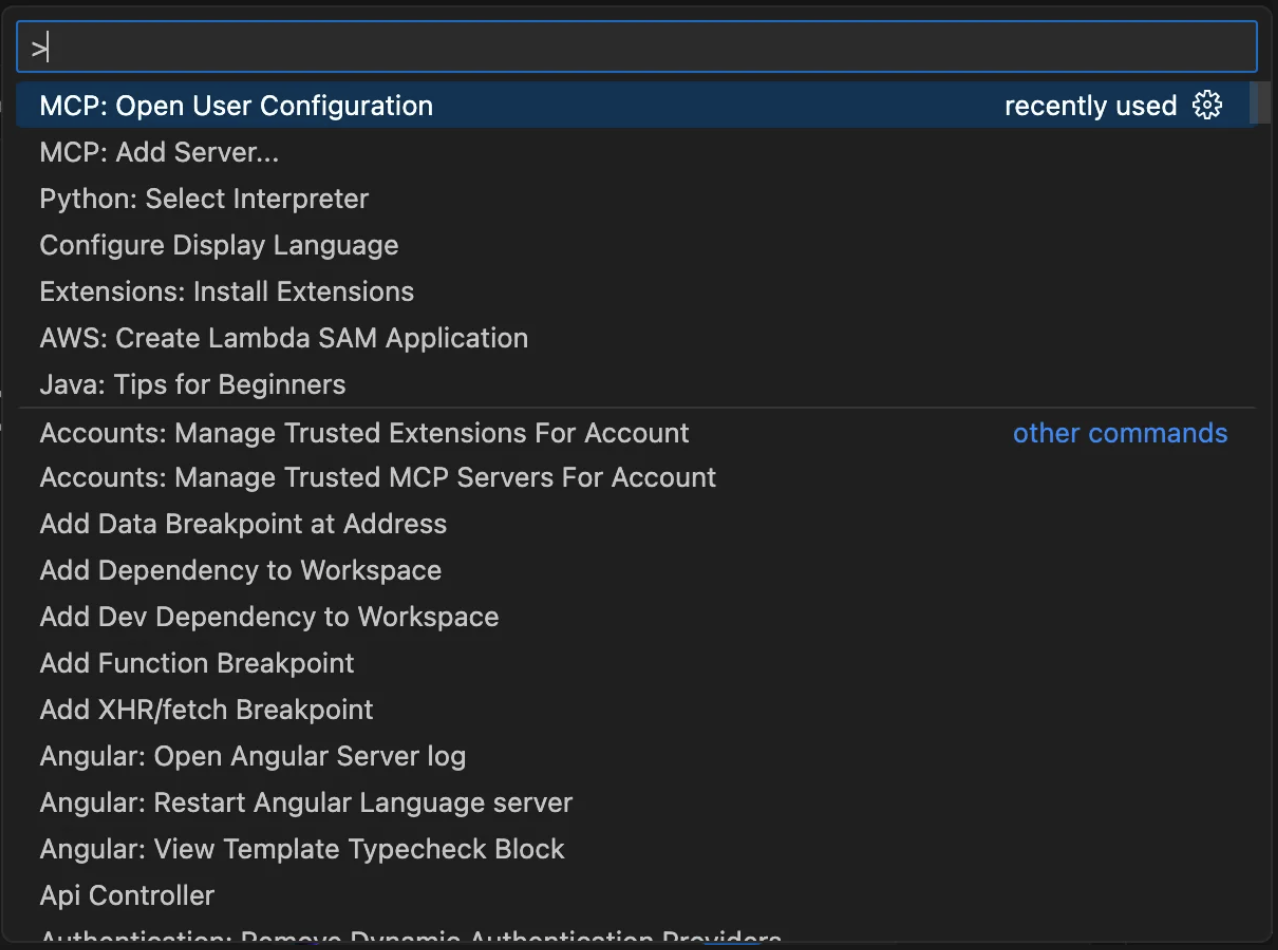
- This will open the
mcp.jsonfile, which should look something like this:
{
	"servers": {}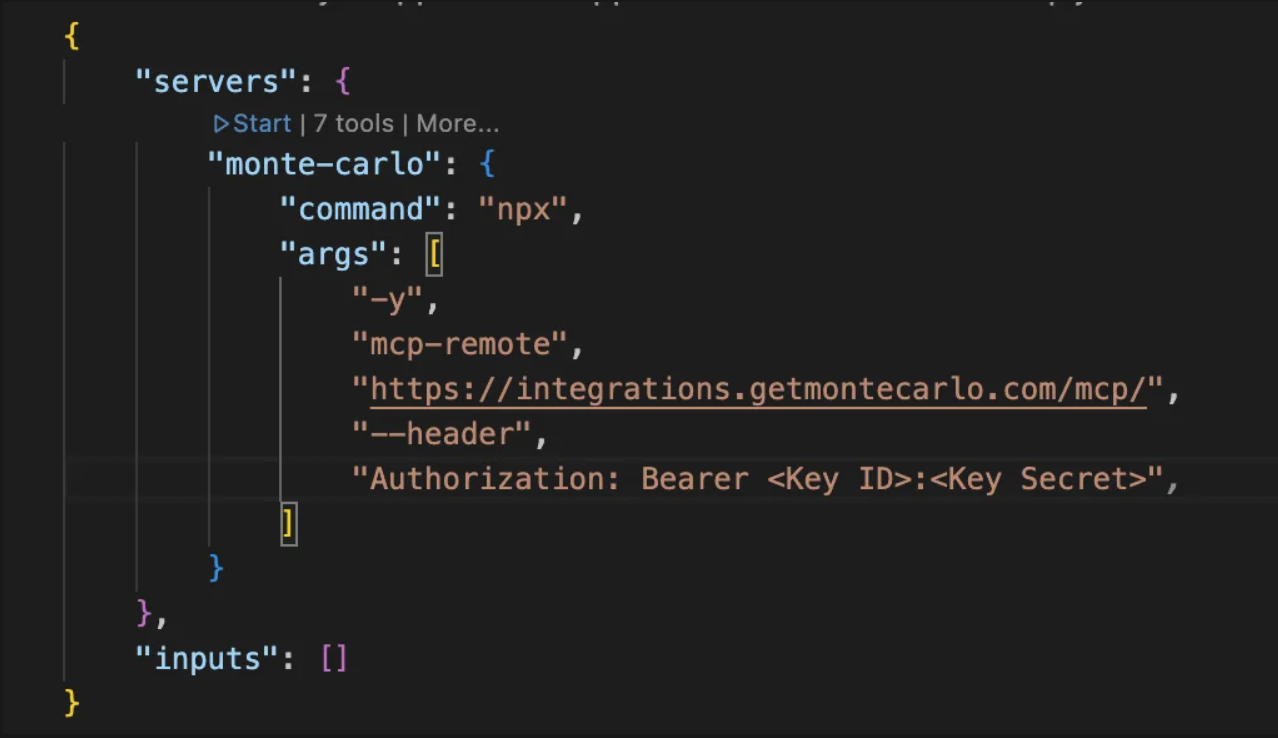
}- Add the Monte Carlo entry inside
servers(replace<KEY_ID>and<KEY_SECRET>with your values obtained from previous step.
{
	"servers": {
		"monte-carlo": {
			"command": "npx",
			"args": [
				"-y",
				"mcp-remote",
				"https://integrations.getmontecarlo.com/mcp/",
				"--header",
				"Authorization: Bearer <KEY_ID>:<KEY_SECRET>"
			]
		}
	},
	"inputs": []
}
Alternatively, we also support using custom headers instead of Authorization, so you can use the following:
{
	"servers": {
		"monte-carlo": {
			"command": "npx",
			"args": [
				"-y",
				"mcp-remote",
				"https://integrations.getmontecarlo.com/mcp/",
				"--header",
				"x-mcd-id: <KEY_ID>",
        "--header",
        "x-mcd-token: <KEY_SECRET>"
			]
		}
	},
	"inputs": []
}- Save
mcp.jsonand click on the “Start” button over the “monte-carlo” MCP Server configuration
- Now the MCP Server should turn to “Running”:
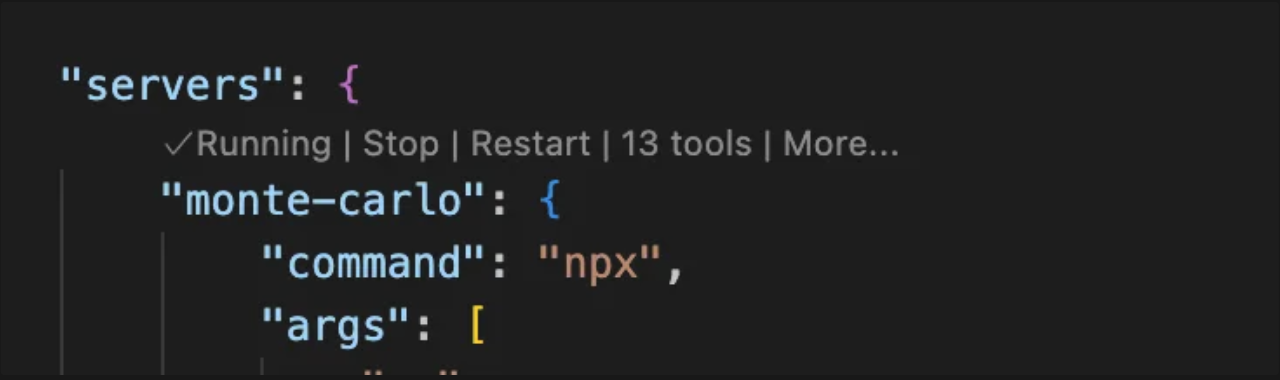
- Open the Chat screen and make sure the “Agent” mode is selected.

- Type:
Test Monte Carlo MCP connection. You should see it call thetestConnectiontool (in some versions it may appear astest_connection).
Setup in Claude Desktop
- Open Claude → Settings.

- Select Developer.
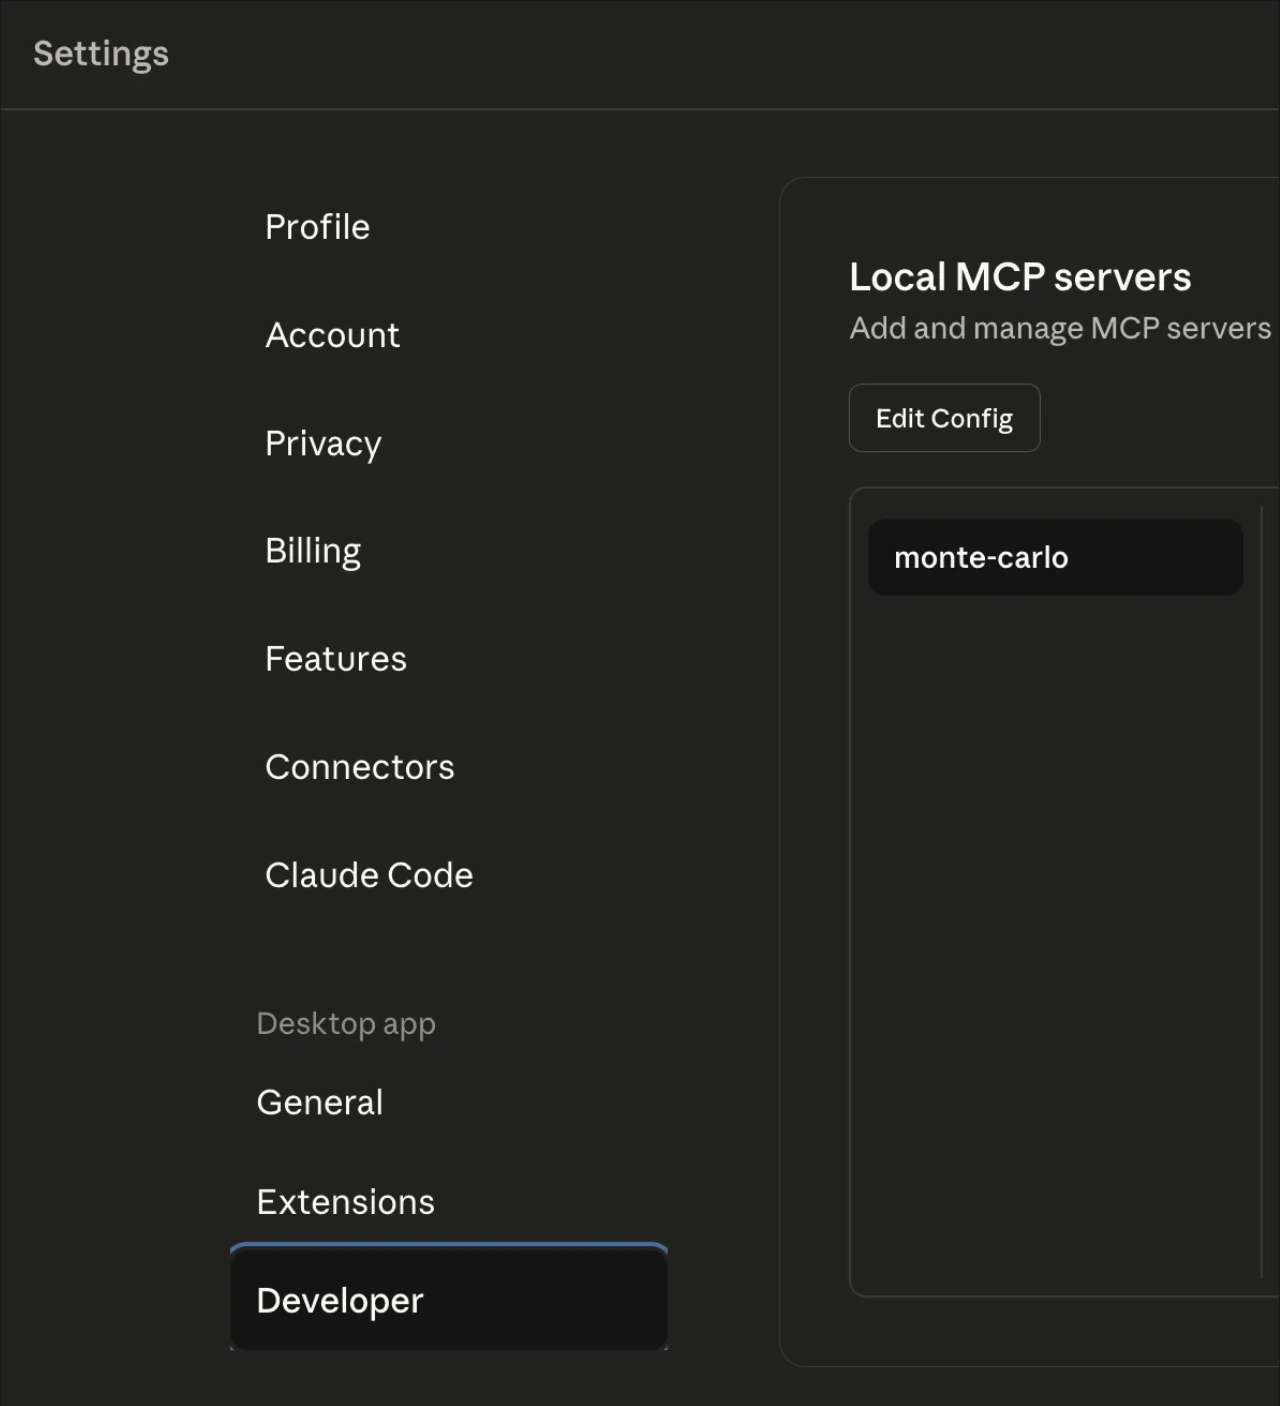
- Click the Edit Config button. This will open the location of the
claude_desktop_config.json. Open it in your preferred editor, you should see something like this:
{
  "mcpServers": {
  }
}- Add the Monte Carlo entry inside
mcpServers(replace<KEY_ID>and<KEY_SECRET>with your values obtained from previous step;
{
  "mcpServers": {
    "monte-carlo": {
      "command": "npx",
      "args": [
            "-y",
            "mcp-remote",
            "https://integrations.getmontecarlo.com/mcp/",
            "--header",
            "Authorization: Bearer <Key Id>:<Key Secret>"
      ]
    }
  }
}
Alternatively, we can also support using custom headers instead of Authorization:
{
  "mcpServers": {
    "monte-carlo": {
      "command": "npx",
      "args": [
        "-y",
        "mcp-remote",
        "https://integrations.getmontecarlo.com/mcp/",
        "--header",
        "x-mcd-id: <KEY_ID>",
        "--header",
        "x-mcd-token: <KEY_SECRET>"
      ]
    }
  }
}- Save
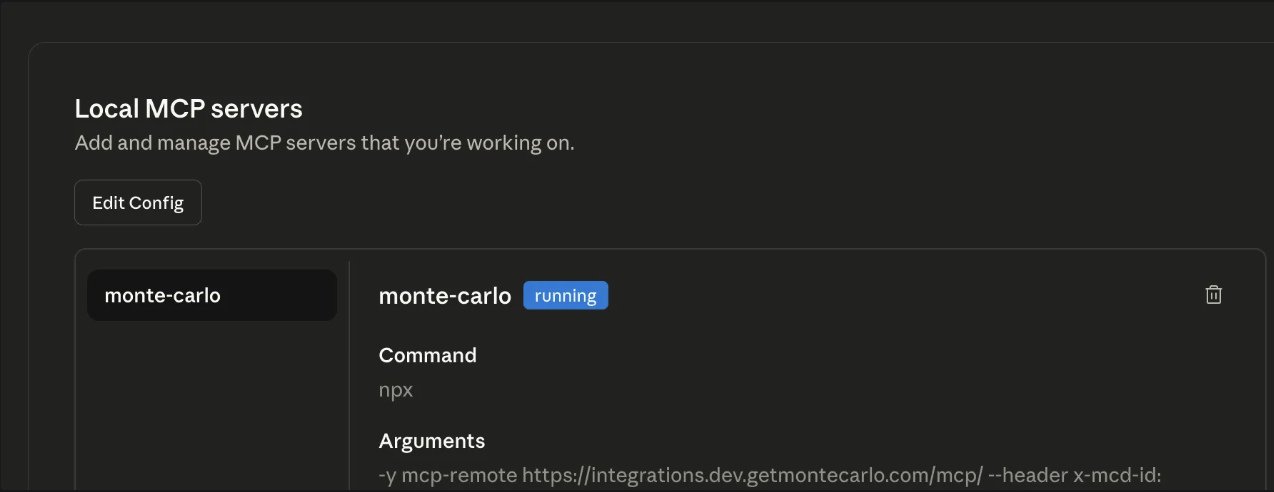
claude_desktop_config.jsonand close Claude. Open it again and return to Settings → Developer. You should see a monte-carlo MCP Server in status Running.
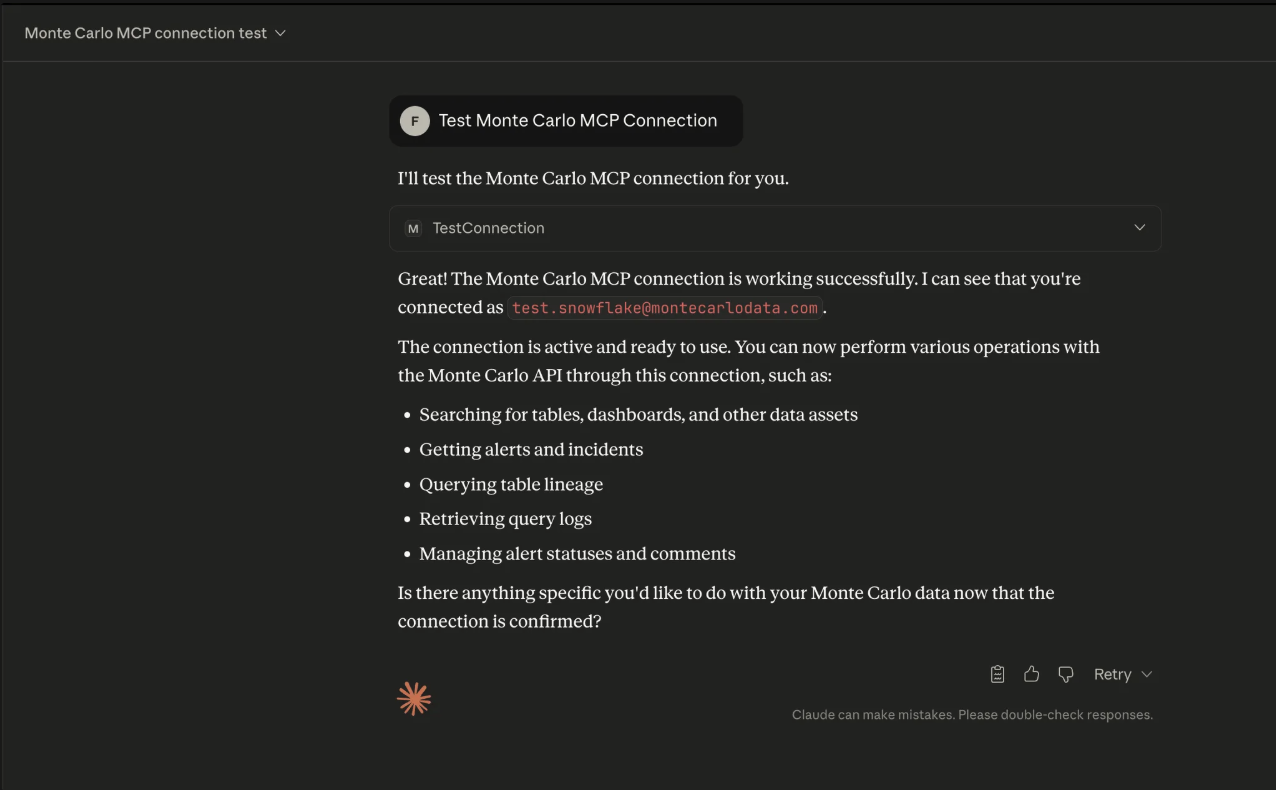
- Go to New Chat and type:
Test Monte Carlo MCP connection. You should see it call thetestConnectiontool (in some versions it may appear astest_connection).
Troubleshooting
- Toggle won’t turn on / shows error
- Verify the URL (prod vs dev) and that it ends with
/mcp/. - Ensure
npxis available on your PATH; theyflag auto-installsmcp-remoteif missing.
- Verify the URL (prod vs dev) and that it ends with
- 401 / Unauthorized
- Double-check you pasted the correct Key id and Key secret.
- Check that you are passing the headers correctly(
Authorization: Bearer <id>:<secret>orx-mcd-id/x-mcd-token). - Make sure the key scope is MCP (API keys won’t work).
- Connection error: ServerError: HTTP 403: Invalid OAuth error response
- This error often occurs when using an outdated version of Cursor. Upgrade to the latest version.
- In some cases, the MCP Server output console will show missing parameters (e.g.,
Using custom headers: {"Authorization":""}). - This means the Authorization token is not being passed. Older versions of Cursor may incorrectly omit these headers.
- Network / proxy issues
- Confirm your corporate proxy allows requests to the MCP endpoint.
- Try again on a different network to rule out blocking.
- Cursor isn’t picking up changes
- Reopen Settings → MCP & Integrations or restart Cursor to reload
mcp.json.
- Reopen Settings → MCP & Integrations or restart Cursor to reload
Check and install Node.js + npm
Quick check
node -v && npm -v && npx -v
# Optional: verify the shim can run
npx -y mcp-remote --version
Install tips
- macOS:
brew install nodeor (recommended)nvm install --lts - Linux:
curl -fsSL https://raw.githubusercontent.com/nvm-sh/nvm/v0.39.7/install.sh | bash && nvm install --lts - Windows:
winget install OpenJS.NodeJS.LTS
If you’re behind a proxy/allow-list, permit access to:
integrations.getmontecarlo.comregistry.npmjs.org(first run ofnpxfetchesmcp-remote)
One-liner sanity checks for MCP Server connection with curl
curlThese checks simply verify that auth headers are accepted by your endpoint. You’re good if you do not get 401/403. (Seeing 202 is fine for this quick test.)
macOS/Linux (bash/zsh)
export MCD_URL="https://integrations.getmontecarlo.com/mcp/"
export MCD_ID="<KEY_ID>"
export MCD_SECRET="<KEY_SECRET>"

# Authorization: Bearer <id>:<secret>
curl -sS -o /dev/null -w "%{http_code}\n" -X POST "$MCD_URL" \
  -H "Authorization: Bearer $MCD_ID:$MCD_SECRET"

# OR alternate custom headers
curl -sS -o /dev/null -w "%{http_code}\n" -X POST "$MCD_URL" \
  -H "x-mcd-id: $MCD_ID" \
  -H "x-mcd-token: $MCD_SECRET"
Windows PowerShell
$MCD_URL    = "https://integrations.getmontecarlo.com/mcp/"
$MCD_ID     = "<KEY_ID>"
$MCD_SECRET = "<KEY_SECRET>"

# Authorization: Bearer <id>:<secret>
(Invoke-WebRequest -Method POST $MCD_URL -Headers @{ Authorization = "Bearer $MCD_ID:$MCD_SECRET" } -UseBasicParsing).StatusCode

# OR alternate custom headers
(Invoke-WebRequest -Method POST $MCD_URL -Headers @{ "x-mcd-id" = $MCD_ID; "x-mcd-token" = $MCD_SECRET } -UseBasicParsing).StatusCode
Updated about 1 month ago