AWS: Databricks Configuration
How-to configure Databricks for OpenTelemetry instrumentation collection
This guide contains instructions on how to configure Databricks to ingest AI agent traces from a Databricks External Location into a table that can be monitored by Monte Carlo.
This guide assumes you already have a Databricks External Location configured to access the S3 bucket containing the OpenTelemetry data. Refer to the FAQ below for Monte Carlo's recommendation on how to configure the External Location if desired.
Configure Databricks Delta Live Table
Lets configure data ingestion from the S3 bucket into a table within your warehouse using a Databricks Delta Live Table. This table will consume files from the S3 bucket, transform the metadata into the expected format, and store the record into a table in your Databricks Catalog. This table requires an External Location to be configured for the S3 bucket to ensure the table has access to the files and is triggered whenever new files arrive.
Run this SQL to create the Databricks Delta Live Table to load data from the External Location into the output table. Be sure to provide values for table_name and bucket_name before execution.
-- !! Replace <table_name> below !!
CREATE OR REFRESH STREAMING LIVE TABLE <table_name>
-- https://docs.databricks.com/aws/en/delta/variant
TBLPROPERTIES ('delta.feature.variantType-preview' = 'enabled')
PARTITIONED BY (date_part)
AS
SELECT
  parse_json(value) AS value,
  _metadata.file_path AS filename,
  _metadata.file_modification_time AS ingest_ts,
  to_date(
    concat(
      regexp_extract(_metadata.file_path, 'year=(\\d{4})', 1), '-',
      regexp_extract(_metadata.file_path, 'month=(\\d{2})', 1), '-',
      regexp_extract(_metadata.file_path, 'day=(\\d{2})', 1)
    ),
    'yyyy-MM-dd'
  ) AS date_part
FROM
  STREAM(
    cloud_files(
      -- !! Replace <bucket_name> below !!
      's3://<bucket_name>/mcd/otel-collector/traces/',
      'text',
      map('useManagedFileEvents', 'true')
    )
  );
Your data warehouse is now configured to ingest OpenTelemetry data from S3.
If not already configured, be sure that your S3 bucket will send events to a SQS Queue when new data arrives and that your Databricks External Location has File Events enabled to receive events from the same SQS queue. If you're using the S3 bucket created by the MC Agent deployment, refer to the instructions in the FAQ below on Monte Carlo's recommendation for how to deploy the SQS queue and manage S3 bucket events.
FAQs
How can I create a AWS S3 data ingestion pipeline to my data warehouse?
This guide provides the steps to configure your Databricks warehouse for ingestion of OpenTelemetry data from AWS S3 so Monte Carlo can monitor your AI agents. These steps are Monte Carlo's recommendation for how to configure ingestion from S3 into Databricks but you may use any existing ingestion pipelines to accomplish this task and skip these steps if desired.
1. Configure Databricks External Location
Configure a Databricks External Location to connect your warehouse to the S3 bucket created by the Agent deployment.
- Login to your Databricks workspace, click "Catalog", and click "External Data"
- Click "Create external location"
- Click "Manual"
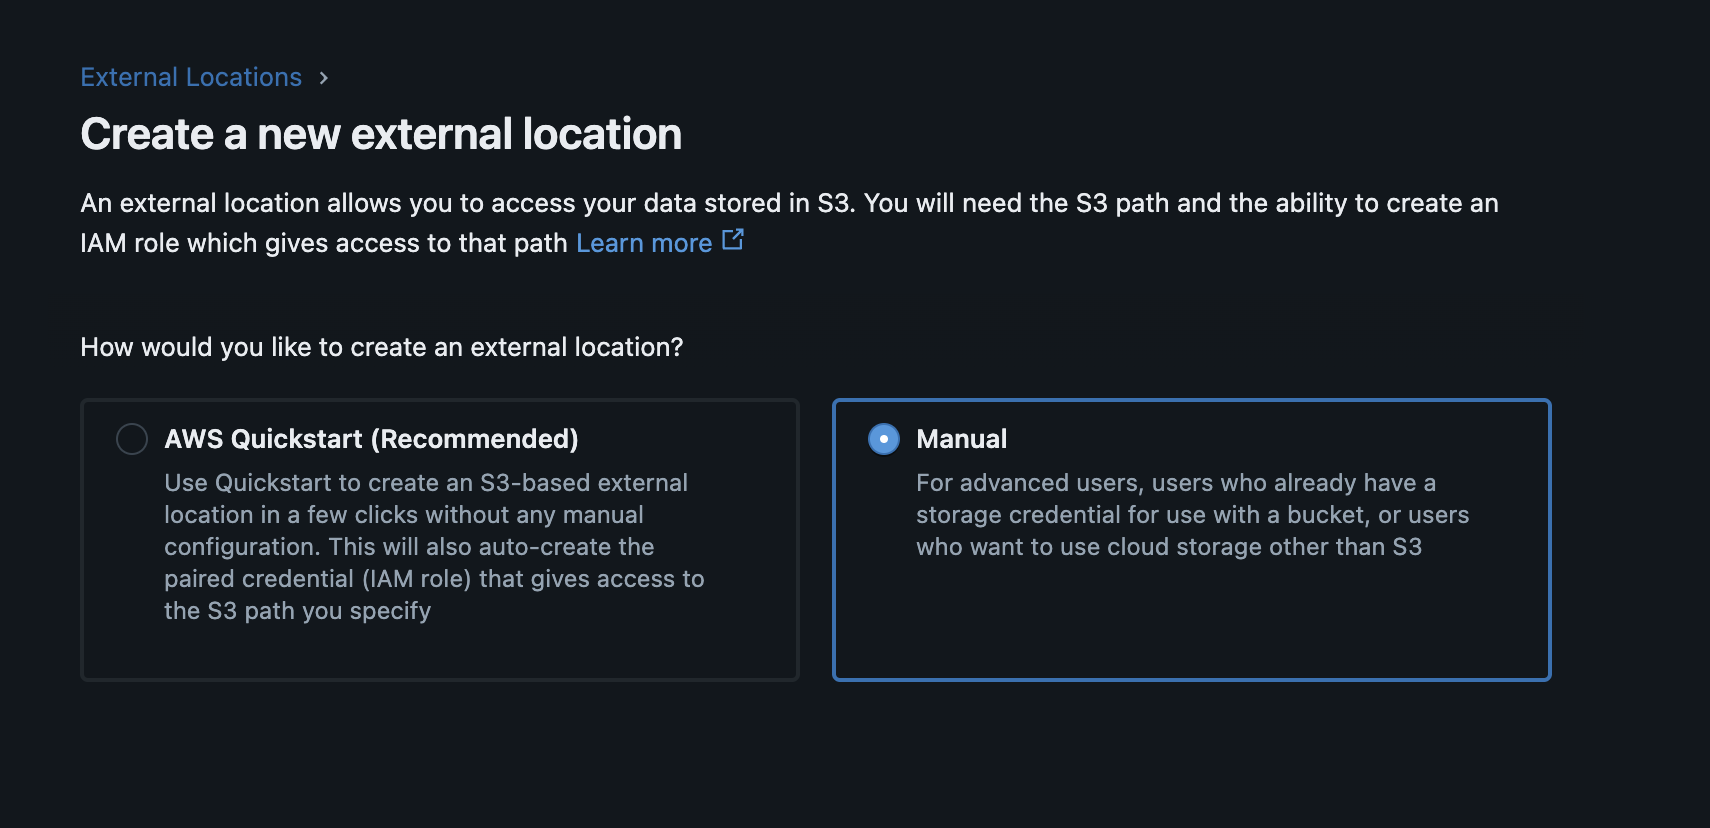
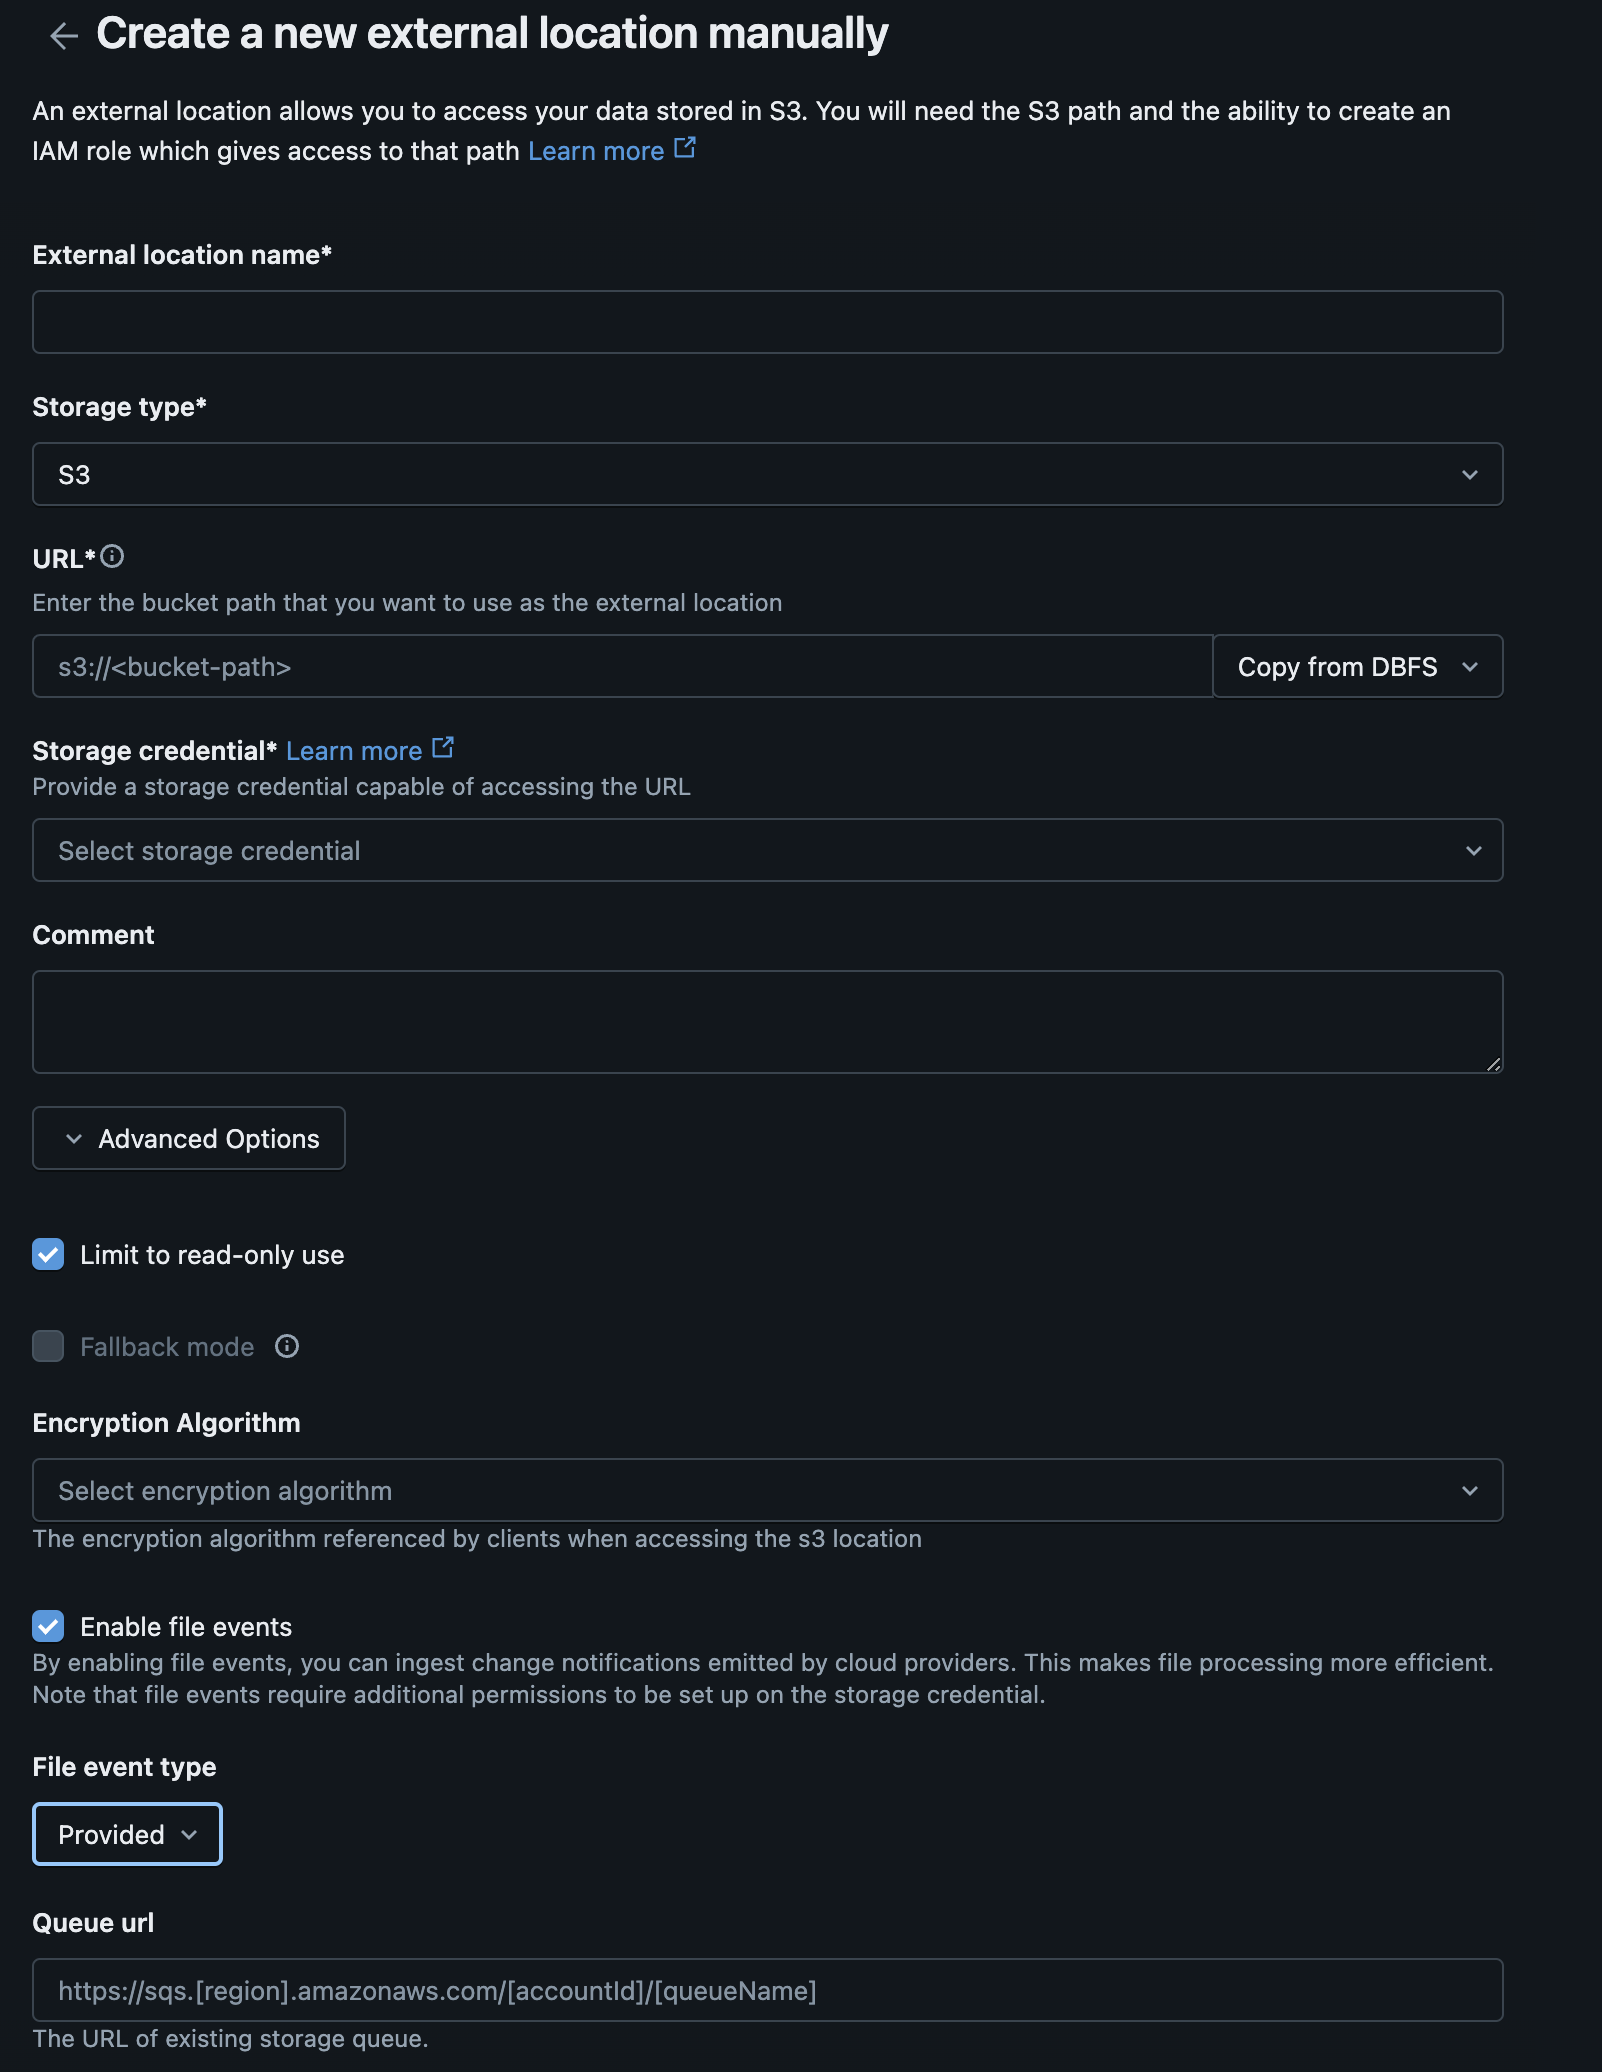
- Complete the form for the new external location. Create a new storage credential.
| Databricks Form Field | CloudFormation Output | Terraform Output |
|---|---|---|
| URL | StorageBucketArn | storage_bucket_arn |
| IAM role (ARN) | OpenTelemetryCollectorExternalAccessRoleArn | external_access_role_arn |
- Select these values under "Advanced Options":
- Check "Limit to read-only use"
- Check "Enable file events"
File event type: Choose "Provided"Queue url: Use the relevant output from the MC SQS stack or any existing queue configured to respond to object creation events in the respective S3 bucket. If you do not have a SQS queue yet, you can enable File Events later by editing the External Location.
| Databricks Form Field | CloudFormation Output | Terraform Output |
|---|---|---|
| Queue url | SqsNotificationQueueArn | sqs_notification_queue_arn |
- Click next to create the External Location.
- Copy the following values from the "Configure IAM Role" page for the next step
- Databricks "master role" from the example trust policy
- External ID
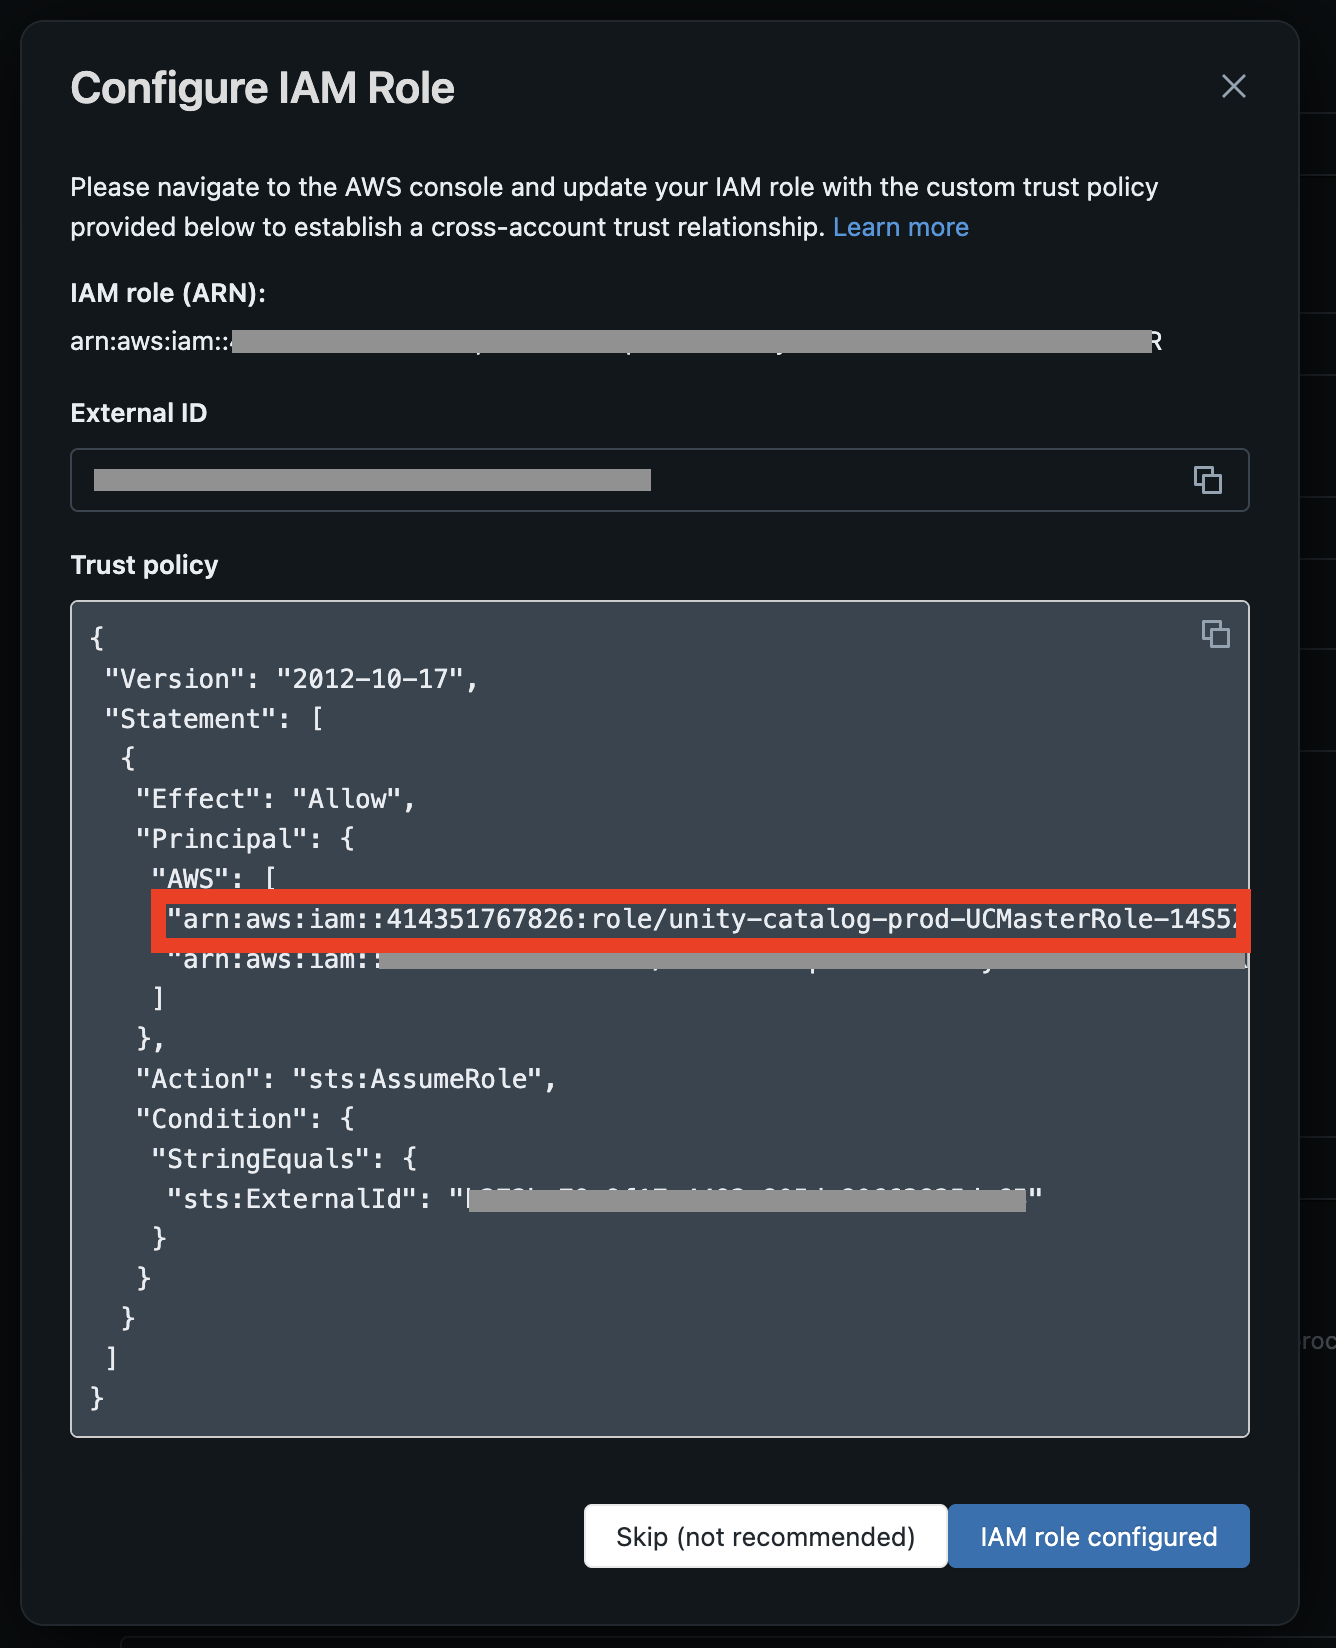
If you're using the S3 bucket created by the MC Agent deployment, Step 2 below describes how to update the appropriate IAM role.
2. Update IAM Role in Agent Deployment
If you're using the S3 bucket created by the MC Agent deployment to store the OpenTelemetry data, you can easily update the appropriate IAM role to provide S3 access to your warehouse by specifying the External ID and External Access Principal as parameters in the deployment.
Using CloudFormation
- Back in the AWS Console, find the MC Agent CloudFormation stack and click “Update Stack” and “Create a change set”
- Leave “Use existing template” selected and click Next
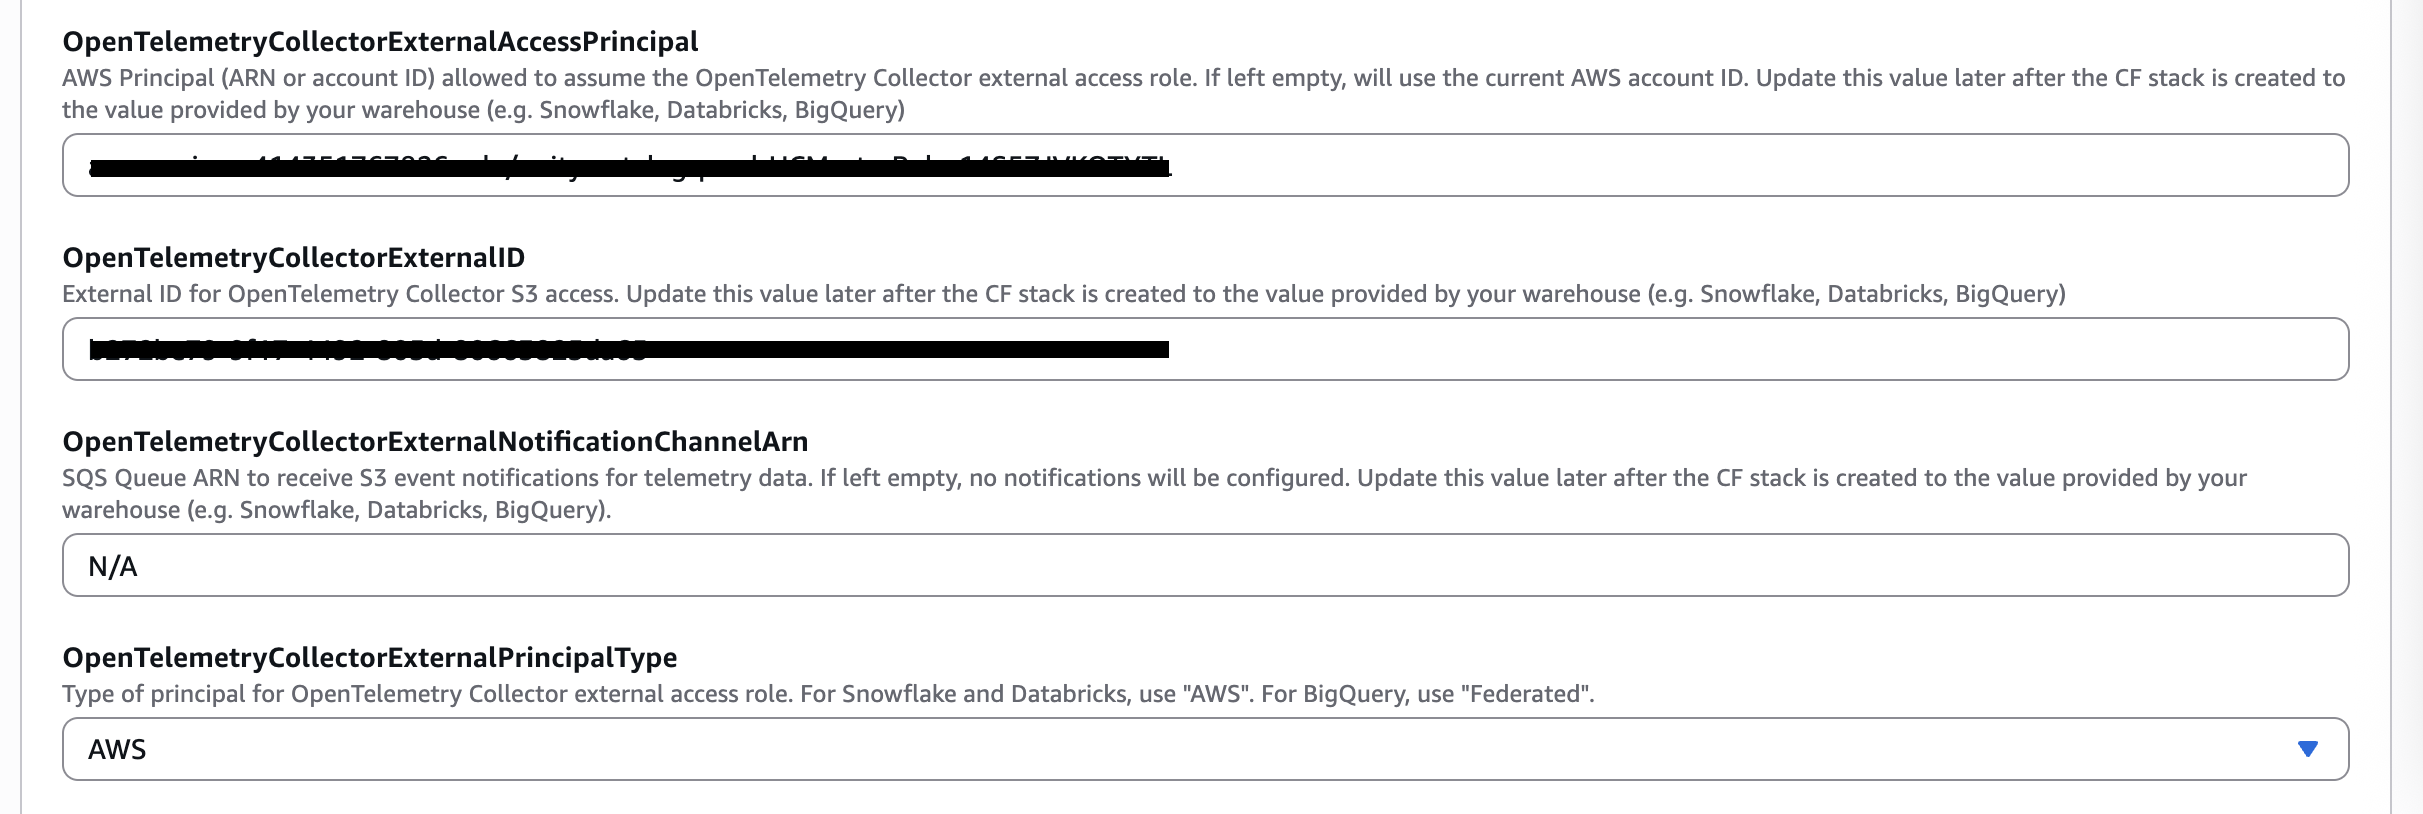
- Update the parameters listed below using the values copied from the previous step for your warehouse vendor type.
| Databricks Values | Parameter |
|---|---|
Databricks 'master role' | OpenTelemetryCollectorExternalAccessPrincipal |
ExternalID | OpenTelemetryCollectorExternalID |
AWS | OpenTelemetryCollectorExternalPrincipalType |
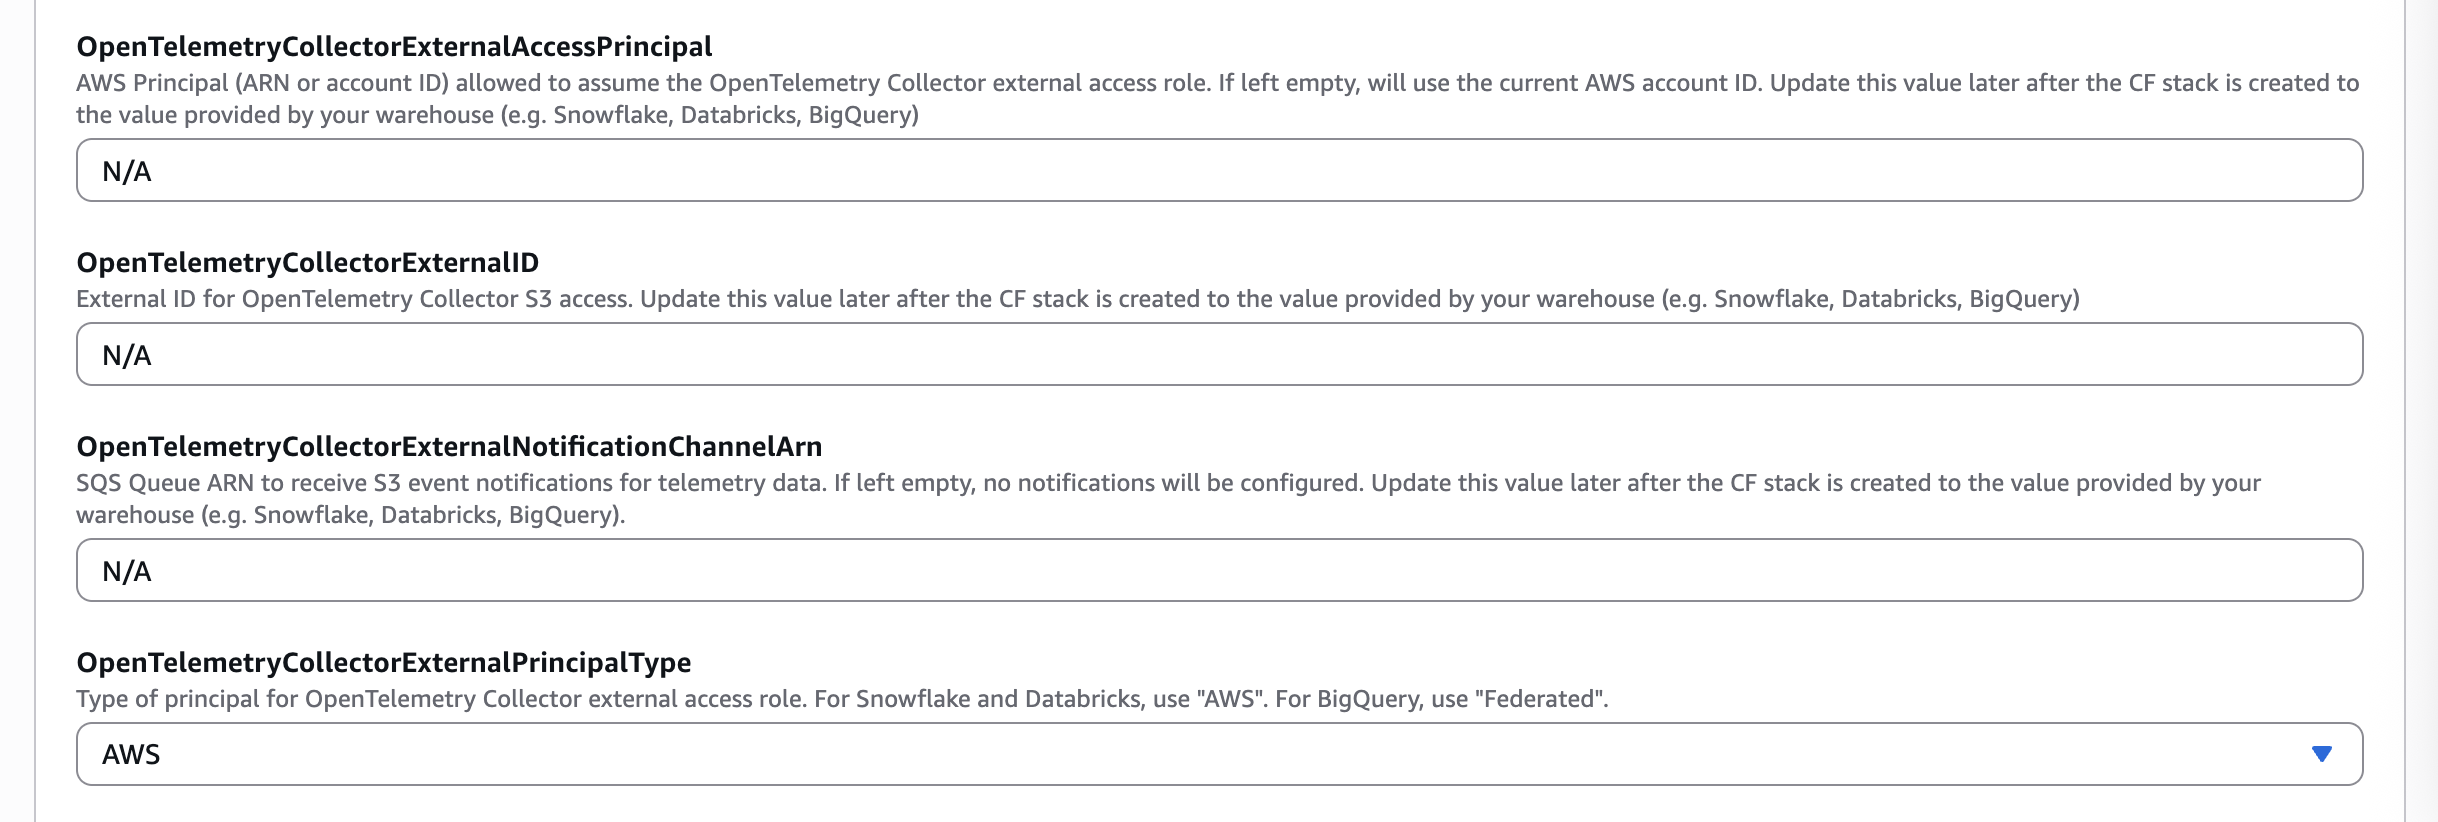
- Click Next, update the CloudFormation stack
Using Terraform
- Update the Terraform variables listed below using the values copied from the previous step for your warehouse vendor type.
| Databricks Values | Terraform Variable |
|---|---|
Databricks 'master role' | external_access_principal |
ExternalID | external_id |
AWS | external_principal_type |
- Apply the Terraform changes:
terraform apply
You now have a Databricks External Location ready to serve your data ingestion pipeline. Continue with the Databricks configuration step at the beginning of this guide to create the Delta Live Table required to ingest the data into your warehouse.
How can I configure S3 Event Notifications to trigger the data ingestion pipeline?
Databricks provides instructions on multiple ways to configure AWS SQS queues to notify Databricks when new files arrive to S3. Monte Carlo provides an AWS CloudFormation stack and Terraform templates to deploy the required SQS and IAM resources to stand up these queues. Follow the steps below to utilize this CloudFormation or Terraform stack. Or refer to the Databricks documentation on other ways to configure File Events for your External Location.
Using CloudFormation
1. Deploy a SQS Queue
You can use the quick-create link below to deploy the SQS queue stack required for data ingestion to Databricks in your AWS account:
If you need to share with a colleague or first review the template you can download a copy here.
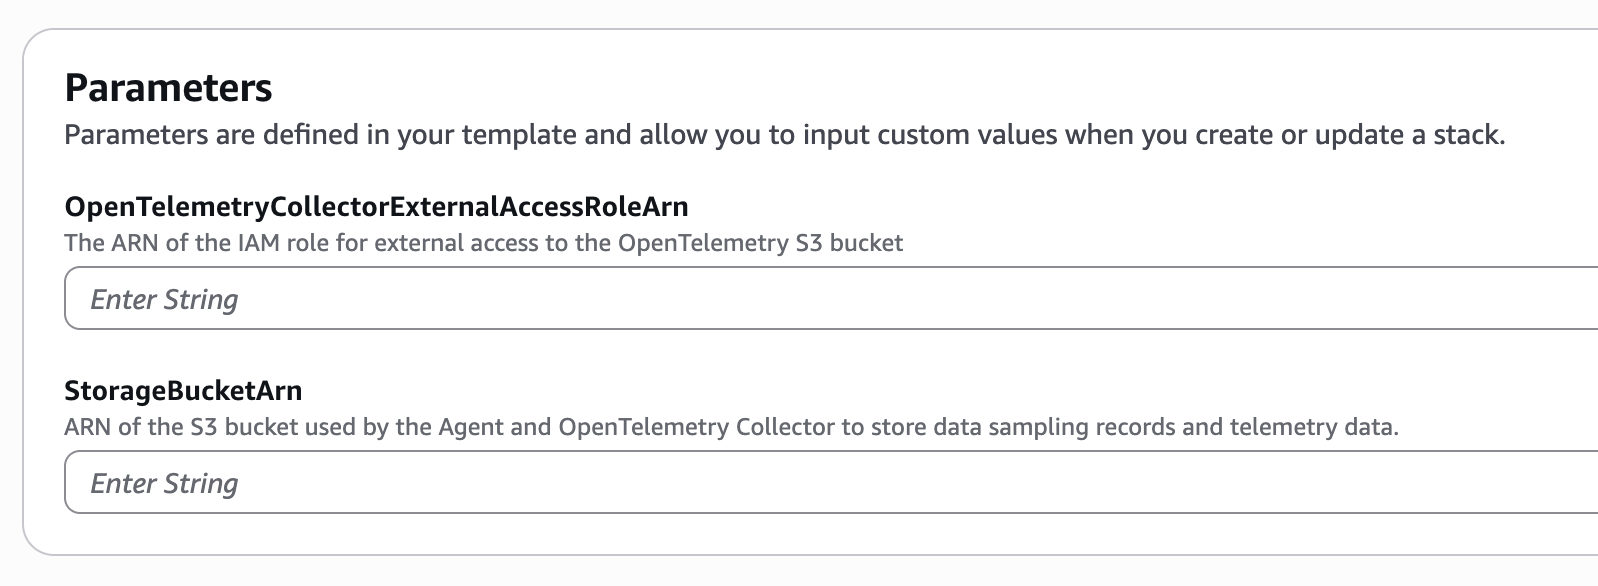
Set the OpenTelemetryCollectorExternalAccessRoleArn to the value from the output of the MC Agent stack deployed previously. Set the StorageBucketArn to the S3 bucket used to store the OpenTelemetry data.
After deployment, copy the SqsNotificationQueueArn output from the CloudFormation stack and use it in the step below.
2. Update MC Agent Stack
If you're using the S3 bucket created by the MC Agent deployment to store the OpenTelemetry trace data, you can easily configure S3 events using the metadata provided from your data warehouse in the previous step.
- Back in the AWS Console, find your MC Agent CloudFormation stack and click “Update Stack” and “Create a change set”
- Leave “Use existing template” selected and click Next
- Update
OpenTelemetryCollectorExternalNotificationChannelArnparameter using the values copied from the previous step for your warehouse vendor.
| CloudFormation MC Agent Parameter | CloudFormation SQS Stack Output Values |
|---|---|
OpenTelemetryCollectorExternalNotificationChannelArn | SqsNotificationQueueArn |
- Click Next, update the MC Agent CloudFormation stack.
The S3 bucket is now configured to trigger your data ingestion pipeline whenever new data arrives.
Using Terraform
Monte Carlo has provided terraform templates that can be used to deploy the necessary SQS queue and IAM resources to AWS. You can review and use these templates from the mcd-public-resources public Github repository.
1. Deploy a SQS Queue
Please make sure you have the terraform CLI installed and an active session to your AWS account available in your terminal. Then follow these steps:
- Clone the mcd-public-resources repo:
git clone [email protected]:monte-carlo-data/mcd-public-resources.git- Navigate to the template:
cd mcd-public-resources/templates/terraform/aws_otel_collector_databricks_sqs- Copy the
terraform.tfvars.exampletoterraform.tfvars:
cp terraform.tfvars.example terraform.tfvars- Modify the
terraform.tfvarsfile and set the required variables:storage_bucket_arn: the ARN of the S3 bucket used to store the OpenTelemetry data.opentelemetry_collector_external_access_role_name: use the equivalent output from the MC Agent deployment
- Initialize Terraform:
terraform init- Create the Terraform plan and review the output:
terraform plan- Apply the Terraform plan:
terraform apply- Validate the deployed occurred successfully by reviewing the command output and by using the AWS Console to locate the newly created resources.
2. Update MC Agent Stack
If you're using the S3 bucket created by the MC Agent deployment to store the OpenTelemetry trace data, you can easily configure S3 events using the metadata provided from your data warehouse in the previous step.
- Navigate to the template:
cd mcd-public-resources/templates/terraform/aws_agent_with_opentelemetry_collector- Modify the
terraform.tfvarsfile created during the MC Agent deployment and set the variable:opentelemetry_collector_external_notification_channel_arn: usesqs_notification_queue_arnfrom the output of the Terraform SQS deployment.
- Initialize Terraform:
terraform init- Create the Terraform plan and review the output:
terraform plan- Apply the Terraform plan:
terraform apply- Validate the deployed occurred successfully by reviewing the command output and by using the AWS Console to locate the newly created resources.
The S3 bucket is now configured to trigger your data ingestion pipeline whenever new data arrives.
How can I route traces from one agent to a different table in Databricks?
If you have multiple agents send traces to the OpenTelemetry Collector and wish for one or more of these agents' traces to be written to a different Databricks table, you can achieve this by creating additional Delta Live Tables in your warehouse.
First, you must set the service.name attribute in your OpenTelemetry traces to the name of your agent. In the montecarlo-opentelemetry Python lib, this is accomplished by providing the agent_name property to the mc.setup(...) method. The OpenTelemetry Collector will include the value of this attribute in the S3 file path of your trace data.
Next, you can configure your Delta Live Tables to route files from this S3 bucket to different tables depending on their file path. For example, the following two Delta Live Tables route traces from agent foo and bar to their own respective tables.
-- Agent foo's Delta Live Table
CREATE OR REFRESH STREAMING LIVE TABLE foo_table
-- https://docs.databricks.com/aws/en/delta/variant
TBLPROPERTIES ('delta.feature.variantType-preview' = 'enabled')
PARTITIONED BY (date_part)
AS
SELECT
  parse_json(value) AS value,
  _metadata.file_path AS filename,
  _metadata.file_modification_time AS ingest_ts,
  to_date(
    concat(
      regexp_extract(_metadata.file_path, 'year=(\\d{4})', 1), '-',
      regexp_extract(_metadata.file_path, 'month=(\\d{2})', 1), '-',
      regexp_extract(_metadata.file_path, 'day=(\\d{2})', 1)
    ),
    'yyyy-MM-dd'
  ) AS date_part
FROM
  STREAM(
    cloud_files(
      -- Note the inclusion of 'foo' in the file path
      's3://<bucket_name>/mcd/otel-collector/traces/foo/',
      'text',
      map('useManagedFileEvents', 'true')
    )
  );

-- Agent bar's Delta Live Table
CREATE OR REFRESH STREAMING LIVE TABLE foo_table
-- https://docs.databricks.com/aws/en/delta/variant
TBLPROPERTIES ('delta.feature.variantType-preview' = 'enabled')
PARTITIONED BY (date_part)
AS
SELECT
  parse_json(value) AS value,
  _metadata.file_path AS filename,
  _metadata.file_modification_time AS ingest_ts,
  to_date(
    concat(
      regexp_extract(_metadata.file_path, 'year=(\\d{4})', 1), '-',
      regexp_extract(_metadata.file_path, 'month=(\\d{2})', 1), '-',
      regexp_extract(_metadata.file_path, 'day=(\\d{2})', 1)
    ),
    'yyyy-MM-dd'
  ) AS date_part
FROM
  STREAM(
    cloud_files(
      -- Note the inclusion of 'bar' in the file path
      's3://<bucket_name>/mcd/otel-collector/traces/bar/',
      'text',
      map('useManagedFileEvents', 'true')
    )
  );
Updated 21 days ago