AWS: Snowflake Configuration
How-to configure Snowflake for OpenTelemetry instrumentation collection
This guide contains instructions on how to configure Snowflake to ingest AI agent traces from a Snowflake Stage into a table that can be monitored by Monte Carlo.
Configure Snowflake Snowpipe
Now that your data warehouse has access to the S3 bucket containing the OpenTelemetry trace data we need to configure data ingestion from the bucket into a table within your warehouse.
Run this SQL to create the Snowpipe to ingest data from a Snowflake stage into the output table.
-- Snowflake Snowpipe setup script for the Monte Carlo OpenTelemetry Collector

-- Set these variables to the values used in the previous Snowflake setup script
SET database_name = 'montecarlodata';
SET schema_name = 'montecarlodata.telemetry';
SET table_name = 'montecarlodata.telemetry.traces';
-- These default values can be changed if desired
SET stage_name = 'montecarlodata.telemetry.mcd_otel_collector_stage';
SET pipe_name = 'montecarlodata.telemetry.montecarlodata_opentelemetry_traces_pipe';
SET pipe_role = 'montecarlodata_opentelemetry_traces_pipe_role';


-- Create output table for agent traces
CREATE TABLE IF NOT EXISTS identifier($table_name) (
  value VARIANT,
  filename STRING,
  ingest_ts TIMESTAMP_TZ,
  date_part DATE
);

-- Create the Snowpipe to ingest traces into the expected structure
CREATE PIPE IF NOT EXISTS identifier($pipe_name)
  AUTO_INGEST = TRUE
  AS
    copy into identifier($table_name)
    from (
        select
            $1 as value,
            metadata$filename as filename,
            -- metadata$start_scan_time is provided as timestamp_ltz
            CONVERT_TIMEZONE('UTC', metadata$start_scan_time) as ingest_ts,
            TO_DATE(
              REGEXP_SUBSTR(metadata$filename, 'year=(\\d{4})', 1, 1, 'e', 1) || '-' ||
              REGEXP_SUBSTR(metadata$filename, 'month=(\\d{2})', 1, 1, 'e', 1) || '-' ||
              REGEXP_SUBSTR(metadata$filename, 'day=(\\d{2})', 1, 1, 'e', 1),
              'YYYY-MM-DD'
            ) as date_part
        -- !! Modify the stage name below if applicable, variables are not allowed here !!
        from @montecarlodata.telemetry.mcd_otel_collector_stage/traces
        )
        FILE_FORMAT = (type = 'JSON');

-- Create a role for the pipe that has access to required database assets
-- https://docs.snowflake.com/en/user-guide/data-load-snowpipe-auto-s3#step-3-configure-security
USE ROLE SECURITYADMIN;
CREATE OR REPLACE ROLE identifier($pipe_role);
GRANT USAGE ON DATABASE identifier($database_name) TO ROLE identifier($pipe_role);
GRANT USAGE ON SCHEMA identifier($schema_name) TO ROLE identifier($pipe_role);
GRANT INSERT, SELECT ON identifier($table_name) TO ROLE identifier($pipe_role);
GRANT USAGE ON STAGE identifier($stage_name) TO ROLE identifier($pipe_role);
ALTER PIPE identifier($pipe_name) SET PIPE_EXECUTION_PAUSED = TRUE;
GRANT OWNERSHIP ON PIPE identifier($pipe_name) TO ROLE identifier($pipe_role);
ALTER PIPE identifier($pipe_name) SET PIPE_EXECUTION_PAUSED = FALSE;

-- Describe the pipe to copy the required value
DESCRIBE PIPE identifier($pipe_name);
Copy the value for property notification_channel from the describe pipe command output. This value should be used to configure S3 Event Notifications to trigger the data ingestion pipeline whenever new data arrives to the S3 bucket. If you are using an external S3 bucket to store the OpenTelemetry data, update it accordingly. If you are using the S3 bucket managed by the MC Agent deployment, follow these instructions in the FAQ below to configure S3 notifications for your pipeline.
FAQs
How can I create a AWS S3 data ingestion pipeline to my data warehouse?
This guide provides the steps to configure your Snowflake warehouse for ingestion of OpenTelemetry data from AWS S3 so Monte Carlo can monitor your AI agents. These steps are Monte Carlo's recommendation for how to configure ingestion from S3 into Snowflake but you may use any existing ingestion pipelines to accomplish this task and skip these steps if desired.
1. Configure Snowflake Integration and Stage
Configure a Snowflake Storage Integration and Snowflake Stage to connect your warehouse to the S3 bucket created by the Agent deployment.
Run this SQL in Snowflake with the following changes:
- Replace
<iam_role>with the output value from your deployment:
| CloudFormation Output | Terraform Output |
|---|---|
OpenTelemetryCollectorExternalAccessRoleArn | external_access_role_arn |
- Replace
<bucket>with the output value from your deployment:
| CloudFormation Output | Terraform Output |
|---|---|
StorageBucketArn | storage_bucket_arn |
Note: This SQL requires the Snowflake role
ACCOUNTADMINin your warehouse
-- Snowflake setup script for the Monte Carlo OpenTelemetry Collector

-- Replace these values with the outputs from the Agent deployment
SET iam_role = '<iam_role>';
SET bucket_name = '<bucket>';
-- These default values can be changed if desired
SET database_name = 'montecarlodata';
SET schema_name = 'montecarlodata.telemetry';
SET integration_name = 'MCD_OTEL_COLLECTOR';
SET stage_name = 'montecarlodata.telemetry.mcd_otel_collector_stage';
-- This S3 path should not be changed
SET s3_path = 'mcd/otel-collector';
SET s3_storage_location = 's3://' || $bucket_name || '/' || $s3_path || '/';

-- Create database and schema
CREATE DATABASE IF NOT EXISTS identifier($database_name);
CREATE SCHEMA IF NOT EXISTS identifier($schema_name);
USE SCHEMA identifier($schema_name);

-- Create storage integration
CREATE STORAGE INTEGRATION IF NOT EXISTS identifier($integration_name)
  TYPE = EXTERNAL_STAGE
  STORAGE_PROVIDER = 'S3'
  ENABLED = TRUE
  STORAGE_AWS_ROLE_ARN = $iam_role
  STORAGE_ALLOWED_LOCATIONS = ($s3_storage_location);

-- Create stage
CREATE STAGE IF NOT EXISTS identifier($stage_name)
  URL = $s3_storage_location
  STORAGE_INTEGRATION = $integration_name;

-- Describe the integration to copy required values
DESCRIBE INTEGRATION identifier($integration_name);
Copy these two values from the describe integration command output to update the IAM role being used by Snowflake to access the S3 bucket.
STORAGE_AWS_IAM_USER_ARNSTORAGE_AWS_EXTERNAL_ID
If you're using the S3 bucket created by the MC Agent deployment, Step 2 below describes how to update the appropriate IAM role.
2. Update IAM Role in Agent Deployment
If you're using the S3 bucket created by the MC Agent deployment to store the OpenTelemetry data, you can easily update the appropriate IAM role to provide S3 access to your warehouse by specifying the External ID and External Access Principal.
Using CloudFormation
- Back in the AWS Console, find the Agent CloudFormation stack and click “Update Stack” and “Create a change set”
- Leave “Use existing template” selected and click Next
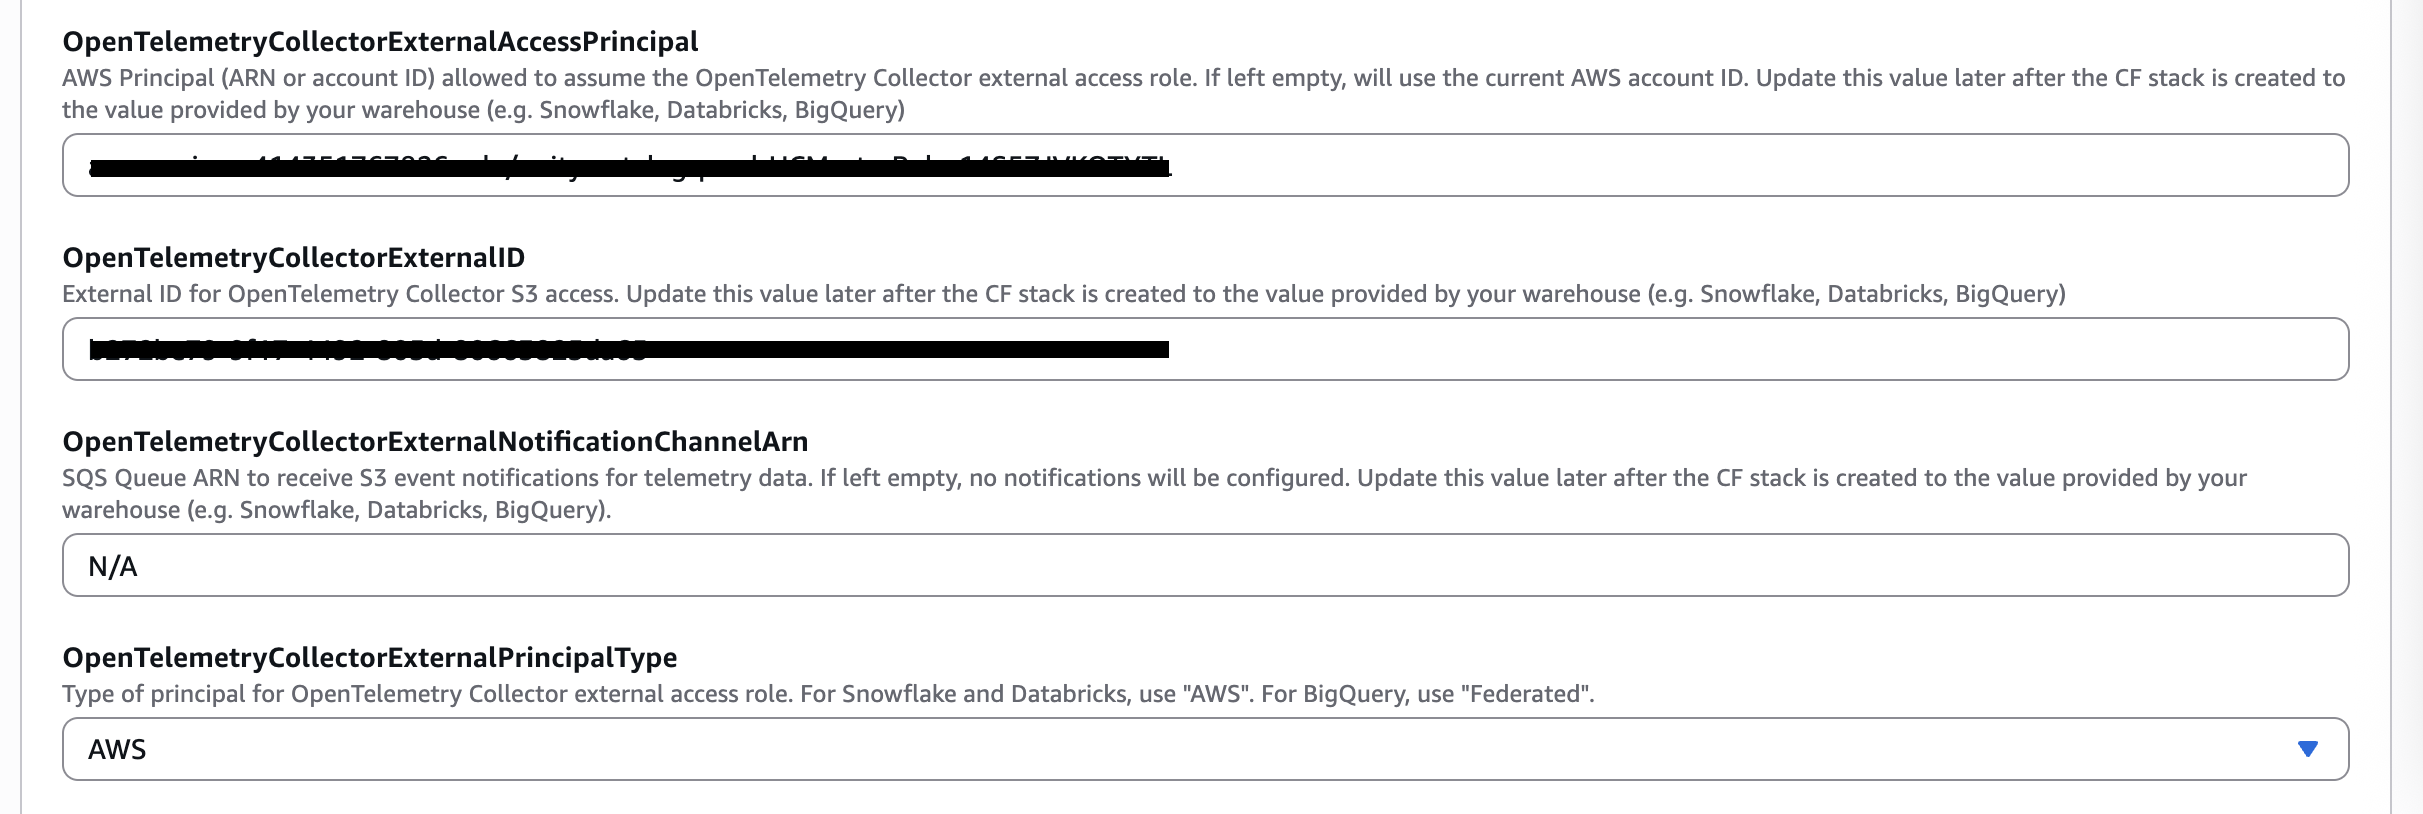
- Update the parameters listed below using the values copied from the previous step for your warehouse vendor types.
| Snowflake Values | CloudFormation Parameter |
|---|---|
STORAGE_AWS_IAM_USER_ARN | OpenTelemetryCollectorExternalAccessPrincipal |
STORAGE_AWS_EXTERNAL_ID | OpenTelemetryCollectorExternalID |
AWS | OpenTelemetryCollectorExternalPrincipalType |
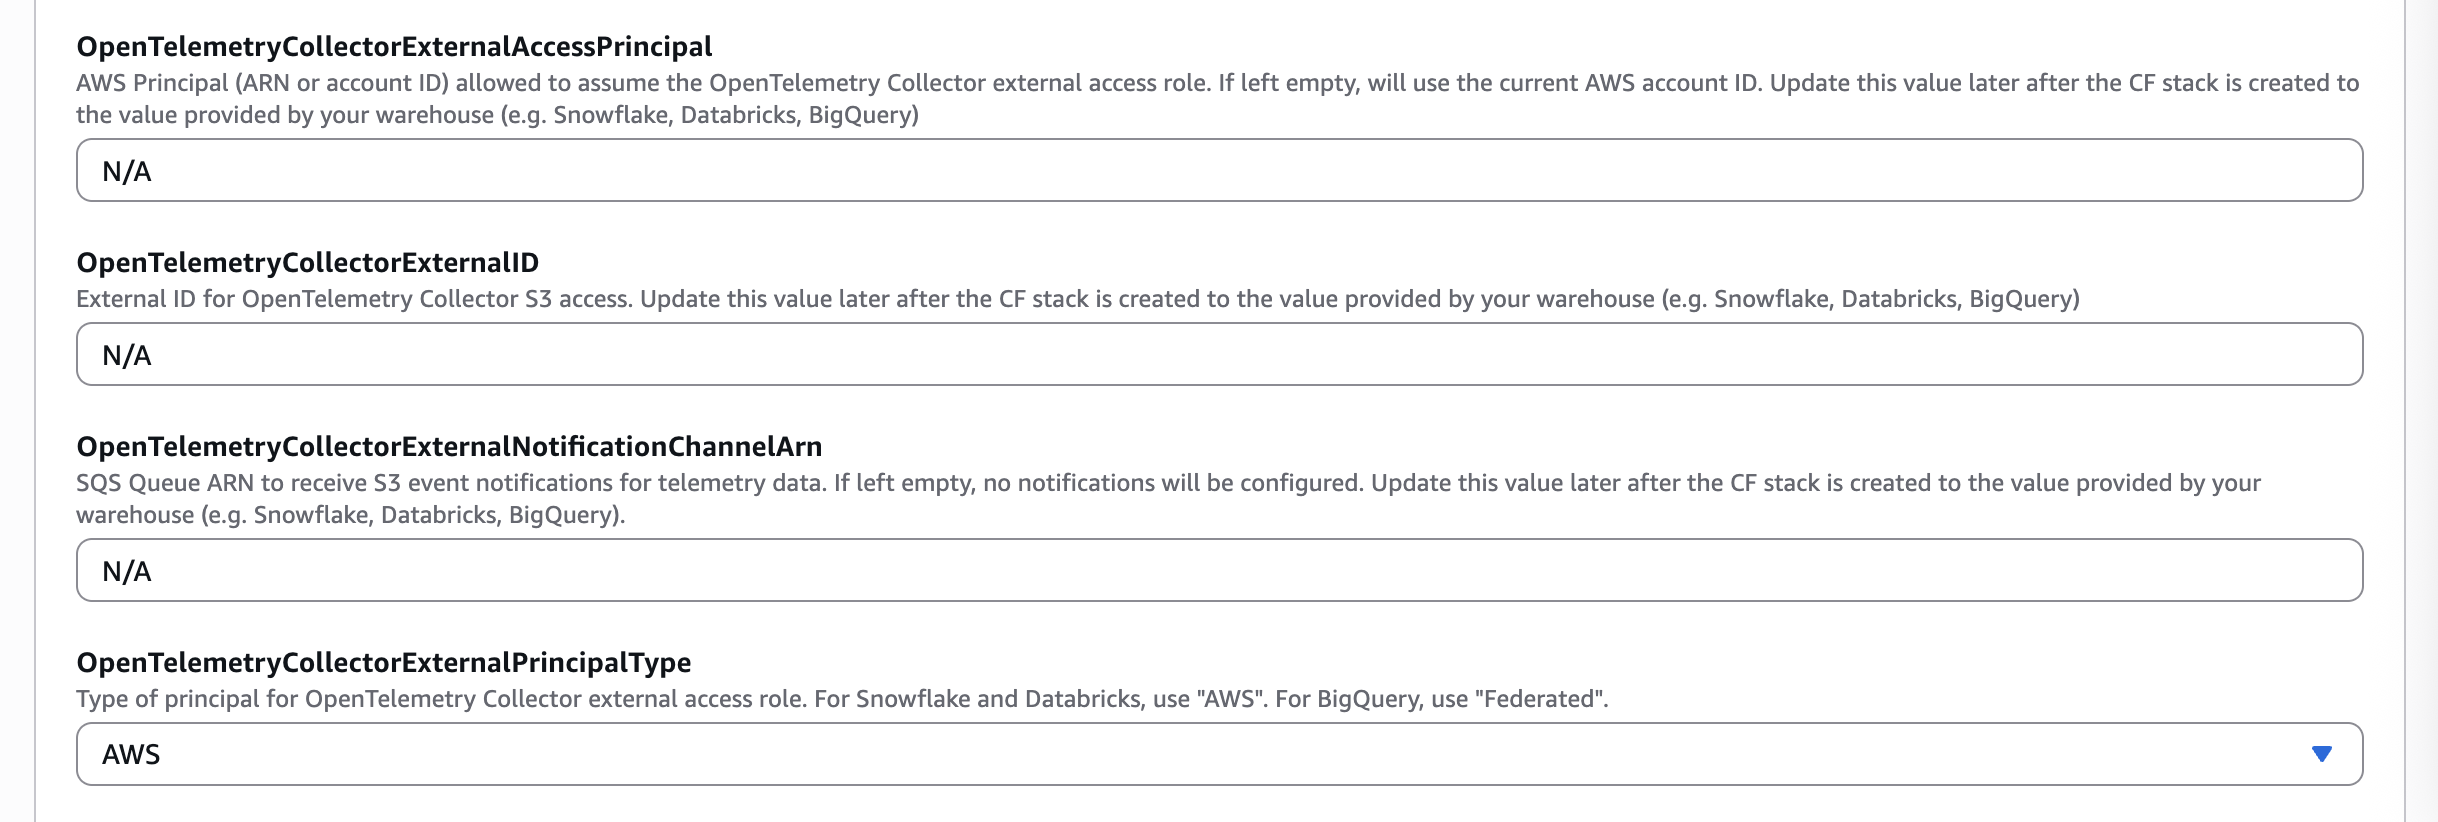
- Click Next, update the CloudFormation stack
Using Terraform
- Update the Terraform variables listed below using the values copied from the previous step for your warehouse vendor type.
| Snowflake Values | Terraform Variable |
|---|---|
STORAGE_AWS_IAM_USER_ARN | external_access_principal |
STORAGE_AWS_EXTERNAL_ID | external_id |
AWS | external_principal_type |
- Apply the Terraform changes:
terraform apply
You now have a Snowflake Storage Integration and Stage ready to serve your data ingestion pipeline. Continue with the Snowflake configuration step at the beginning of this guide to create the Snowpipe required to ingest the data into your warehouse.
How can I configure S3 Event Notifications to trigger the data ingestion pipeline?
If you're using the S3 bucket created by the MC Agent deployment to store the OpenTelemetry trace data, you can easily configure S3 events using the metadata provided from your data warehouse in the previous step.
Using CloudFormation
- Back in the AWS Console, find your CloudFormation stack and click “Update Stack” and “Create a change set”
- Leave “Use existing template” selected and click Next
- Update
OpenTelemetryCollectorExternalNotificationChannelArnparameter using the values copied from the previous step for your warehouse vendor.
| Snowflake Values | CloudFormation Parameter |
|---|---|
notification_channel | OpenTelemetryCollectorExternalNotificationChannelArn |
- Click Next, update the CloudFormation stack.
Using Terraform
- Update the Terraform variable using the values copied from the previous step for your warehouse vendor.
| Snowflake Values | Terraform Variable |
|---|---|
notification_channel | external_notification_channel_arn |
- Apply the Terraform changes:
terraform apply
The S3 bucket is now configured to trigger your data ingestion pipeline whenever new data arrives.
How can I route traces from one agent to a different table in Snowflake?
If you have multiple agents send traces to the OpenTelemetry Collector and wish for one or more of these agents' traces to be written to a different Snowflake table, you can achieve this by creating additional Snowpipes in your warehouse.
First, you must set the service.name attribute in your OpenTelemetry traces to the name of your agent. In the montecarlo-opentelemetry Python lib, this is accomplished by providing the agent_name property to the mc.setup(...) method. The OpenTelemetry Collector will include the value of this attribute in the S3 file path of your trace data.
Next, you can configure your Snowpipes to route files from this S3 bucket to different tables depending on their file path. For example, the following two Snowpipes route traces from agent foo and bar to their own respective tables.
-- Agent foo's Snowpipe
CREATE PIPE IF NOT EXISTS foo_pipe
  AUTO_INGEST = TRUE
  AS
    -- Note the unique table name 'foo'
    copy into montecarlodata.telemetry.foo
    from (
        select
            $1 as value,
            metadata$filename as filename,
            -- metadata$start_scan_time is provided as timestamp_ltz
            CONVERT_TIMEZONE('UTC', metadata$start_scan_time) as ingest_ts,
            to_date(
              REGEXP_SUBSTR(metadata$filename, 'year=(\\d{4})', 1, 1, 'e', 1) || '-' ||
              REGEXP_SUBSTR(metadata$filename, 'month=(\\d{2})', 1, 1, 'e', 1) || '-' ||
              REGEXP_SUBSTR(metadata$filename, 'day=(\\d{2})', 1, 1, 'e', 1),
              'YYYY-MM-DD'
            ) as date_part
        -- Note the inclusion of 'foo' in the file path
        from @montecarlodata.telemetry.mcd_otel_collector_stage/traces/foo
        )
        FILE_FORMAT = (type = 'JSON');

-- Agent bar's Snowpipe
CREATE PIPE IF NOT EXISTS bar_pipe
  AUTO_INGEST = TRUE
  AS
    -- Note the unique table name 'bar'
    copy into montecarlodata.telemetry.bar
    from (
        select
            $1 as value,
            metadata$filename as filename,
            -- metadata$start_scan_time is provided as timestamp_ltz
            CONVERT_TIMEZONE('UTC', metadata$start_scan_time) as ingest_ts,
            to_date(
              REGEXP_SUBSTR(metadata$filename, 'year=(\\d{4})', 1, 1, 'e', 1) || '-' ||
              REGEXP_SUBSTR(metadata$filename, 'month=(\\d{2})', 1, 1, 'e', 1) || '-' ||
              REGEXP_SUBSTR(metadata$filename, 'day=(\\d{2})', 1, 1, 'e', 1),
              'YYYY-MM-DD'
            ) as date_part
        -- Note the inclusion of 'bar' in the file path
        from @montecarlodata.telemetry.mcd_otel_collector_stage/traces/bar
        )
        FILE_FORMAT = (type = 'JSON');
See the full Snowpipe definition reference above.
Updated 22 days ago