Self Hosted Credentials with the Agent (public preview)
About
Monte Carlo supports self-hosted credentials with the Agent. Instead of providing credentials to the Monte Carlo platform during the typical integration onboarding process, customers can choose to store the credentials externally and allow the Agent to access them at runtime.
Currently, self-hosted credentials are supported on the following platforms:
- AWS:
- AWS Secrets Manager
- Environment Variables
- GCP:
- GCP Secret Manager
- Azure:
- Azure Key Vault
- Using Files (Kubernetes / Docker)
Generally, Monte Carlo recommends using secret managers (like AWS Secrets Manager or GCP Secret Manager) instead of environment variables. However, if the latter is desired, in the case of AWS it is recommended to use AWS Key Management Service (KMS) to encrypt the values.
To get started:
- First, verify the integration and deployment type you want to use are supported.
- Then, create the necessary service user or role by following the respective integration instructions.
- Afterwards, prepare the specified schema.
- Finally, follow the documentation for the self-hosting type you wish to use:
Further FAQs can be found here.
Credential Schemas
Self-hosted credentials must be provided to the agent using JSON schemas specific to the respective integration type. Please refer to the integration documentation for details on provisioning the service user, role, or other account information. Once this is done, you can follow the documentation for the self-hosting type (AWS Secrets Manager, GCP Secret Manager or Environment Variables) you want to use to store this structure. Be sure to keep this safe.
Schemas
Azure Dedicated SQL Pool
{
  "connect_args": {
    "type": "string",
    "required": true
  },
  "login_timeout": {
    "type": "integer",
    "required": false
  },
  "query_timeout": {
    "type": "integer",
    "required": false
  }
}
{
"connect_args": "DRIVER={ODBC Driver 17 for SQL Server};SERVER={tcp:<HOST>,3342};DATABASE={<DATABASE>};UID={<USER>};PWD={<PASSWORD>};MARS_Connection=Yes",
"login_timeout": 15,
"query_timeout": 840
}Azure SQL Database
{
  "connect_args": {
    "type": "string",
    "required": true
  },
  "login_timeout": {
    "type": "integer",
    "required": false
  },
  "query_timeout": {
    "type": "integer",
    "required": false
  }
}
{
"connect_args": "DRIVER={ODBC Driver 17 for SQL Server};SERVER={tcp:<HOST>,1433};DATABASE={<DATABASE>};UID={<USER>};PWD={<PASSWORD>};MARS_Connection=Yes",
"login_timeout": 15,
"query_timeout": 840
}BigQuery
{
  "connect_args": {
    "type": {
      "type": "string",
      "required": true,
      "description": "Must be 'service_account'"
    },
    "project_id": {
      "type": "string",
      "required": true
    },
    "private_key_id": {
      "type": "string",
      "required": true
    },
    "private_key": {
      "type": "string",
      "required": true
    },
    "client_email": {
      "type": "string",
      "required": true
    },
    "client_id": {
      "type": "string",
      "required": true
    },
    "auth_uri": {
      "type": "string",
      "required": true
    },
    "token_uri": {
      "type": "string",
      "required": true
    },
    "auth_provider_x509_cert_url": {
      "type": "string",
      "required": true
    },
    "client_x509_cert_url": {
      "type": "string",
      "required": true
    }
  }
}
{
"connect_args": {
"type": "service_account",
"project_id": "<project-id>",
"private_key_id": "abc123...",
"private_key": "-----BEGIN PRIVATE KEY-----\n...\n-----END PRIVATE KEY-----\n",
"client_email": "<service-account>@<project-id>.iam.gserviceaccount.com",
"client_id": "123456789",
"auth_uri": "https://accounts.google.com/o/oauth2/auth",
"token_uri": "https://oauth2.googleapis.com/token",
"auth_provider_x509_cert_url": "https://www.googleapis.com/oauth2/v1/certs",
"client_x509_cert_url": "https://www.googleapis.com/robot/v1/metadata/x509/<service-account>%40<project-id>.iam.gserviceaccount.com"
}
}ClickHouse
{
  "connect_args": {
    "host": {
      "type": "string",
      "required": true
    },
    "port": {
      "type": "integer",
      "required": true,
      "description": "8443 for HTTPS (ClickHouse Cloud), 8123 for HTTP, 9440 for native TCP/TLS, 9000 for native TCP."
    },
    "username": {
      "type": "string",
      "required": true
    },
    "password": {
      "type": "string",
      "required": true
    },
    "database": {
      "type": "string",
      "required": true
    }
  }
}
{
"connect_args": {
"host": "<hostname>",
"port": 8443,
"username": "<username>",
"password": "<password>",
"database": "<database>"
}
}Databricks
{
  "connect_args": {
    "databricks_workspace_url": {
      "type": "string",
      "required": true
    },
    "databricks_client_id": {
      "type": "string",
      "required": false
    },
    "databricks_client_secret": {
      "type": "string",
      "required": false
    },
    "azure_tenant_id": {
      "type": "string",
      "required": false
    },
    "azure_workspace_resource_id": {
      "type": "string",
      "required": false
    },
    "databricks_token": {
      "type": "string",
      "required": false
    }
  }
}
{
"connect_args": {
"databricks_workspace_url": "https://dbc-<id>.cloud.databricks.com/",
"databricks_client_id": "<client_id>",
"databricks_client_secret": "<client_secret>"
}
}DB2
{
  "connect_args": {
    "hostname": {
      "type": "string",
      "required": true
    },
    "port": {
      "type": "integer",
      "required": true
    },
    "database": {
      "type": "string",
      "required": true
    },
    "uid": {
      "type": "string",
      "required": true
    },
    "pwd": {
      "type": "string",
      "required": true
    }
  },
  "ssl_options": {
    "type": "object",
    "required": false,
    "fields": {
      "ca_data": {
        "type": "string",
        "required": true,
        "example": "-----BEGIN CERTIFICATE-----\nxxx\n-----END CERTIFICATE-----\n"
      }
    }
  }
}
{
"connect_args": {
"hostname": "<hostname>",
"port": 50000,
"database": "<database>",
"uid": "<user>",
"pwd": "<password>"
}
}Dremio
{
  "connect_args": {
    "location": {
      "type": "string",
      "required": true,
      "description": "Use 'grpc+tls://' for TLS connections (required for Dremio Cloud); use 'grpc://' for non-TLS."
    }
  },
  "token": {
    "type": "string",
    "required": true
  }
}
{
"connect_args": {
"location": "grpc+tls://<hostname>:<port>"
},
"token": "<personal_access_token>"
}Fivetran
{
  "connect_args": {
    "fivetran_api_key": {
      "type": "string",
      "required": true,
      "description": "The API key obtained from Fivetran."
    },
    "fivetran_api_password": {
      "type": "string",
      "required": true,
      "description": "The API secret obtained from Fivetran"
    }
  }
}
{
"connect_args": {
"fivetran_api_key": "xxxxxxxxxxxxxxxx",
"fivetran_api_password": "xxxxxxxxxxxxxxxxxxxxxxxxxxxxxxxx"
}
}Informatica
{
  "connect_args": {
    "username": {
      "type": "string",
      "required": true
    },
    "password": {
      "type": "string",
      "required": true
    },
    "base_url": {
      "type": "string",
      "required": true
    }
  }
}
{
"connect_args": {
"username": "[email protected]",
"password": "your-password",
"base_url": "https://dm-us.informaticacloud.com"
}
}Looker
{
  "client_id": {
    "type": "string",
    "required": true
  },
  "client_secret": {
    "type": "string",
    "required": true
  },
  "base_url": {
    "type": "string",
    "required": true
  }
}
{
"base_url": "https://<hostname>:<port>",
"client_id": "<client id>",
"client_secret": "<client secret>"
}Looker-GIT
{
  "repo_url": {
    "type": "string",
    "required": true
  },
  "ssh_key": {
    "type": "string",
    "required": true
  }
}
{
"repo_url": "[email protected]:<org>/<project>.git",
"ssh_key": "Base64('-----BEGIN OPENSSH PRIVATE KEY-----\n...\n-----END OPENSSH PRIVATE KEY-----')"
}Microsoft Fabric
{
  "connect_args": {
    "server": {
      "type": "string",
      "required": true
    },
    "port": {
      "type": "string",
        "required": false,
        "example": "1433"
    },
    "database": {
      "type": "string",
      "required": true
    },
    "tenant_id": {
      "type": "string",
      "required": true
    },
    "client_id": {
      "type": "string",
      "required": true
    },
    "client_secret": {
      "type": "string",
      "required": true
    }
  }
}
{
"connect_args": {
"server": "myworkspace.datawarehouse.fabric.microsoft.com",
"port": "1433",
"database": "MyDb1",
"tenant_id": "4ef6ba51-341b-4b33-89b1-b9140ea62cef",
"client_id": "57031eae-1278-4d79-833e-22f899976203",
"client_secret": "secret-string-value!"
}
}Motherduck
{
  "connect_args": {
    "type": "string",
    "required": true,
    "description": "DuckDB connection string of the form 'md:<database>?motherduck_token=<motherduck_token>'."
  }
}
{
"connect_args": "md:<database>?motherduck_token=<motherduck_token>"
}MySQL
{
  "connect_args": {
    "host": {
      "type": "string",
      "required": true
    },
    "port": {
      "type": "integer",
      "required": true
    },
    "user": {
      "type": "string",
      "required": true
    },
    "password": {
      "type": "string",
      "required": true
    }
  }
}
{
"connect_args": {
"host": "<hostname>",
"port": 3306,
"user": "<user>",
"password": "<password>"
}
}Oracle
{
  "connect_args": {
    "dsn": {
      "type": "string",
      "required": true
    },
    "user": {
      "type": "string",
      "required": true
    },
    "password": {
      "type": "string",
      "required": true
    }
  },
  "ssl_options": {
    "type": "object",
    "required": false,
    "fields": {
      "ca_data": {
        "type": "string",
        "required": false,
        "example": "-----BEGIN CERTIFICATE-----\nxxx\n-----END CERTIFICATE-----\n"
      },
      "cert_data": {
        "type": "string",
        "required": false,
      },
      "key_data": {
        "type": "string",
        "required": false,
      },
      "key_password": {
        "type": "string",
        "required": false,
      },
      "disabled": {
        "type": "boolean",
        "required": false
      },
      "skip_cert_verification": {
        "type": "boolean",
        "required": false
      },
      "verify_cert": {
        "type": "boolean",
        "required": false
      },
      "verify_identity": {
        "type": "boolean",
        "required": false
      }
    }
  }
}
{
"connect_args": {
"dsn": "tcp://<hostname>:1521/<database>",
"user": "<user>",
"password": "<password>"
}
}Postgres
{
  "connect_args": {
    "dbname": {
      "type": "string",
      "required": true
    },
    "user": {
      "type": "string",
      "required": true
    },
    "password": {
      "type": "string",
      "required": true
    },
    "host": {
      "type": "string",
      "required": true
    },
    "port": {
      "type": "integer",
      "required": true
    }
  }
}
{
"connect_args": {
"host": "<hostname>",
"port": 5432,
"database": "<database>",
"user": "<user>",
"password": "<password>"
}
}PowerBI
{
  "client_id": {
    "type": "string",
    "required": true
  },
  "client_secret": {
    "type": "string",
    "required": true
  },
  "tenant_id": {
    "type": "string",
    "required": true
  }
}
{
"client_id": "<azure-application-client-id>",
"client_secret": "<azure-application-client-secret>",
"tenant_id": "<azure-tenant-id>"
}Redshift
{
  "connect_args": {
    "host": {
      "type": "string",
      "required": true
    },
    "dbname": {
      "type": "string",
      "required": true
    },
    "port": {
      "type": "string",
      "required": true
    },
    "user": {
      "type": "string",
      "required": true
    },
    "password": {
      "type": "string",
      "required": true
    }
  },
  "autocommit": {
    "type": "boolean",
    "required": false
  }
}
{
"connect_args": {
"host": "<redshift_host_name>",
"dbname": "<database_name>",
"user": "awsuser",
"password": "<password>",
"port": "5439"
},
"autocommit": true
}Salesforce CRM
{
  "connect_args": {
    "user": {
      "type": "string",
      "required": true
    },
    "password": {
      "type": "string",
      "required": true
    },
    "security_token": {
      "type": "string",
      "required": true
    }
  }
}
{
"connect_args": {
"consumer_key": {
"type": "string",
"required": true
},
"consumer_secret": {
"type": "string",
"required": true
},
"domain": {
"type": "string",
"required": true
}
}
}{
"connect_args": {
"user": "<email>",
"password": "<password>",
"security_token": "<security-token>"
}
}{
"connect_args": {
"consumer_key": "<connected-app-consumer-key>",
"consumer_secret": "<connected-app-consumer-secret>",
"domain": "<myorg>"
}
}Salesforce Data Cloud
{
  "connect_args": {
    "domain": {
      "type": "string",
      "required": true
    },
    "client_id": {
      "type": "string",
      "required": true
    },
    "client_secret": {
      "type": "string",
      "required": true
    }
  }
}
{
"connect_args": {
"domain": "<myorg>.my.salesforce.com",
"client_id": "<connected-app-consumer-key>",
"client_secret": "<connected-app-consumer-secret>"
}
}SAP HANA
{
  "connect_args": {
    "address": {
      "type": "string",
      "required": true
    },
    "port": {
      "type": "integer",
      "required": true
    },
    "user": {
      "type": "string",
      "required": true
    },
    "password": {
      "type": "string",
      "required": true
    },
    "databaseName": {
      "type": "string",
      "required": true
    }
  }
}
{
"connect_args": {
"address": "<hostname>",
"port": 30015,
"user": "<user>",
"password": "<password>",
"databaseName": "<tenant_db>"
}
}Snowflake
{
  "connect_args": {
    "user": {
      "type": "string",
      "required": true
    },
    "private_key": {
      "type": "string",
      "required": true
    },
    "account": {
      "type": "string",
      "required": true
    },
    "warehouse": {
      "type": "string",
      "required": false
    }
  }
}
{
"connect_args": {
"user": "MONTE_CARLO",
"private_key": "Private Key in PKCS#8 Format: MII...",
"account": "<SNOWFLAKE ACCOUNT NAME>",
"warehouse": "MONTE_CARLO_WH"
}
}SQL Server
{
  "connect_args": {
    "type": "string",
    "required": true
  },
  "login_timeout": {
    "type": "integer",
    "required": false
  },
  "query_timeout_in_seconds": {
    "type": "integer",
    "required": false
  }
}
{
"connect_args": "DRIVER={ODBC Driver 17 for SQL Server};SERVER={<HOST>,<PORT>};UID={<USER>};PWD={<PASSWORD>};",
"login_timeout": 15,
"query_timeout_in_seconds": 840
}Starburst Enterprise
{
  "connect_args": {
    "host": {
      "type": "string",
      "required": true
    },
    "port": {
      "type": "integer",
      "required": true
    },
    "user": {
      "type": "string",
      "required": true
    },
    "password": {
      "type": "string",
      "required": true
    }
  },
  "ssl_options": {
    "type": "object",
    "required": false,
    "fields": {
      "ca_data": {
        "type": "string",
        "required": false,
        "example": "-----BEGIN CERTIFICATE-----\nxxx\n-----END CERTIFICATE-----\n"
      },
      "disabled": {
        "type": "boolean",
        "required": false
        }
    }
  }
}
{
"connect_args": {
"host": "<hostname>",
"port": 8443,
"user": "<user>",
"password": "<password>"
}
}Starburst Galaxy
{
  "connect_args": {
    "host": {
      "type": "string",
      "required": true
    },
    "port": {
      "type": "integer",
      "required": false
    },
    "user": {
      "type": "string",
      "required": true
    },
    "password": {
      "type": "string",
      "required": true
    },
    "catalog": {
      "type": "string",
      "required": false
    }
  }
}
{
"connect_args": {
"host": "<account>.trino.galaxy.starburst.io",
"port": 443,
"user": "<user>/accountadmin",
"password": "<password>",
"catalog": "<catalog>"
}
}Tableau
{
  "username": {
    "type": "string",
    "required": true
  },
  "client_id": {
    "type": "string",
    "required": true
  },
  "secret_id": {
    "type": "string",
    "required": true
  },
  "secret_value": {
    "type": "string",
    "required": true
  },
  "site_name": {
    "type": "string",
    "required": false
  },
  "server_name": {
    "type": "string",
    "required": true
  },
  "verify_ssl": {
    "type": "boolean",
    "required": false
  },
  "token_expiration_seconds": {
    "type": "integer",
    "required": false
  }
}
Teradata
{
  "connect_args": {
    "host": {
      "type": "string",
      "required": true
    },
    "user": {
      "type": "string",
      "required": true
    },
    "password": {
      "type": "string",
      "required": true
    },
    "dbs_port": {
      "type": "string",
        "required": true,
        "example": "1025"
    },
    "request_timeout": {
      "type": "integer",
      "required": false
    },
    "logon_timeout": {
      "type": "integer",
      "required": false
    },
    "tmode": {
      "type": "string",
        "required": true,
        "example": "TERA"
    },
    "sslmode": {
      "type": "string",
        "required": true,
        "example": "PREFER"
    },
    "logmech": {
      "type": "string",
        "required": true,
        "example": "TD2"
    }
  },
  "ssl_options": {
    "type": "object",
    "required": false,
    "fields": {
      "ca_data": {
        "type": "string",
        "required": false,
        "example": "-----BEGIN CERTIFICATE-----\nxxx\n-----END CERTIFICATE-----\n"
      },
      "disabled": {
        "type": "boolean",
        "required": false
      }
    }
  }
}
{
"connect_args": {
"host": "<hostname>",
"user": "dbc",
"password": "<password>",
"dbs_port": "1025",
"request_timeout": "840",
"logon_timeout": "15",
"tmode": "TERA",
"sslmode": "PREFER",
"logmech": "TD2"
}
} Additional Details
Note that certain integrations have additional requirements when creating this schema. See below:
Snowflake
When connecting a Snowflake integration that requires key-pair authentication, the private key must be decrypted. If the key-pair was encrypted with a private key passphrase, it must be decrypted using the correct passphrase.
For example, given a Snowflake private key in a file my_snowflake_private_key.p8, here's how to produce the expected private key value using the openssl CLI. Note that you must replace <PASS_PHRASE> with the correct private key passphrase.
openssl pkcs8 -in my_snowflake_private_key.p8 -inform PEM -outform DER -passin pass:<PASS_PHRASE> | openssl base64 -AIf your key-pair does not have a passphrase, you can use this command instead:
openssl pkcs8 -in my_snowflake_private_key.p8 -inform PEM -outform DER -nocrypt | openssl base64 -AUse the outputted value as the private_key in your Snowflake credentials JSON file.
Note: some terminals will add special characters when copying encoded text values. It is recommended to use a utility such as
pbcopyto copy the base64 encoded private key from your terminal to avoid adding unwanted, invisible characters.
BigQuery
BigQuery self-hosted credentials use a GCP Service Account JSON key. This is the same JSON file you would download from the GCP Console when creating a service account key.
BigQuery self-hosted credentials require the
--bq-project-idparameter when onboarding via CLI. This specifies the GCP project ID to use for running BigQuery queries and billing. This is required because the service account JSON is stored externally and Monte Carlo cannot extract the project ID from it during onboarding.
BigQuery self-hosted connections are created in a disabled state. After validating the connection, you can enable it by selecting "Enable" from the connection's context menu in the Monte Carlo UI (Settings → Integrations).
To create the credentials JSON:
- Follow the BigQuery integration documentation to create a service account with the required permissions.
- Create a JSON key for the service account from the GCP Console (IAM & Admin → Service Accounts → Keys → Add Key → Create new key → JSON).
- Wrap the downloaded JSON key inside a
connect_argsobject:
{
  "connect_args": {
    "type": "service_account",
    "project_id": "my-project-id",
    "private_key_id": "abc123...",
    "private_key": "-----BEGIN PRIVATE KEY-----\n...\n-----END PRIVATE KEY-----\n",
    "client_email": "[email protected]",
    "client_id": "123456789",
    "auth_uri": "https://accounts.google.com/o/oauth2/auth",
    "token_uri": "https://oauth2.googleapis.com/token",
    "auth_provider_x509_cert_url": "https://www.googleapis.com/oauth2/v1/certs",
    "client_x509_cert_url": "https://www.googleapis.com/robot/v1/metadata/x509/..."
  }
}
Databricks
For Databricks, the SQL Warehouse ID must be specified when registering the credentials and not stored as part of the self-hosted credentials.
Example:
montecarlo integrations add-self-hosted-credentials-v2 \
    --connection-type databricks-metastore-sql-warehouse \
    --databricks-warehouse-id <databricks_warehouse_id> \
    --self-hosted-credentials-type AWS_SECRETS_MANAGER \
    --aws-secret <secret_arn> \
    --name my-databricks
Using AWS Secrets Manager
Credentials for an integration can be provided to the Agent by storing them in AWS Secrets Manager and having the Agent fetch them at runtime. This is the approach Monte Carlo recommends.
Step 1: Define Credentials
Step 2: Store Credentials in AWS Secrets Manager
Navigate to Secrets Manager in your AWS console and select "Store a new secret". Ensure you select the appropriate region, generally the same region where you are deploying the agent. If you prefer, you can also complete these steps using the AWS CLI, Infrastructure as Code (IaC), or another tool of your choice.
Then, choose "Other type of secrets" and paste the filled-in schema from the previous step. Finally, select "Next".
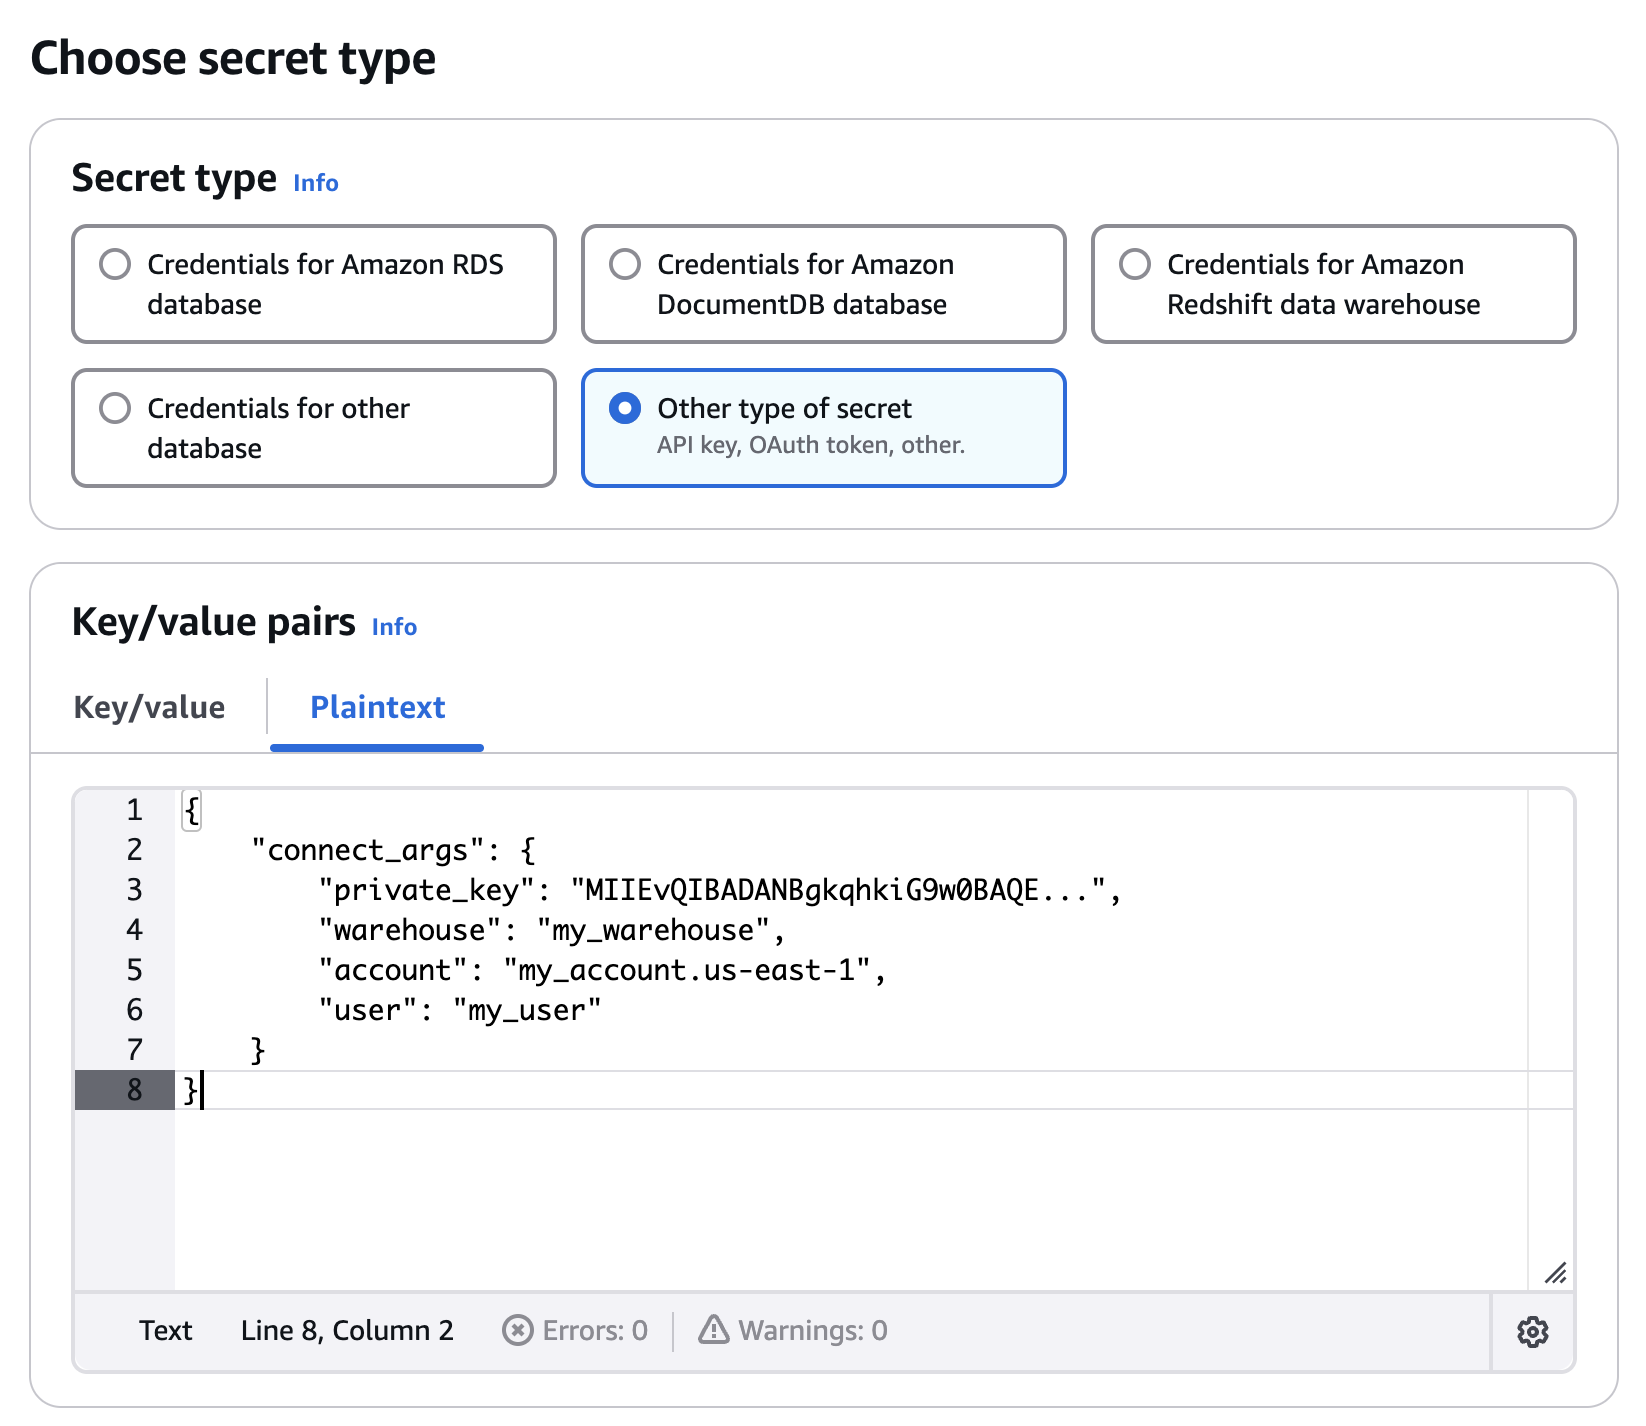
Example AWS Console
Follow the rest of the wizard to proceed and give the secret a meaningful name, description, and any tags. You can also configure rotation if desired.
Once you have stored the new secret, search for it and save the ARN. You will need this value in subsequent steps.
Step 3: Create a policy
You will then need to update the IAM role associated with the agent to allow access to the secret.
First, copy the policy below and replace <secret_arn> with the ARN you saved earlier.
{
    "Version": "2012-10-17",
    "Statement": [
        {
            "Effect": "Allow",
            "Action": "secretsmanager:GetSecretValue",
            "Resource": "<secret_arn>"
        }
    ]
}
Then, update the role associated with the agent using the policy created above. This can be done using the AWS Console, AWS CLI, Infrastructure as Code (IaC), or another tool of your choice.
Step 4: Onboard the Integration
Via the Monte Carlo UI
- In Monte Carlo, navigate to Settings > Integrations and select the integration type you want to add.
- Select Customer managed credentials.
- Select the deployment to use for this integration.
- Choose AWS Secrets Manager as the secret store.
- Fill in the required fields and click Add to validate and add the connection.

Via the CLI
Alternatively, you can onboard the integration using the Monte Carlo CLI.
- Follow this guide to install and configure the CLI (requires >=
0.147.0). - Use the command
montecarlo integrations add-self-hosted-credentials-v2to add the integration. For detailed instructions, refer to the reference guide.montecarlo integrations add-self-hosted-credentials-v2 \ --connection-type snowflake \ --self-hosted-credentials-type AWS_SECRETS_MANAGER \ --aws-secret <secret_arn> \ --name my-snowflakemontecarlo integrations add-self-hosted-credentials-v2 \ --connection-type bigquery \ --self-hosted-credentials-type AWS_SECRETS_MANAGER \ --aws-secret <secret_arn> \ --bq-project-id <gcp_project_id> \ --name my-bigquerymontecarlo integrations add-self-hosted-credentials-v2 \ --connection-type databricks-metastore-sql-warehouse \ --databricks-warehouse-id <databricks_warehouse_id> \ --self-hosted-credentials-type AWS_SECRETS_MANAGER \ --aws-secret <secret_arn> \ --name my-databricks
This will create a new, disabled integration in your Monte Carlo account.
Using GCP Secret Manager
Credentials for an integration can be provided to the Agent by storing them in GCP Secret Manager and having the Agent fetch them at runtime. This is the approach Monte Carlo recommends for the GCP platform.
Step 1: Define Credentials
Step 2: Store Credentials in GCP Secret Manager
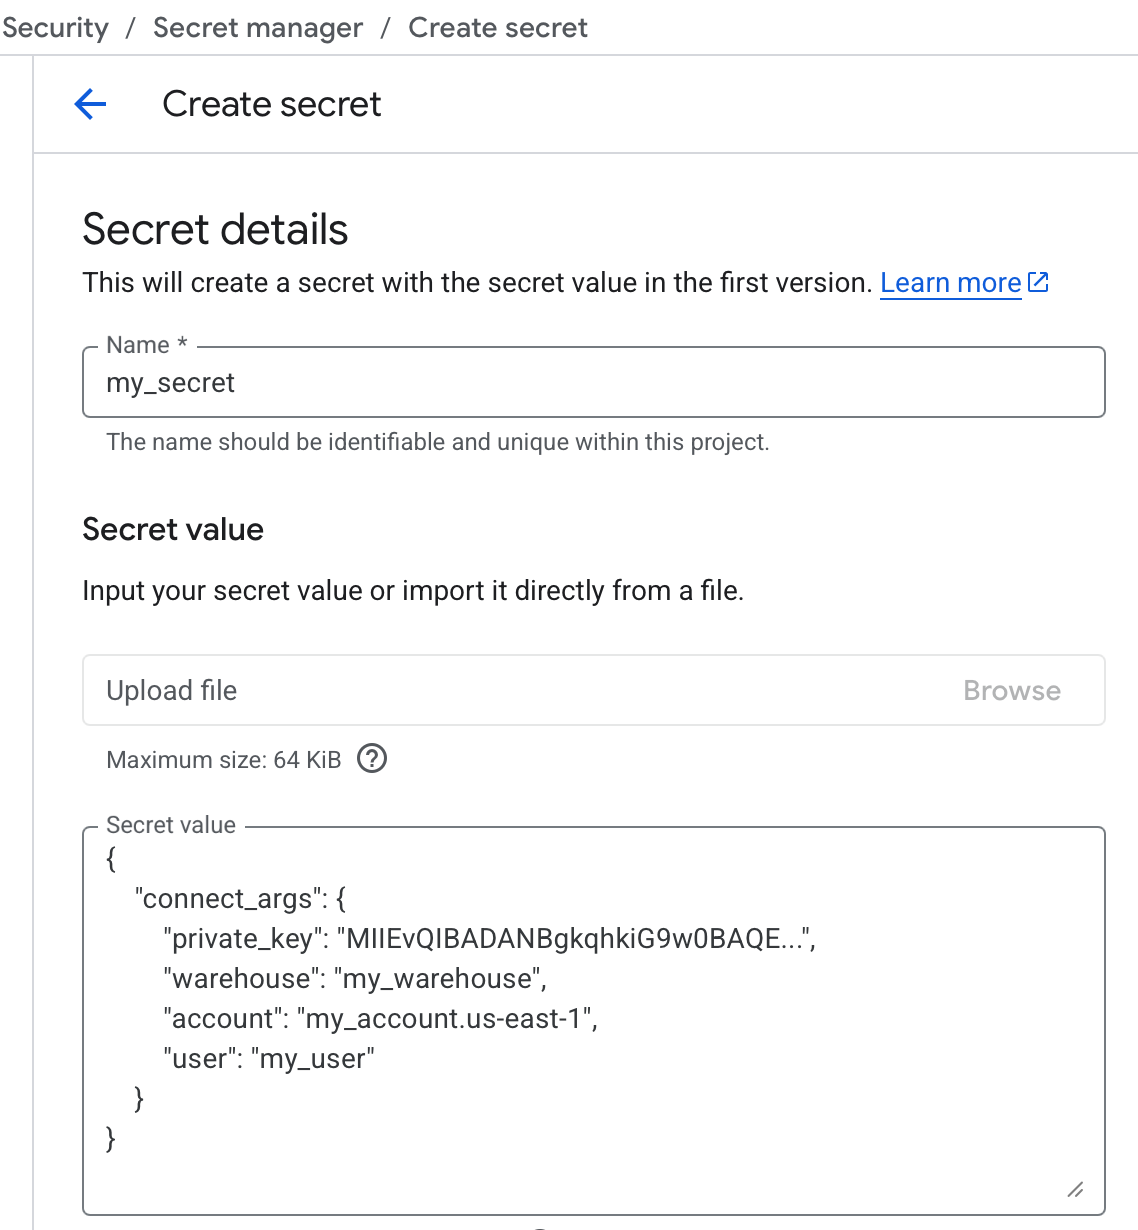
Navigate to Secret Manager in your GCP console and select "Create secret", specify a name and paste the filled-in schema from the previous step in the "Secret value" field. Finally, select "Create secret".
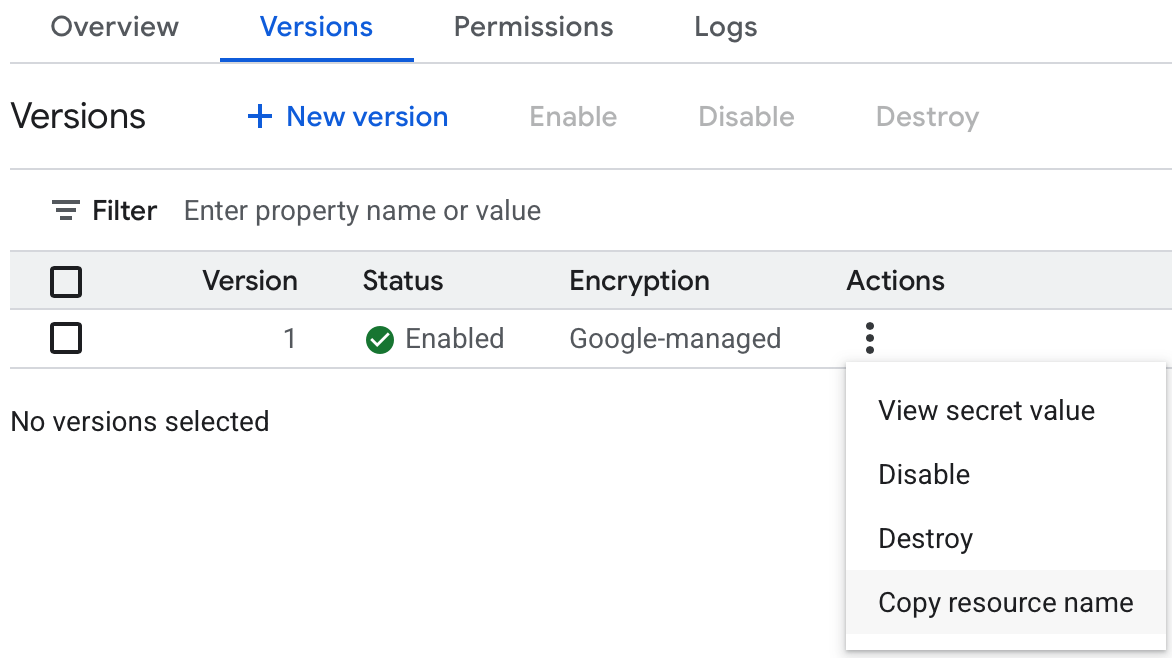
Once you have stored the new secret, you can use the "Copy resource name" option in the Actions menu for the version to copy the resource name, it should be a string like: projects/<project_id>/secrets/<secret_name>/versions/1, you can use latest instead of 1 to reference the latest version of the secret, this value will be needed in subsequent steps.
Step 3: Grant the agent access to the secret
You will then need to update the permissions on the new secret, granting access to the service account used by the agent.
Navigate to the secret you just created in your GCP console and select the "Permissions" tab, click "Grant access", add the principal for the agent's service account and select the Secret Manager Secret Accessor role.
You can get the principal for the agent from the CloudRun service, from the serviceAccountName attribute in the YAML file, for example: mcd-agent-service-sa-<number>@<project_id>.iam.gserviceaccount.com.
Step 4: Onboard the Integration
Via the Monte Carlo UI
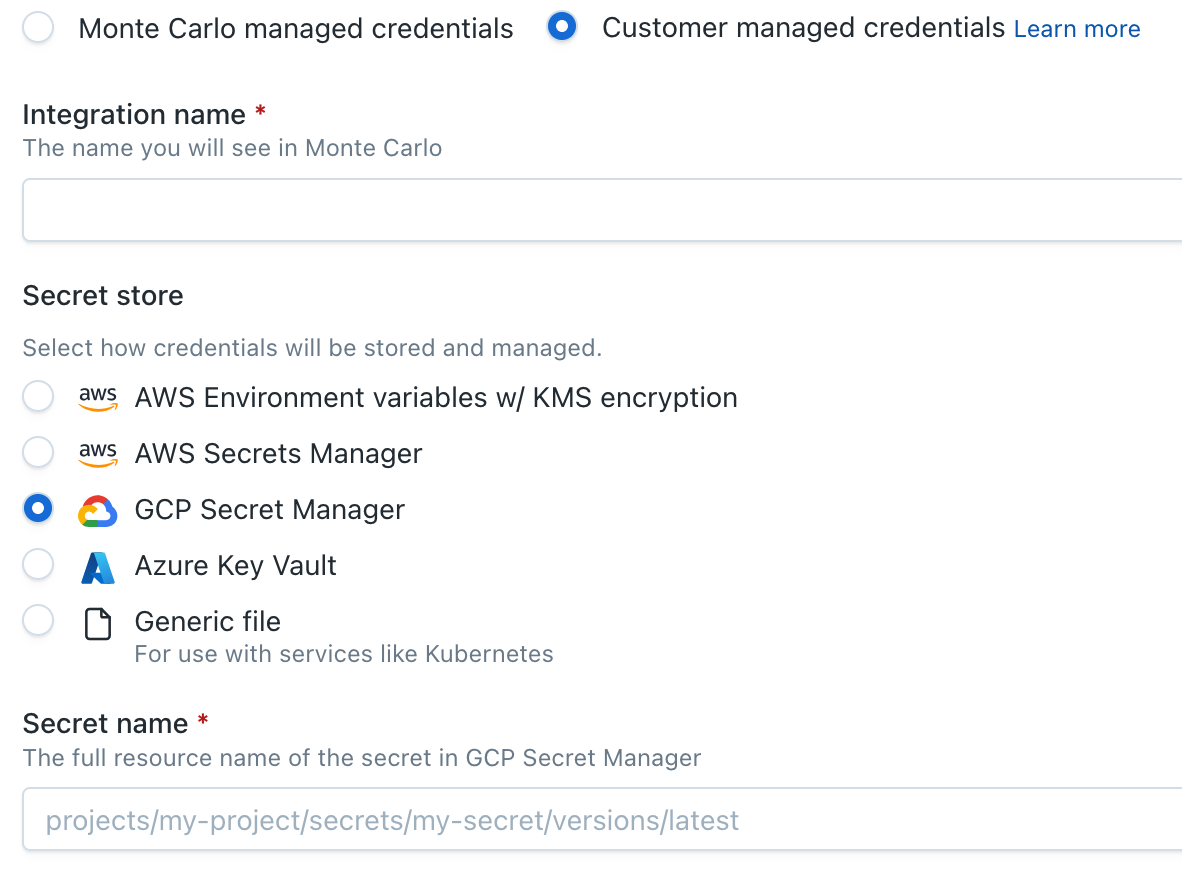
- In Monte Carlo, navigate to Settings > Integrations and select the integration type you want to add.
- Select Customer managed credentials.
- Select the deployment to use for this integration.
- Choose GCP Secret Manager as the secret store.
- Fill in the required fields and click Add to validate and add the connection.
Via the CLI
Alternatively, you can onboard the integration using the Monte Carlo CLI.
- Follow this guide to install and configure the CLI (requires >=
0.131.0). - Use the command
montecarlo integrations add-self-hosted-credentials-v2to add the integration. For detailed instructions, refer to the reference guide.montecarlo integrations add-self-hosted-credentials-v2 \ --connection-type snowflake \ --self-hosted-credentials-type GCP_SECRET_MANAGER \ --gcp-secret <secret_resource_name> \ --name my-snowflakemontecarlo integrations add-self-hosted-credentials-v2 \ --connection-type bigquery \ --self-hosted-credentials-type GCP_SECRET_MANAGER \ --gcp-secret <secret_resource_name> \ --bq-project-id <gcp_project_id> \ --name my-bigquery
This will create a new, disabled integration in your Monte Carlo account.
Using Azure Key Vault
Credentials for an integration can be provided to the Agent by storing them in Azure Key Vault as secrets, and having the Agent fetch them at runtime. This is the approach Monte Carlo recommends for the Azure platform.
Step 1: Define Credentials
Step 2: Store Credentials in Azure Key Vault
Navigate to "Key vaults" in your Azure Portal (If you prefer, you can also use the Azure API, CLI, etc.) and select "Create" (you can also use an existing Key Vault if you prefer to), follow the instructions to create it (select a name, resource group, etc.). Both permission models (RBAC and access policies) are supported.
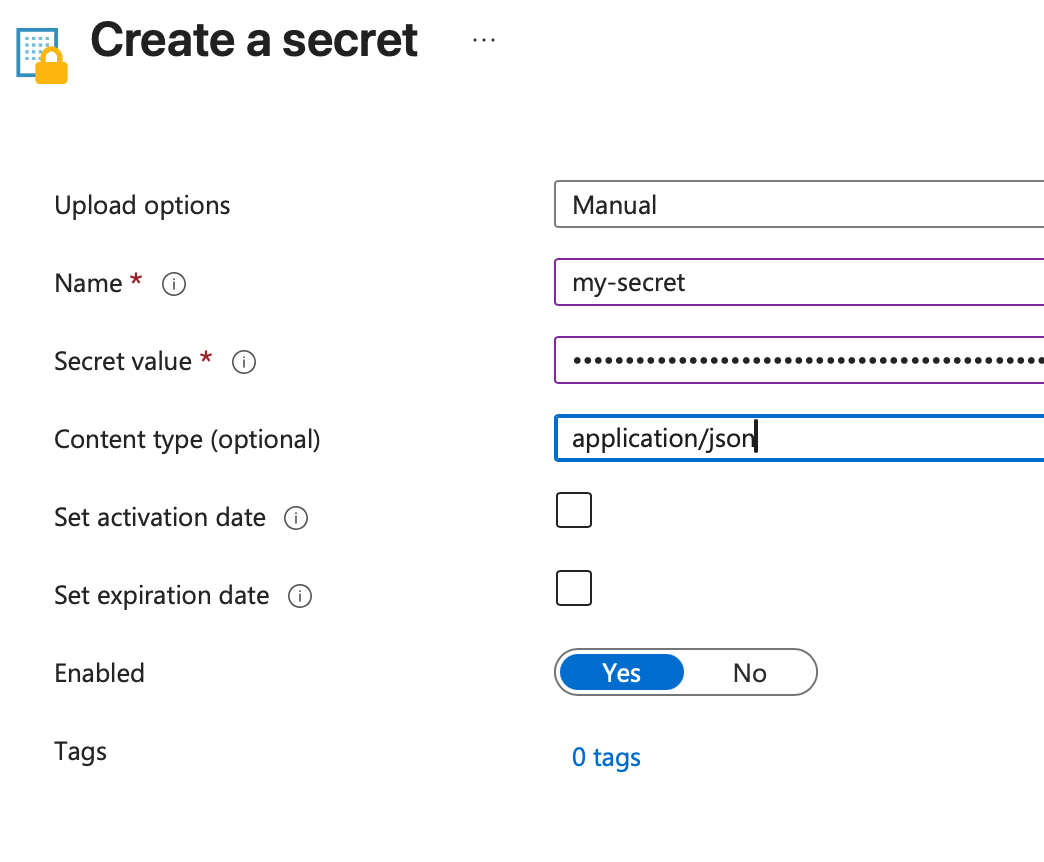
Once the key vault is created, you need to add a secret to it with the credentials: navigate to the Key Vault and select Objects -> Secrets, click "Generate/Import", specify a name and paste the filled-in schema from the previous step in the "Secret value" field. Finally, select "Create".
Step 3: Grant the agent access to the Key Vault secrets
The steps to follow to grant the agent access to the secret depend on the permission model used on the Key Vault:
Using Access Policies
You will then need to update the permissions on the Key Vault, granting access to the managed identity used by the agent.
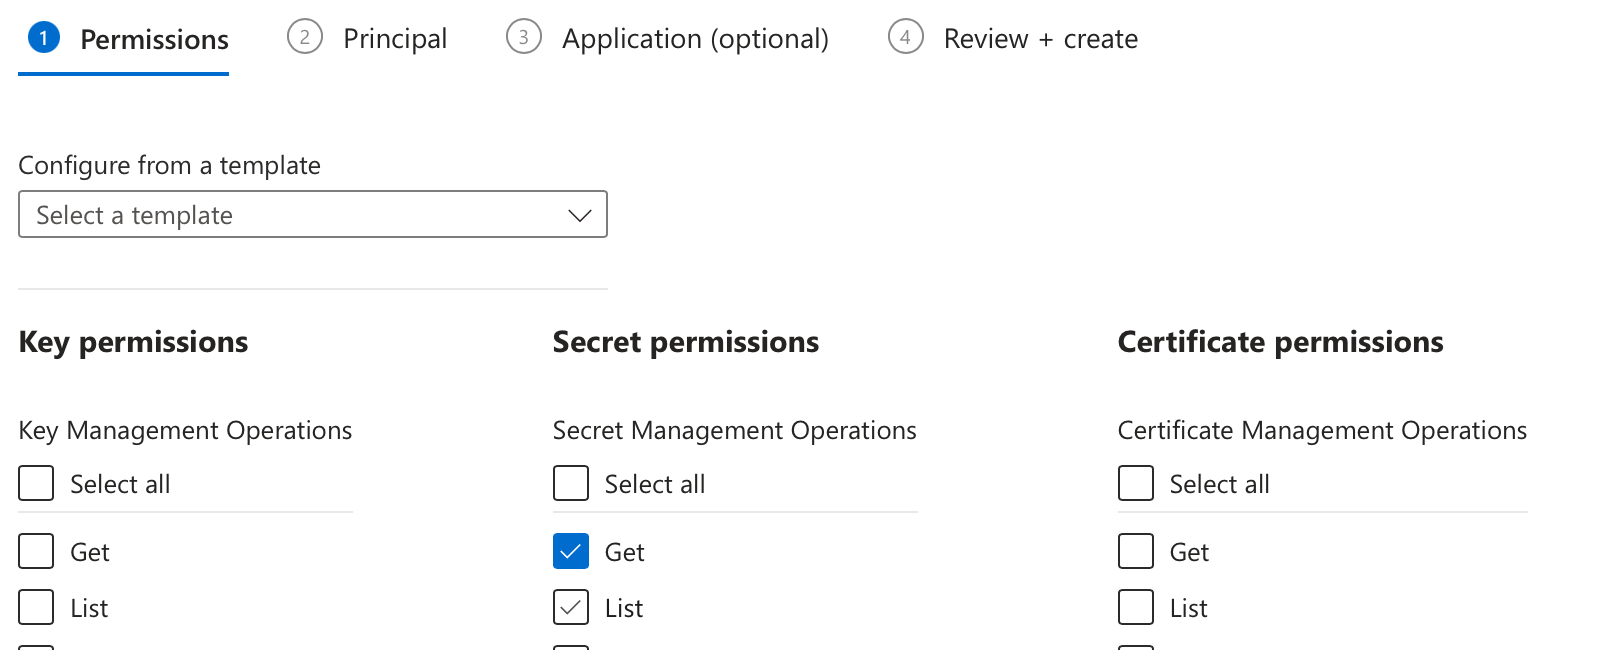
Navigate to the Key Vault in the Azure Portal and select "Access policies", click "Create", select "Get" under "Secret permissions" and select the managed identity used by the agent (usually named mcd-agent-service-<ID>-identity). Click "Create" to save the policy.
Using Role Based Access Control (RBAC)
You will need to grant the agent read-only access to the secret values in your Key Vault.
Navigate to the Key Vault in the Azure Portal and select "Access control (IAM)", click "Add" -> "Add role assignment", select "Key Vault Secrets User" as the "Job function role", in the next screen select "Assign access to" -> "Managed identity", click "Select members" and select the identity used by the agent (usually named mcd-agent-service-<ID>-identity). Click "Review + assign" to save your changes.

Step 4: Onboard the Integration
Via the Monte Carlo UI
- In Monte Carlo, navigate to Settings > Integrations and select the integration type you want to add.
- Select Customer managed credentials.
- Select the deployment to use for this integration.
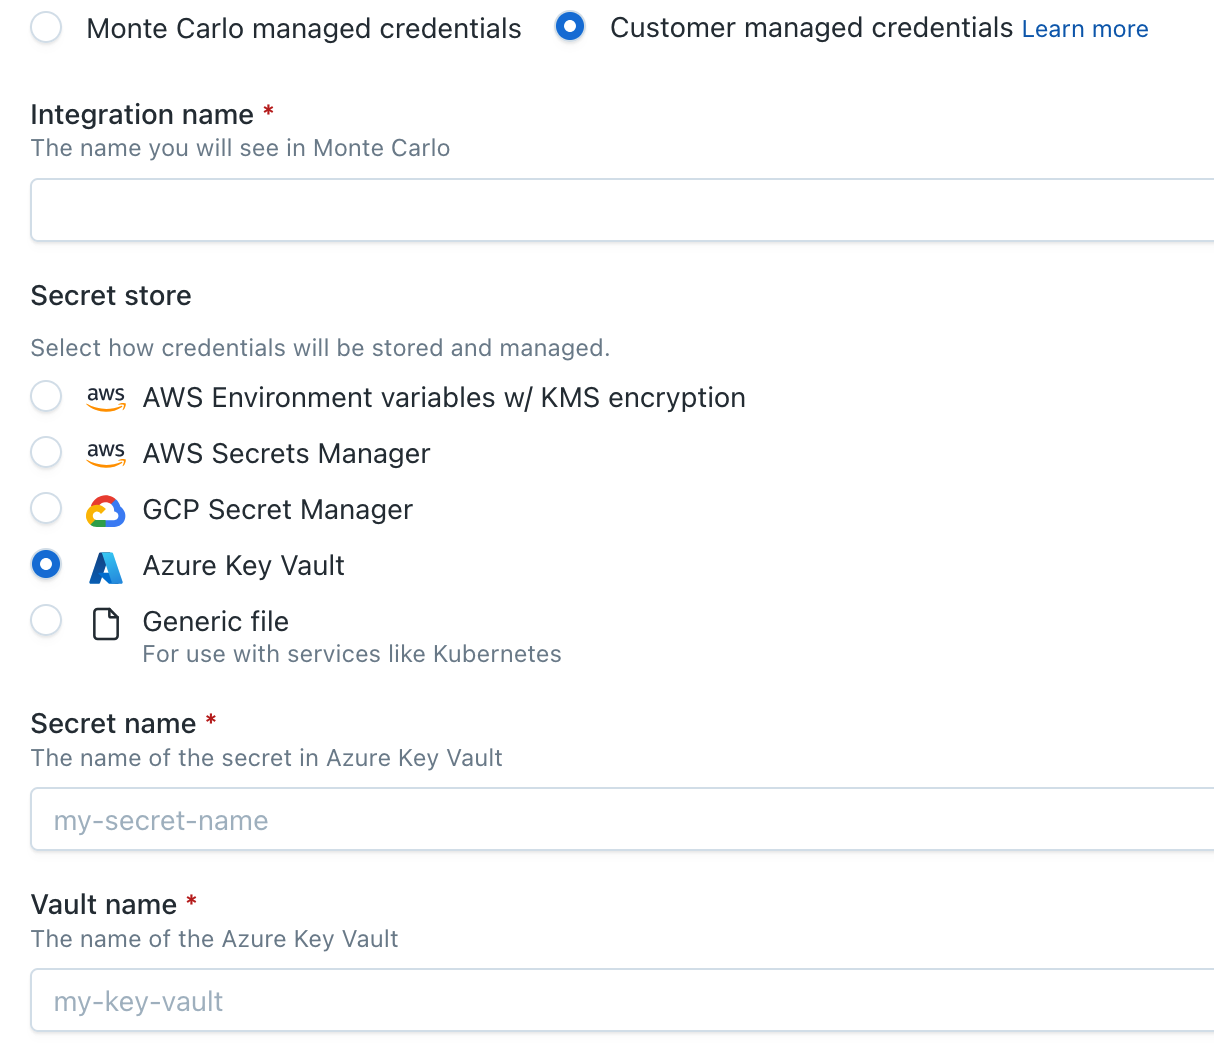
- Choose Azure Key Vault as the secret store.
- Fill in the required fields and click Add to validate and add the connection.
Via the CLI
Alternatively, you can onboard the integration using the Monte Carlo CLI.
- Follow this guide to install and configure the CLI (requires >=
0.148.0). - Use the command
montecarlo integrations add-self-hosted-credentials-v2to add the integration. For detailed instructions, refer to the reference guide.montecarlo integrations add-self-hosted-credentials-v2 \ --connection-type snowflake \ --self-hosted-credentials-type AZURE_KEY_VAULT \ --akv-vault-name <vault_name> \ --akv-secret <secret_name> \ --name my-snowflake
This will create a new, disabled integration in your Monte Carlo account.
Using Environment Variables on AWS
Credentials for an integration can be provided to the Agent by storing them as environment variables. While Monte Carlo generally recommends using AWS Secrets Manager, if you choose to store credentials as environment variables, it is recommended to use AWS KMS to encrypt the credential values.
AWS Lambda LimitationsAWS limits Lambda's environment variables to 4 KB. If the Agent is deployed to AWS Lambda, Monte Carlo again recommends using AWS Secrets Manager to self-host credentials.
Step 1: Define Credentials
You might need to format the JSON object so it can be stored as an environment variable. This can be accomplished using the coding language of your choice or a jq shell command. For example:
jq -c . my_snowflake_creds.json{"connect_args":{"private_key":"MIIEvQIBADANBgkqhkiG9w0BAQE...","warehouse": "my_warehouse","account":"my_account.us-east-1","user":"my_user"}}Step 2: Encrypt Credentials using AWS KMS (optional)
For the AWS platform, Monte Carlo recommends encrypting your credentials using AWS KMS before adding them as environment variables to the Agent. You can complete these steps using the AWS UI, AWS CLI, Infrastructure as Code (IaC), or another tool of your choice. The examples below use the AWS CLI.
First, create a new KMS key. For example using the AWS CLI:
aws kms create-key \
    --description "My Snowflake Creds" \
    --key-usage ENCRYPT_DECRYPT \
    --origin AWS_KMS
Then, use the KeyId from the output to encrypt your credentials. For example, using the AWS CLI:
 aws kms encrypt \
    --key-id <KEY_ID> \
    --plaintext fileb://my_snowflake_creds.json \
    --output text \
    --query CiphertextBlob
Copy the text blob and the AWS KMS KeyId. You will need this in subsequent steps.
Finally, ensure the agent has the correct IAM policy declared in its IAM role to use the newly created KMS key.
{
    "Version": "2012-10-17",
    "Statement": [
        {
            "Effect": "Allow",
            "Action": [
                "kms:Decrypt"
            ],
            "Resource": "<your_kms_key_id>"
        }
    ]
}
Step 3: Set Environment Variable
This process will vary depending on the Agent's deployment. However, simply choose any unused environment variable name (e.g., MCD_SNOWFLAKE_CREDS) and set your credentials as the value. The credential value should be either the stringified JSON object or the AWS KMS encrypted text blob.
Note that Monte Carlo requires the use of the following standard prefix for all environment variables: MCD.
After setting the environment variable, make sure to deploy these changes (if applicable). If encrypting the variables with KMS, you will need to attach a policy to the agent's role to allow access to the key and decrypt the values.
Step 4: Onboard the Integration
Via the Monte Carlo UI
- In Monte Carlo, navigate to Settings > Integrations and select the integration type you want to add.
- Select Customer managed credentials.
- Select the deployment to use for this integration.
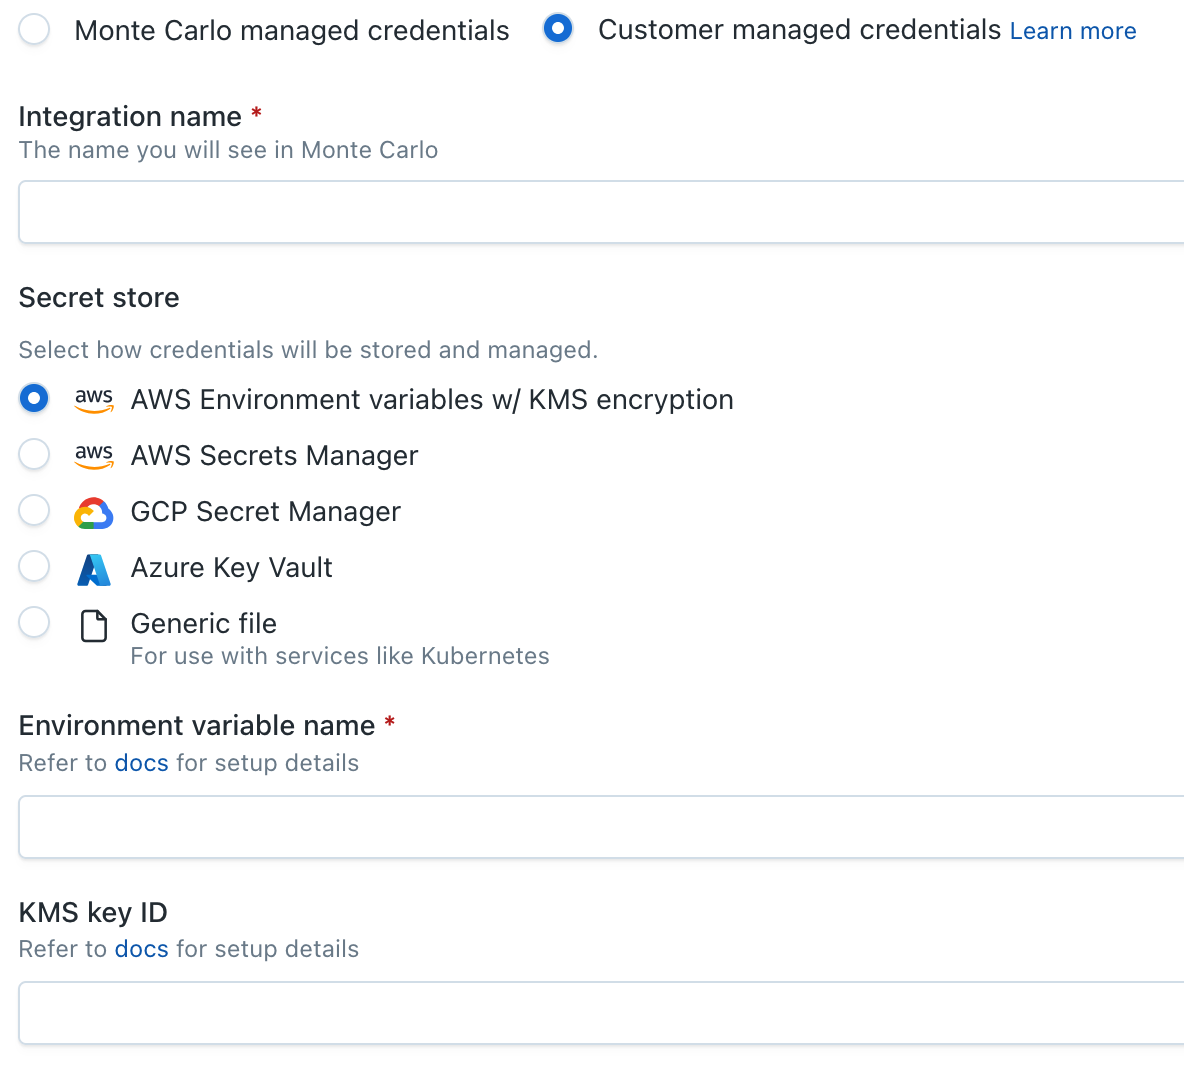
- Choose AWS Environment variables w/ KMS encryption as the secret store.
- Fill in the required fields and click Add to validate and add the connection.
Via the CLI
Alternatively, you can onboard the integration using the Monte Carlo CLI.
- Follow this guide to install and configure the CLI (requires >=
0.131.0). - Use the command
montecarlo integrations add-self-hosted-credentials-v2to add the integration. For detailed instructions, refer to the reference guide.- The value for argument
--env-var-nameis the name of the environment variable set in Step 3. - The value for argument
--kms-key-idis the AWS KMSKeyIdfrom Step 2 (if used).
- The value for argument
montecarlo integrations add-self-hosted-credentials-v2 \
    --connection-type snowflake \
    --self-hosted-credentials-type ENV_VAR \
    --decryption-service-type KMS \
    --env-var-name MCD_SNOWFLAKE_CREDS \
    --kms-key-id <kms key arn> \
    --name my-snowflake
This will create a new, disabled integration in your Monte Carlo account.
Using Files (Kubernetes / Docker)
Credentials for an integration can be provided to the Agent as JSON files mounted into the container. This approach is used with the Generic Agent when deployed on Kubernetes or Docker Compose, where credential files are mounted from Kubernetes Secrets or Docker volumes.
This method is specific to Kubernetes and Docker deployments of the Generic Agent. For cloud-native secret managers (AWS Secrets Manager, Azure Key Vault, GCP Secret Manager), see the corresponding sections above or the Secrets Management guide.
For Kubernetes deployments on cloud platforms (EKS, AKS, GKE), we recommend using the native cloud secret manager (AWS Secrets Manager, Azure Key Vault, or GCP Secret Manager) instead of files. With a cloud secret manager, the agent accesses secrets directly from the provider at runtime rather than relying on secrets synchronized to the filesystem. See the AWS EKS, Azure AKS, or GCP GKE guides for details.
Step 1: Define Credentials
Step 2: Store Credentials as a File
Create a JSON file with the filled-in schema from the previous step and make it available to the agent:
Kubernetes: Add the file to the mcd-integrations-secrets Kubernetes secret:
kubectl delete secret mcd-integrations-secrets -n mcd-agent
kubectl create secret generic mcd-integrations-secrets -n mcd-agent \
  --from-file=<integration>.json=<integration>.json
kubectl rollout restart deployment/mcd-agent-deployment -n mcd-agent
To include multiple integrations in the same secret, pass additional --from-file flags:
kubectl create secret generic mcd-integrations-secrets -n mcd-agent \
  --from-file=snowflake.json=snowflake.json \
  --from-file=postgres.json=postgres.json
Docker Compose: Place the file in the ./secrets/integrations/ directory. It is automatically mounted read-only into the container at /etc/secrets/integrations/.
For more details, see the Kubernetes or Docker Compose deployment guides and the Secrets Management guide.
Step 3: Onboard the Integration
Via the Monte Carlo UI
- In Monte Carlo, navigate to Settings > Integrations and select the integration type you want to add.
- Select Customer managed credentials.
- Select the deployment to use for this integration.
- Choose Generic file as the secret store.
- Enter the file path (e.g.
/etc/secrets/integrations/<integration>.json) and an integration name. - Click Add to validate and add the connection.

Via the CLI
Alternatively, you can onboard the integration using the Monte Carlo CLI.
- Follow this guide to install and configure the CLI (requires >=
0.147.0). - Use the command
montecarlo integrations add-self-hosted-credentials-v2to add the integration. For detailed instructions, refer to the reference guide.
montecarlo integrations add-self-hosted-credentials-v2 \
    --connection-type <integration> \
    --self-hosted-credentials-type FILE \
    --file-path /etc/secrets/integrations/<integration>.json \
--name <connection_name>montecarlo integrations add-self-hosted-credentials-v2 \
--connection-type bigquery \
--self-hosted-credentials-type FILE \
--file-path /etc/secrets/integrations/bigquery.json \
--bq-project-id <gcp_project_id> \
--name my-bigqueryThis will create a new, disabled integration in your Monte Carlo account.
FAQs
What deployment types support self-hosted credentials?
Self-hosted credentials with the agent are supported on the native AWS agent, the proxied AWS agent, the native Azure agent, the native GCP agent, and the Generic Agent for the V2 Platform.
Which integrations support self-hosted credentials?
Currently the following integration types are supported:
- Azure Dedicated SQL Pool
- Azure SQL Database
- BigQuery
- ClickHouse
- Databricks
- DB2
- Dremio
- Informatica
- Looker / Looker GIT
- Microsoft Fabric
- Motherduck
- MySQL
- Oracle
- Postgres
- PowerBI
- Redshift
- Salesforce CRM
- Salesforce Data Cloud
- SAP HANA
- Snowflake
- Starburst Enterprise
- Starburst Galaxy
- SQL Server
- Tableau
- Teradata
How do I update my integration credentials?
Self-hosted credentials can be directly updated in the hosting mechanism. If credentials are stored in AWS Secrets Manager, simply update the secret value with the new credentials. If credentials are stored as environment variables in the Agent, just update the environment variable value and deploy the changes (if applicable).
If the metadata (configuration) of the self-hosted credentials needs to be updated in Monte Carlo, this can be accomplished using the Monte Carlo API. See below for an example.
You can use the API to either by generating an API token or from the UI via the API Explorer.
Steps
- Execute the updateSelfHostedCredentialsV2 mutation to start the update.
mutation updateSelfHostedCredentialsV2(
    $changes: SelfHostedUpdateCredentialsConnectionDetails!
    $connectionId: UUID!
  ) {
    updateSelfHostedCredentialsV2(
      changes: $changes
      connectionId: $connectionId
    ) {
      result {
        success
        key
      }
      __typename
    }
  }
{
"connectionId": "<connection uuid>",
"changes":{
"selfHostedCredentialsType": "AWS_SECRETS_MANAGER",
"awsSecret": "<new AWS secret ARN>",
}
}{
"data": {
"updateSelfHostedCredentialsV2": {
"result": {
"success": true,
"key": "tmp/55705681-7ff7-4836-b179-ca31597912fb"
}
}
}
}- Next, copy the
keyfrom the result and use it to update the connection via updateCredentialsV2.
  mutation updateCredentialsV2(
    $tempCredentialsKey: String!
    $connectionId: UUID!
  ) {
    updateCredentialsV2(
      tempCredentialsKey: $tempCredentialsKey
      connectionId: $connectionId
    ) {
      success
      updatedAt
    }
  }
{
"tempCredentialsKey": "tmp/55705681-7ff7-4836-b179-ca31597912fb",
"connectionId":"<connection uuid>"
}It is recommended to use the validation process described in step #5 to confirm that the integration still works as expected.
How do I convert an integration using self-hosted credentials to Monte Carlo Managed?
If an integration was onboarded using the self-hosted credential mechanism and you wish to migrate this integration to manage credentials securely on Monte Carlo's platform, you can do so via the Monte Carlo API.
You can use the API by generating an API token or from the UI via the API Explorer.
This will vary based on your connection type, but see the example below for an illustration with Snowflake.
Steps
- Execute the TestSnowflakeCredentialsV2 mutation to start the process.
mutation TestSnowflakeCredentialsV2(
    $connectionDetails: SnowflakeConnectionDetails!
    $validationName: String!
    $connectionOptions: ConnectionTestOptions
    $connectionId: UUID
  ) {
    testSnowflakeCredentialsV2(
      connectionDetails: $connectionDetails
      validationName: $validationName
      connectionOptions: $connectionOptions
      connectionId: $connectionId
    ) {
      key
      validationResult {
        additionalData {
          projectsValidated
          datasetsValidated
          tablesValidated
          queriesWithResults {
            query
            rows
          }
        }
        description
        errors {
          cause
          stackTrace
          friendlyMessage
          resolution
        }
        success
        validationName
        warnings {
          cause
          stackTrace
          friendlyMessage
          resolution
        }
      }
    }
  }
{
"connectionDetails": {
"private_key": "MIIEvQIBADANBgkqhkiG9w0BAQE...",
"private_key_passphrase": "my_passphrase",
"warehouse": "my_warehouse",
"account": "my_account.us-east-1",
"user": "my_user"
},
"connectionOptions": {
"dcId": "<service node id>"
},
"connectionId": "<connection uuid>",
"validationName": "save_credentials"
}{
"data": {
"testSnowflakeCredentialsV2": {
"key": "tmp/2230610d-b107-40d5-87ab-7ed478aabd22",
"validationResult": {
"success": true,
"validationName": null,
"description": null,
"errors": null,
"warnings": null,
"additionalData": null
}
}
}
}- Copy the
keyfrom the result in step one and use this as input in thetempCredentialsKeyfor the updateCredentialsV2 mutation.
  mutation updateCredentialsV2(
    $tempCredentialsKey: String!
    $connectionId: UUID!
  ) {
    updateCredentialsV2(
      tempCredentialsKey: $tempCredentialsKey
      connectionId: $connectionId
    ) {
      success
      updatedAt
      __typename
    }
  }
{
"tempCredentialsKey": "tmp/2230610d-b107-40d5-87ab-7ed478aabd22",
"connectionId": "<connection uuid>"
}It is recommended to use the validation process described in step #5 to confirm that the integration still works as expected. You can then delete any resources no longer in use.
How do I convert an integration using Monte Carlo managed credentials to self-hosted?
If an integration was onboarded using Monte Carlo's platform and you wish to migrate this to use the self-hosted credential mechanism, you can do so via the Monte Carlo API.
You can use the API by generating an API token or from the UI via the API Explorer.
This will vary based on your connection type, but see the example below for an illustration with Snowflake.
Steps
These steps assume you have already created the secret by following steps 1-3 for the self-hosting type you wish to use (e.g., AWS Secrets Manager, GCP Secret Manager, Environment Variables).
- Execute the TestSelfHostedCredentialsV2 mutation to start the process.
mutation testSelfHostedCredentialsV2(
    $connectionDetails: SelfHostedCredentialsConnectionDetails!
    $validationName: String!
  	$connectionOptions: ConnectionTestOptions
  ) {
    testSelfHostedCredentialsV2(
      connectionDetails: $connectionDetails
      validationName: $validationName
      connectionOptions: $connectionOptions
    ) {
      key
      validationResult {
        success
        validationName
        description
        errors {
          cause
          stackTrace
          friendlyMessage
          resolution
        }
        warnings {
          cause
          stackTrace
          friendlyMessage
          resolution
        }
        additionalData {
          projectsValidated
          datasetsValidated
          tablesValidated
          queriesWithResults {
            query
            rows
          }
        }
      }
    }
  }
{
"connectionDetails": {
"selfHostedCredentialsType": "ENV_VAR",
"envVarName": "MCD_MY_SNOWFLAKE_CREDS",
"connectionType": "snowflake"
},
"connectionOptions": {
"dcId": "<service node id>"
},
"validationName": "save_credentials"
}{
"data": {
"testSelfHostedCredentialsV2": {
"key": "tmp/2230610d-b107-40d5-87ab-7ed478aabd22",
"validationResult": {
"success": true,
"validationName": null,
"description": null,
"errors": null,
"warnings": null,
"additionalData": null
}
}
}
}- Copy the
keyfrom the result in step one and use this as input in thetempCredentialsKeyfor the updateCredentialsV2 mutation.
  mutation updateCredentialsV2(
    $tempCredentialsKey: String!
    $connectionId: UUID!
  ) {
    updateCredentialsV2(
      tempCredentialsKey: $tempCredentialsKey
      connectionId: $connectionId
    ) {
      success
      updatedAt
      __typename
    }
  }
{
"tempCredentialsKey": "tmp/2230610d-b107-40d5-87ab-7ed478aabd22",
"connectionId": "<connection uuid>"
}It is recommended to use the validation process described in step #5 to confirm that the integration still works as expected.
How do I verify that my AWS Secrets Manager value is valid JSON?
If the agent fails with Expecting value: line 1 column 1 (char 0) when fetching credentials from AWS Secrets Manager, the secret value may not be stored as a plain-text JSON string.
To verify that the secret is parseable, run the following from the host where the agent runs:
aws secretsmanager get-secret-value \
  --secret-id <secret-arn> \
  --region <region> \
  --query SecretString \
  --output text \
  | python -c 'import sys,json; json.loads(sys.stdin.read()); print("ok")'
If this prints ok, the secret value is valid JSON.
How do I debug connectivity between the Agent and my integration?
Please refer to the documentation here.
Updated 28 days ago