Databricks External Tables
Overview
Databricks external tables allow you to query data stored directly in cloud object storage—such as Amazon S3, Azure Data Lake Storage (ADLS Gen2), or Google Cloud Storage (GCS)—without ingesting or copying it into the Databricks-managed storage layer. These tables reference files in your data lake (Parquet, Delta, CSV, JSON, etc.) and expose them in the metastore so they behave like regular tables while still reading from the underlying storage location. Because external tables rely on the storage system as the source of truth, Databricks simply maintains metadata such as schema, location, and table properties.
File Formats
Databricks supports creating external tables from these file formats:
- Delta
- Iceberg
- CSV
- JSON
- Avro
- Parquet
- ORC
File type support is controlled by Databricks. Please reach out to Databricks if you need additional file formats supported.
Create and Monitor Databricks External Tables
Already have external tables created in Databricks?If you already have external tables in Databricks, skip to Add Databricks integration in Monte Carlo
An example of steps you can use for creating and monitoring external tables from cloud storage in Databricks are:
- Create a storage credential object that contains a long-term cloud credential, such as a service account, with access to the cloud storage path.
- Create an external location object that references the storage path and the storage credential object.
- Reference a path that is included in the external location when you create external tables, external volumes, or default managed storage locations. This can be the exact path defined in the external location or a subpath.
- Add Databricks integration in Monte Carlo..
- Create Table monitors for the external tables.
Below are only example queries for each of these steps for the different cloud storage provides.
Refer to the Databricks documentation for detailed instructions, configuration options, limitations, and other information.
AWS S3 Workflow
The following steps are an example of how to create external tables in Databricks from your S3 files. For detailed instructions and other info, see Databricks documentation.
-- Grant `mc_user` user permission to create external location on `my_aws_storage_cred` storage credential
GRANT CREATE EXTERNAL LOCATION ON STORAGE CREDENTIAL `my_aws_storage_cred` TO `mc_user`

-- Create an external location on the specific path to which `my_aws_storage_cred` has access
CREATE EXTERNAL LOCATION finance_loc URL 's3://depts/finance'
 WITH (CREDENTIAL my_aws_storage_cred)
 COMMENT 'finance';

 -- `mc_user` can create an external table over specific object within the `finance_loc` location
CREATE TABLE main.default.sec_filings LOCATION 's3://depts/finance/sec_filings';
Azure Storage Workflow
The following steps are an example of how to create external tables in Databricks from your Azure storage files. For detailed instructions and other info, see Databricks documentation.
-- Grant `mc_user` user permission to create external location on `my_azure_storage_cred` storage credential
GRANT CREATE EXTERNAL LOCATION ON STORAGE CREDENTIAL `my_azure_storage_cred` TO `mc_user`

-- Create an external location on the specific path to which `my_azure_storage_cred` has access
CREATE EXTERNAL LOCATION `finance_loc`
  URL 'abfss://[email protected]/depts/finance'
  WITH (CREDENTIAL `my_azure_storage_cred`)
  COMMENT 'finance';

-- `mc_user` can create an external table over specific object within the `finance_loc` location
CREATE TABLE main.default.sec_filings
LOCATION 'abfss://[email protected]/depts/finance/sec_filings';
GCS Workflow
The following steps are an example of how to create external tables in Databricks from your Azure storage files. For detailed instructions and other info, see Databricks documentation.
-- Grant `mc_user` user permission to create external location on `my_gcp_storage_cred` storage credential
GRANT CREATE EXTERNAL LOCATION ON STORAGE CREDENTIAL `my_gcp_storage_cred` TO `finance`

-- Create an external location on the specific path to which `my_gcp_storage_cred` has access
CREATE EXTERNAL LOCATION finance_loc URL 'gs://depts/finance'
  WITH (CREDENTIAL my_aws_storage_cred)
  COMMENT 'finance';

-- `mc_user` can create an external table over specific object within the `finance_loc` location
CREATE TABLE main.default.sec_filings LOCATION 'gs://depts/finance/sec_filings';
Add Databricks Integration in Monte Carlo
Now that you have external tables created in Databricks, we can add a Databricks integration in Monte Carlo to monitor the external tables.
First, refer to the Connecting to Databricks guide for details on creating a service user, managing permissions, and related setup (such as network configuration).
If you’ve already integrated Databricks with Monte Carlo, you can skip this step. If you’d like to confirm access to a specific asset, you can do so from the Integration Settings page.
Onboard Databricks Integration
Once you have the Databricks service user credentials created, you can add a Databricks integration using the onboarding wizard. Integrations can also be added via the CLI or API if you prefer.
This step uses the Monte Carlo UI to add the Connections.
- To add the Connections, navigate to the Integrations page in Monte Carlo. If this page is not visible to you, please reach out to your account representative.
- Under the Data Lake and Warehouses section, click the Create button and Databricks.
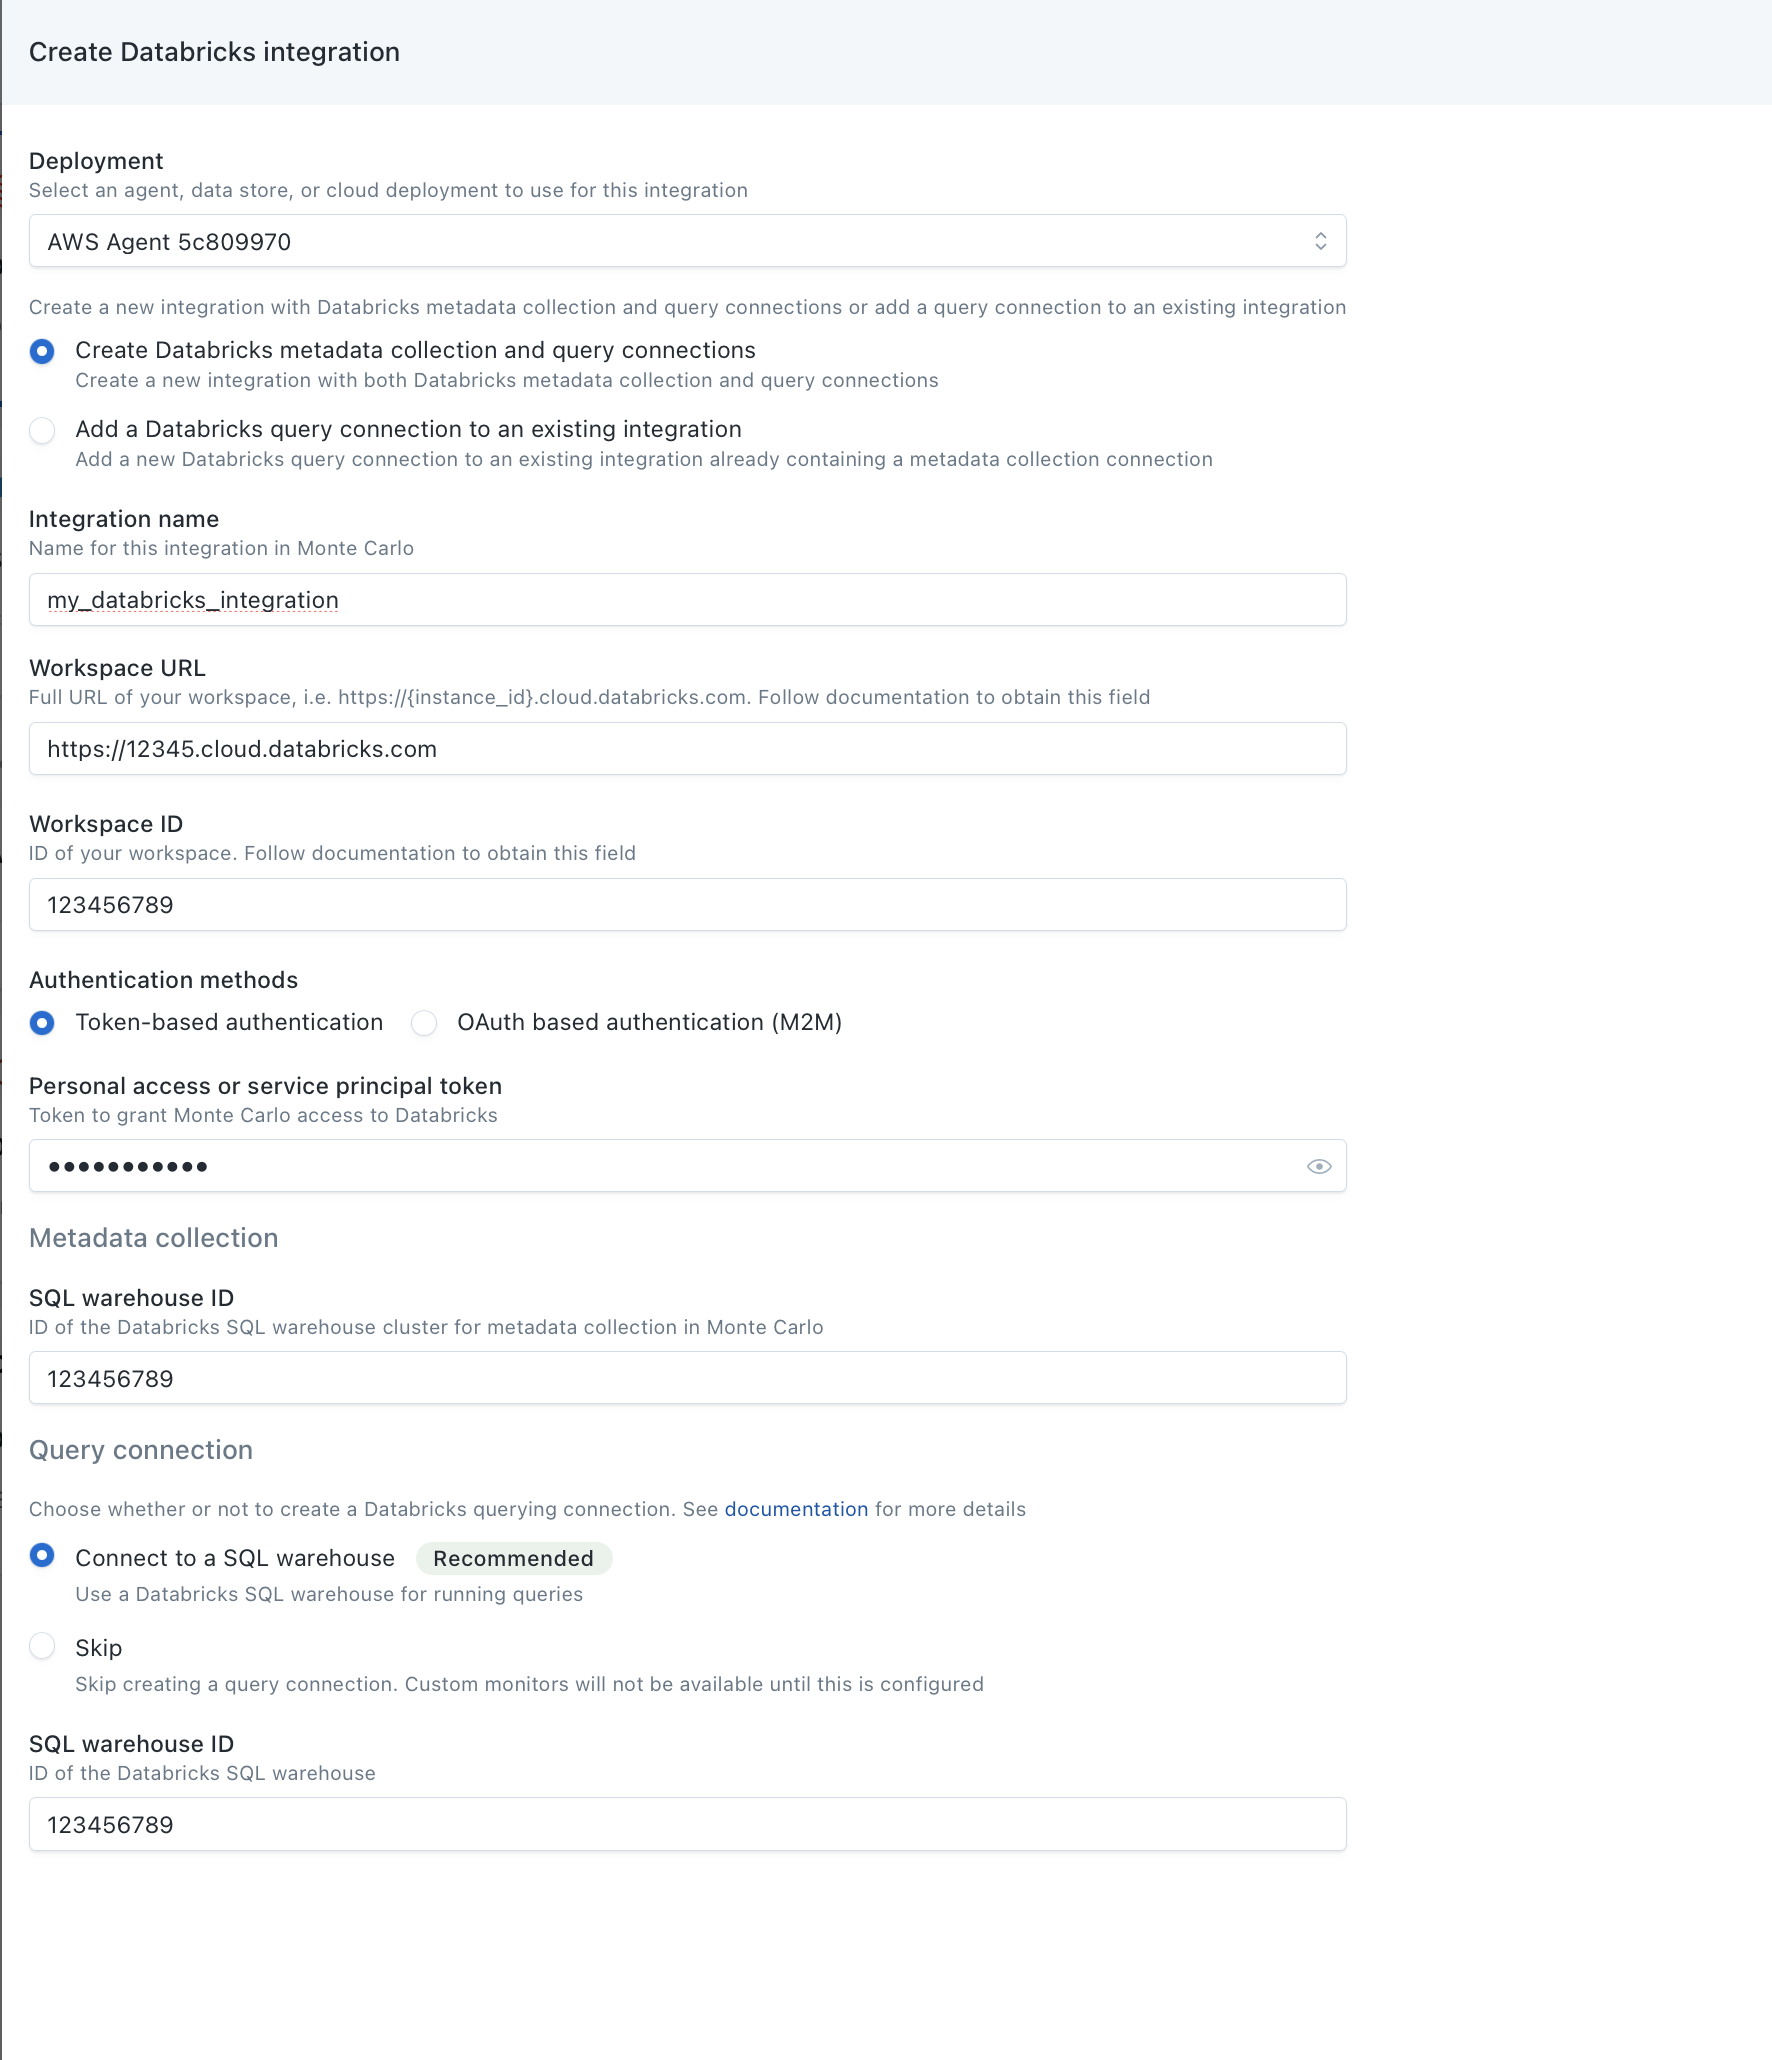
- Use the Create Databricks metadata collection and querying connections button.
- Under Warehouse Name, enter the name of the connection that you would like to see in Monte Carlo for this Databricks Workspace.
- Under Workspace URL, enter the full URL of your Workspace, i.e.
https://${instance_id}.cloud.databricks.com". Be sure to enter thehttps://. - Under Workspace ID, enter the Workspace ID of your Databricks Workspace. If there is
o=in your Databricks Workspace URL, for example,https://<databricks-instance>/?o=6280049833385130, the number aftero=is the Databricks Workspace ID. Here the workspace ID is6280049833385130. If there is noo=in the deployment URL, the workspace ID is0. - Authentication method: under Personal Access or Service Principal Token, enter the Service Principal or Personal Access Token you created in Step 1.
- For Metadata Collection Jobs, enter the SQL Warehouse ID (Step 3.2).
- Under Query Engine, select the integration type that matches what you set up in Step 4 and enter the SQL Warehouse ID (Step 4.2).
- Click Create and validate that the connection was created successfully.
Create Table Monitors on External tables
With the Snowflake integration added, you can now create table monitors for schema, freshness and volume on the external tables. See our guide on creating table monitors.
You can also create additional monitors types if you’d like (e.g., custom).
Updated 7 months ago