Generic Agent: Azure AKS Deployment
Deploy the Generic Agent on Azure using AKS
Prerequisites
- You have an Azure account with administrative access (see required permissions below).
- Terraform (>= 1.9) is installed with Azure authentication configured.
- kubectl is installed for cluster access.
- You are an Account Owner in Monte Carlo.
This guide walks through deploying the Generic Agent on Azure using AKS (Azure Kubernetes Service) with the monte-carlo-data/mcd-k8s-agent/azurerm Terraform module. The module provisions all required infrastructure — including VNet, AKS cluster, Blob Storage, Key Vault, and managed identity — and deploys the agent via Helm. Storage and Key Vault resources are automatically secured with private endpoints when created by the module.
Architecture
The diagram below shows the Azure-specific deployment architecture. For a general overview of how the Generic Agent works, see the Architecture section on the main page.
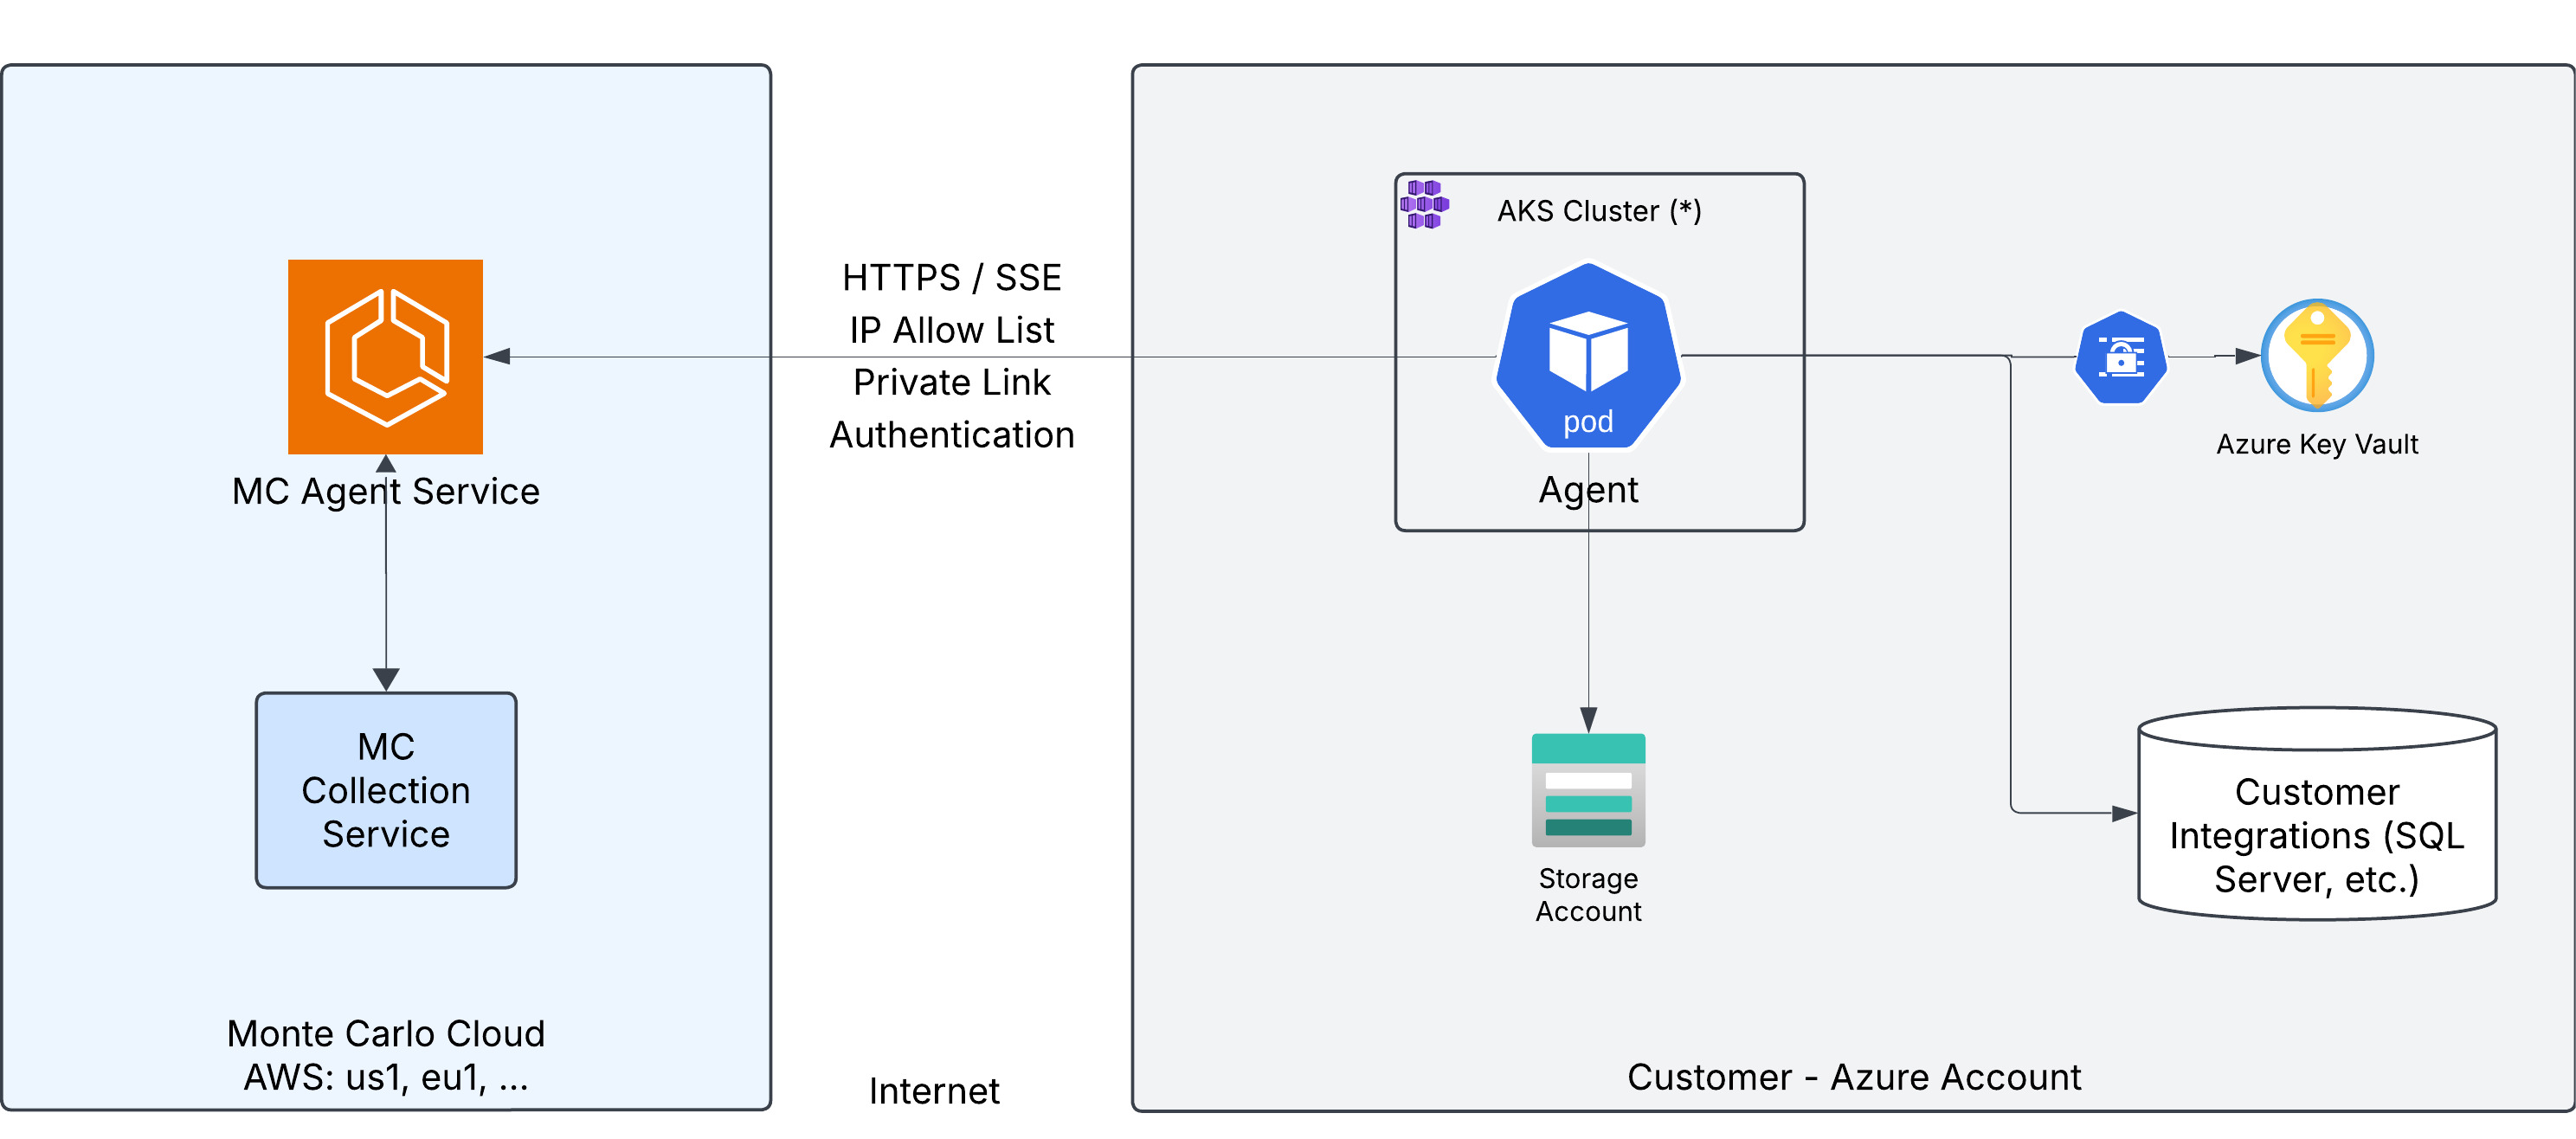
The agent runs as a pod in an AKS cluster and connects to:
- Storage Account — object storage for sampling and temporary data during operations.
- Azure Key Vault — stores the agent token and integration credentials, synced to the cluster via External Secrets Operator.
- Customer Integrations — the data sources (e.g. Databricks, Snowflake) being monitored by Monte Carlo.
Traffic to the Monte Carlo platform can optionally be routed over Azure Private Link instead of the internet.
Provider Configuration
This module does not configure the azurerm provider — your root module must do so. The following settings are required:
provider "azurerm" {
  features {}
  storage_use_azuread = true  # Required: the module uses Azure AD auth for storage (no shared keys)
}
Required Azure Permissions
The identity running Terraform needs the following roles on the target subscription or resource group:
| Role | Purpose |
|---|---|
| Contributor | Create resource groups, AKS clusters, storage accounts, Key Vaults, VNets |
| User Access Administrator or Owner | Create role assignments for Key Vault and Storage access |
The module creates the following role assignments:
| Role Assigned | Assignee | Purpose |
|---|---|---|
| Storage Blob Data Contributor | Terraform deployer | Allow Terraform to create containers and manage blobs via Azure AD auth |
| Key Vault Secrets Officer | Terraform deployer | Allow Terraform to create the initial agent token secret |
| Key Vault Secrets User | Managed Identity | Allow the agent to read secrets at runtime |
| Storage Blob Data Contributor | Managed Identity | Allow the agent to read/write blob data |
If you cannot obtain the required role assignment permissions, you can pre-create the Key Vault and storage account with their role assignments outside of Terraform and use the
existing_*variables to reference them.
Steps
1. Register the Agent
-
In Monte Carlo, navigate to Settings > Deployments and click Add.
-
Select Generic, enter a name for the agent, and choose an Authentication method:
- Key/Token (default) — the agent authenticates with a Monte Carlo-generated key pair (
mcd_id/mcd_token). - OAuth — the agent authenticates using OAuth 2.0 Client Credentials (
client_id/client_secret). The agent automatically obtains and refreshes short-lived JWT tokens. See Authentication for more details.
The authentication method is permanent and cannot be changed after provisioning.
- Key/Token (default) — the agent authenticates with a Monte Carlo-generated key pair (
-
Click Provision.
-
Copy the credentials — they are displayed only once and cannot be retrieved later.
- Key/Token: copy the Key ID and Key Secret — these are used as
mcd_idandmcd_tokenin the deployment steps below. - OAuth: copy the Client ID and Client Secret — these are used as
client_idandclient_secretin the deployment steps below.
- Key/Token: copy the Key ID and Key Secret — these are used as
2. Deploy the Agent
2.1 Configure the Terraform Module
Set
backend_service_urlto the Public endpoint shown in the Agent Service section of the Account Information page in Monte Carlo.
Check Docker Hub for the latest available chart version and update the
helm.chart_versionvalue accordingly.
Agent authentication secret
The authentication secret depends on the method you chose during registration.
You must configure the agent token secret using one of two options:
Option 1 — Provide credentials at deploy time (recommended): The module creates a Key Vault and populates the secret automatically.
token_credentials = {
  mcd_id    = var.mcd_id
  mcd_token = var.mcd_token
}
Define the variables in a terraform.tfvars file:
mcd_id    = "your-mcd-id"
mcd_token = "your-mcd-token"
Option 2 — Use a pre-existing Key Vault: Point the module to an existing Key Vault. The secret value must be a JSON object with the following format:
{
  "mcd_id": "<your-mcd-id>",
  "mcd_token": "<your-mcd-token>"
}token_secret = {
create_key_vault = false
existing_key_vault_name = "my-keyvault"
existing_key_vault_resource_group_name = "my-rg"
existing_key_vault_url = "https://my-keyvault.vault.azure.net/"
}Full deployment (new VNet and cluster)
This is the simplest option — the module creates all infrastructure from scratch:
provider "azurerm" {
  features {}
  storage_use_azuread = true
}

module "mcd_agent" {
  source = "monte-carlo-data/mcd-k8s-agent/azurerm"

  location            = "East US"
  backend_service_url = "<backend_service_url>"
  helm                = { chart_version = "0.0.2" }

  token_credentials = {
    mcd_id    = var.mcd_id
    mcd_token = var.mcd_token
  }
}
Existing VNet
If you already have a VNet, provide the subnet IDs. You need a subnet for AKS and a separate subnet for private endpoints:
provider "azurerm" {
  features {}
  storage_use_azuread = true
}

module "mcd_agent" {
  source = "monte-carlo-data/mcd-k8s-agent/azurerm"

  location            = "East US"
  backend_service_url = "<backend_service_url>"
  helm                = { chart_version = "0.0.2" }

  networking = {
    create_vnet                          = false
    existing_subnet_id                   = "/subscriptions/.../subnets/aks-subnet"
    existing_vnet_id                     = "/subscriptions/.../virtualNetworks/my-vnet"
    existing_private_endpoints_subnet_id = "/subscriptions/.../subnets/pe-subnet"
  }
}
Existing AKS cluster
If you already have an AKS cluster, the module can deploy the agent into it:
provider "azurerm" {
  features {}
  storage_use_azuread = true
}

module "mcd_agent" {
  source = "monte-carlo-data/mcd-k8s-agent/azurerm"

  location            = "East US"
  backend_service_url = "<backend_service_url>"
  helm                = { chart_version = "0.0.2" }

  cluster = {
    create                               = false
    existing_cluster_name                = "my-cluster"
    existing_cluster_resource_group_name = "my-rg"
  }
  networking = {
    create_vnet                          = false
    existing_subnet_id                   = "/subscriptions/.../subnets/aks-subnet"
    existing_vnet_id                     = "/subscriptions/.../virtualNetworks/my-vnet"
    existing_private_endpoints_subnet_id = "/subscriptions/.../subnets/pe-subnet"
  }
}
Infrastructure only (manual Helm deployment)
To provision Azure infrastructure without deploying the agent via Helm — useful if you want to manage the Helm release separately:
provider "azurerm" {
  features {}
  storage_use_azuread = true
}

module "mcd_agent" {
  source = "monte-carlo-data/mcd-k8s-agent/azurerm"

  location            = "East US"
  backend_service_url = "<backend_service_url>"
  helm                = { chart_version = "0.0.2", deploy_agent = false }
}

output "helm_values" {
  value     = module.mcd_agent.helm_values
  sensitive = true
}
After applying, use the helm_values output as your values.yaml and follow the Helm deployment steps in the Kubernetes deployment guide.
Azure Private Link (optional)
To route traffic to the Monte Carlo backend over Azure Private Link instead of the public internet, add the private_link block. The module creates a private endpoint, a private DNS zone, and DNS resolution.
With Private Link, the agent connects through a Private Endpoint in your Azure account to an Application Gateway in Monte Carlo's Azure account over the Azure Backbone Network — never traversing the public internet. The Application Gateway routes the connection to the MC Agent Service in Monte Carlo's AWS infrastructure via a Site-to-Site VPN.
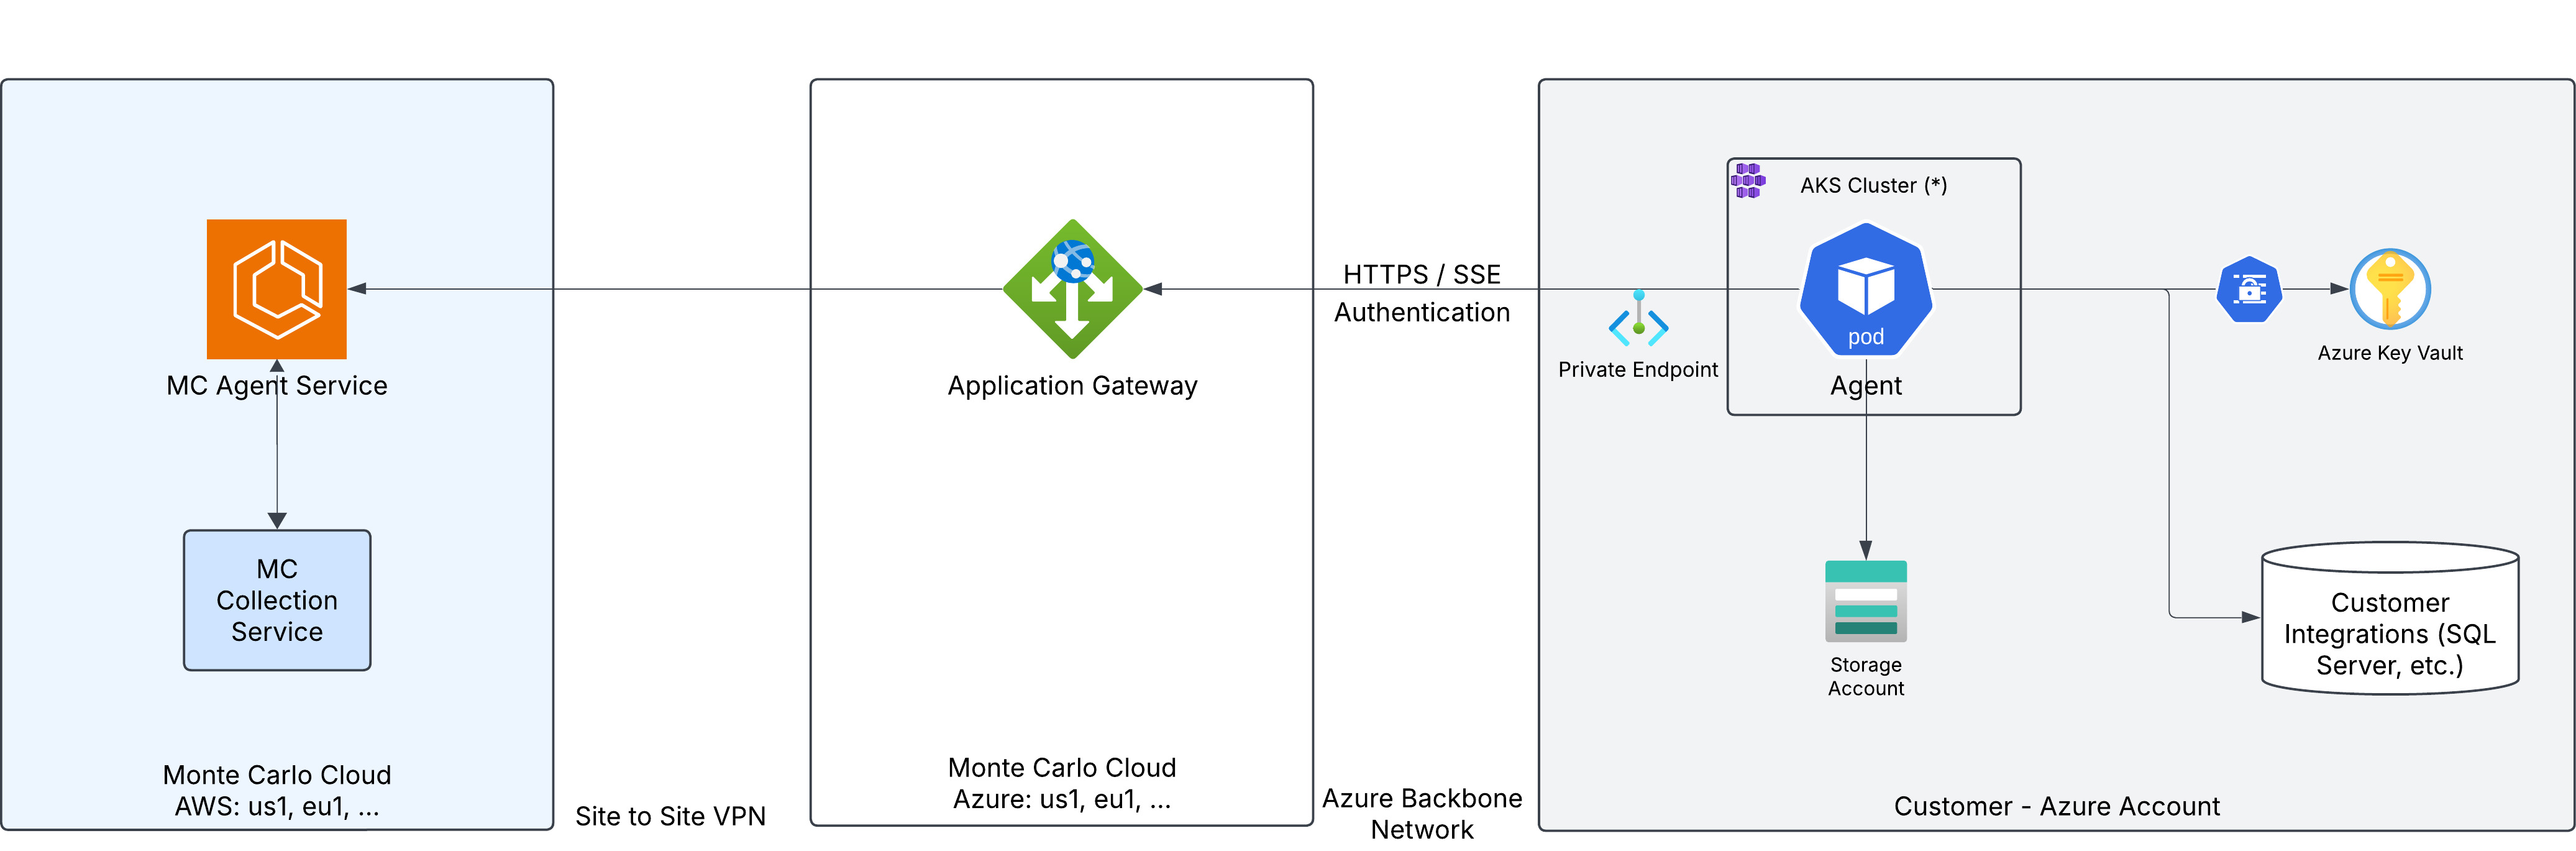
You can find the Application gateway resource ID and Application gateway sub-resource in the Agent Service section of the Account Information page in Monte Carlo, under Azure Private Link. When using Private Link, backend_service_url must use the private link endpoint (it must contain .privatelink.).
provider "azurerm" {
  features {}
  storage_use_azuread = true
}

module "mcd_agent" {
  source = "monte-carlo-data/mcd-k8s-agent/azurerm"

  location            = "East US"
  backend_service_url = "https://artemis.privatelink.getmontecarlo.com"
  helm                = { chart_version = "0.0.2" }

  private_link = {
    private_link_service_resource_id = "<private_link_service_resource_id>"
    subresource_names                = ["<sub_resource_name>"]
  }
}
After deploying, the private endpoint connection requires approval from Monte Carlo. Contact [email protected] and include the following output values:
terraform output private_endpoint_id
terraform output private_endpoint_ip
The agent will not be able to communicate with the Monte Carlo backend until the connection is approved — you will see ConnectTimeout errors in the agent logs during this time. Once approved, restart the agent services and run the reachability test:
kubectl rollout restart deployment mcd-agent-deployment -n mcd-agent
kubectl rollout restart daemonset metrics-collector -n mcd-agent
For more details on Private Link setup, see the Agent Service Azure Private Link documentation.
2.2 Deploy
terraform init && terraform applyAdditional module inputs, options, and defaults can be found in the module documentation.
2.3 Verify
Configure kubectl access to the cluster:
az aks get-credentials --name <cluster_name> --resource-group <resource_group_name>Check the agent pod is running:
kubectl get pods -n mcd-agent
kubectl logs -n mcd-agent -l app=mcd-agent --tail=30
Run the reachability test to confirm the agent can communicate with the Monte Carlo platform:
kubectl exec -n mcd-agent deploy/mcd-agent-deployment -- \
  curl -s -X POST localhost:8080/api/v1/test/reachability
A successful response contains "ok": true.
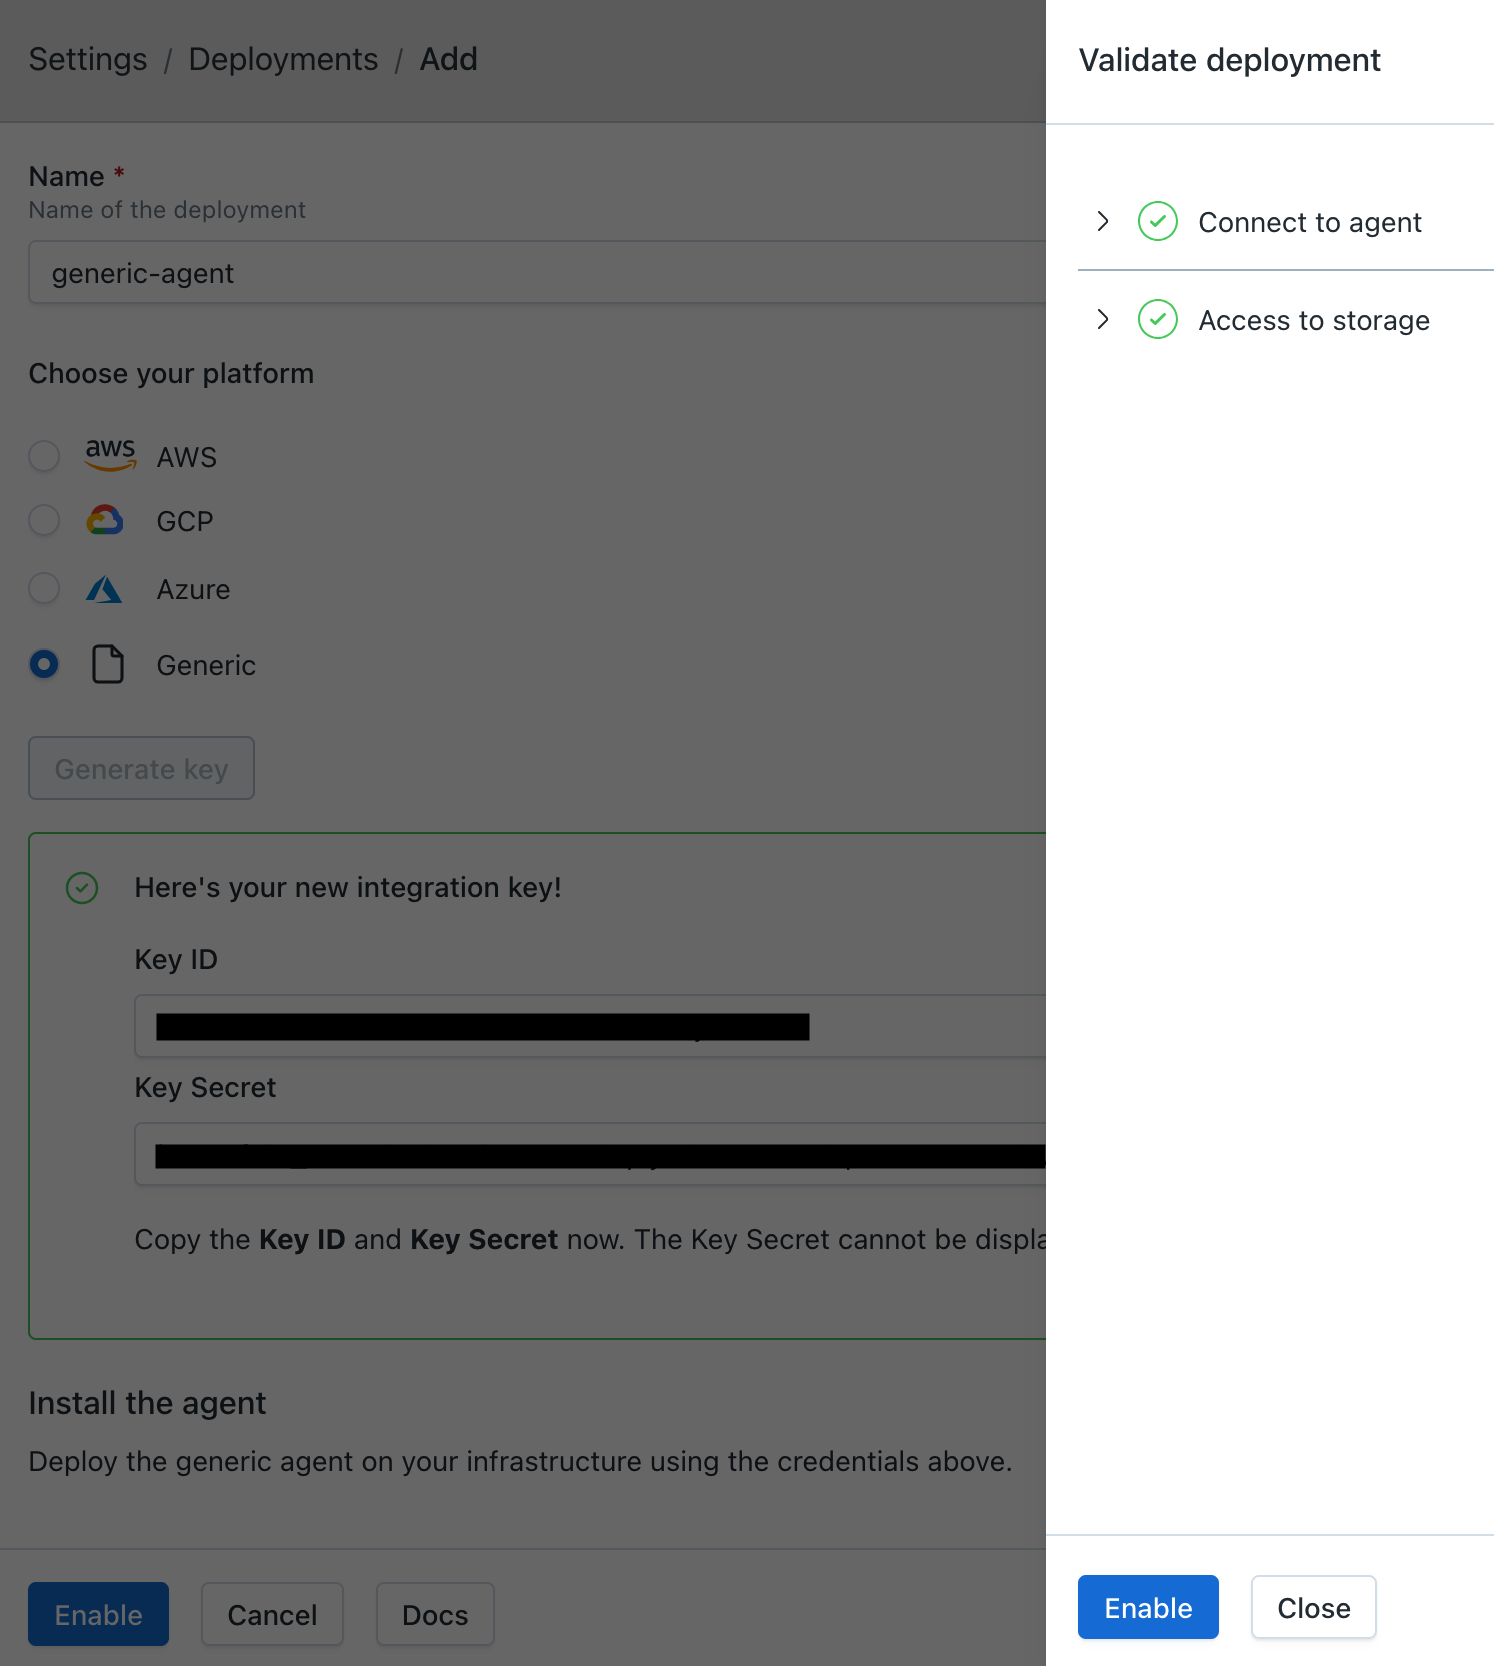
3. Enable the Agent
After verifying the agent is running, click Enable on the agent registration screen.
If you've navigated away from the registration screen, go to Settings > Deployments, select your agent, and click Enable.
Once validations pass, click Enable in the validations dialog to activate the agent.
Outputs
The module exposes the following outputs:
| Name | Description |
|---|---|
resource_group_name | Resource group name |
cluster_name | AKS cluster name |
cluster_endpoint | Endpoint for AKS control plane |
storage_account_name | Storage account name for agent data |
storage_container_name | Storage container name for agent data |
key_vault_url | Key Vault URL for agent secrets |
managed_identity_client_id | Client ID of the managed identity |
managed_identity_principal_id | Principal ID of the managed identity |
namespace | Kubernetes namespace for the agent |
private_endpoint_id | ID of the Private Link endpoint (when configured) |
private_endpoint_ip | Private IP of the Private Link endpoint (when configured) |
helm_values | Helm values for manual deployment (sensitive) |
FAQs
Can I use Azure Private Link instead of the internet?
Yes. The module supports optional Azure Private Link to route traffic to the Monte Carlo backend over a private connection. See the Azure Private Link section above for configuration details and the Agent Service Azure Private Link documentation for more information.
Which Kubernetes versions are supported?
The agent is regularly tested against current Kubernetes releases on managed cloud platforms (EKS, AKS, GKE). The chart uses standard, non-deprecated Kubernetes APIs (v1, apps/v1, autoscaling/v2, rbac.authorization.k8s.io/v1), which require Kubernetes 1.23 or later — in practice, all currently supported versions on the major managed platforms.
When your cluster is upgraded to a newer Kubernetes version, no agent-side changes are typically required. If you encounter an issue specific to a particular version, please open a support case.
Does the agent run as root?
No. The agent and the metrics-collector daemonset run with runAsNonRoot: true:
- The main agent deployment (
mcd-agent-deployment) — runs as UID 1000 - The
metrics-collectordaemonset (OpenTelemetry) — runs as UID 10001 - All init containers used during pod startup (CA bundle build, credential extraction)
The optional Fluentd logs-collector daemonset is the exception — see How do I monitor the agent?. No container uses privileged: true, requests extra Linux capabilities, or attaches host namespaces.
Is SELinux supported?
Yes. The agent has been validated against Kubernetes nodes running SELinux in enforcing mode and triggers no AVC denials during normal operation. This includes the agent deployment, the logs-collector and metrics-collector daemonsets, and all init containers used by the chart.
Does the agent require inbound network access?
No. The Generic Agent is egress-only. All connections are initiated from the agent to the Monte Carlo platform. No inbound connectivity to the agent is required.
What outbound destinations does the agent connect to?
See the Outbound Destinations section in the architecture overview for the full list of egress targets and ports.
Can I customize the Helm values?
Yes. Use the custom_values variable to merge additional values with the module-generated Helm configuration. This accepts any map matching the chart's values.yaml schema.
How do I add credentials for data source integrations?
-
Create a secret in Azure Key Vault with the integration credentials. See the Self-Hosted Credentials documentation for the JSON format for each integration type.
az keyvault secret set --vault-name <vault_name> \ --name <integration> --value '{"connect_args": { ... }}' -
The agent's managed identity already has the Key Vault Secrets User role on the Key Vault, so no additional permissions are needed for secrets in the same vault.
-
Register the integration in Monte Carlo. You can do this via the UI (see Self-Hosted Credentials) or via the CLI:
montecarlo integrations add-self-hosted-credentials-v2 \
  --connection-type <integration> \
  --self-hosted-credentials-type AZURE_KEY_VAULT \
  --azure-key-vault-secret <secret_name>
How do I connect the agent to my data sources privately?
When the agent is deployed in a separate VNet from your data sources, you need to establish network connectivity between them. Common options include:
- VNet Peering — connect two VNets directly. See Azure VNet Peering documentation.
- Private Endpoints — access Azure services (e.g. Azure SQL, Databricks, Storage) privately without traversing the internet. See Azure Private Endpoint documentation.
- VNet Service Endpoints — extend your VNet identity to Azure services. See Azure VNet Service Endpoints documentation.
If your data sources are on-premises or in another cloud, you can use Azure ExpressRoute or a Site-to-Site VPN to establish connectivity.
The agent itself does not require any special configuration for networking — connectivity to data sources must be configured at the infrastructure level.
How do I scale the agent?
There are several ways to scale the agent:
Manual replicas: Set agent.replica_count in your module configuration:
agent = {
  replica_count = 3
}
Thread count: Increase the number of concurrent operations a single replica can process via custom_values:
custom_values = {
  container = {
    opsRunnerThreadCount = "36"
  }
}
The default is 18. Increasing this value allows each replica to handle more operations in parallel, which can be useful before adding more replicas.
Pod resources: Set CPU and memory requests/limits to ensure replicas have adequate resources, especially when increasing thread count:
custom_values = {
  container = {
    resources = {
      requests = {
        cpu    = "500m"
        memory = "512Mi"
      }
      limits = {
        cpu    = "2"
        memory = "2Gi"
      }
    }
  }
}
Autoscaling (HPA): Enable the Horizontal Pod Autoscaler to scale replicas automatically based on CPU (and optionally memory) utilization:
custom_values = {
  autoscaling = {
    enabled                          = true
    minReplicas                      = 1
    maxReplicas                      = 5
    targetCPUUtilizationPercentage   = 70
  }
}
When autoscaling is enabled, replica_count is ignored — the HPA manages replicas. container.resources.requests must be set for the HPA to calculate utilization, and metrics-server must be installed in the cluster (standard in EKS, AKS, and GKE).
How do I upgrade the agent?
To upgrade the agent, update both the Helm chart version and the agent image tag in your module configuration, then run terraform apply:
agent = {
  image = "montecarlodata/agent:1.0.0-generic"
}

helm = {
  chart_version = "0.1.0"
}
Available agent images are published to montecarlodata/agent on Docker Hub (use tags ending with -generic, e.g. latest-generic or 1.0.0-generic). Helm chart versions are available at montecarlodata/generic-agent-helm.
You will not receive notifications when an update is available from Monte Carlo, but you can subscribe to the repositories for new updates. Keeping the agent up to date is part of your shared responsibility.
How do I monitor the agent?
You can monitor the agent using Azure Monitor Container Insights. The agent exposes a health endpoint at /api/v1/test/healthcheck that can be used for liveness and readiness probes.
Using your platform's logs and metrics pipeline
By default the chart ships agent logs in-process — the agent buffers and POSTs them itself, no DaemonSet required — and deploys a metrics-collector daemonset (OpenTelemetry) for runtime metrics. If your platform already collects pod logs and container metrics centrally and you don't want a parallel pipeline, you can opt out of both:
logShipping: none
metricsCollector:
  enabled: false
The agent itself continues to run normally; only the Monte Carlo log-shipping path and the metrics-collector daemonset are removed. The agent's stdout JSON logs still flow to your cluster's standard log driver and any pipeline subscribed to it.
logShipping accepts three values:
in-process(default) — agent ships its own logs to Monte Carlofluentd— opt in to alogs-collectordaemonset (Fluentd) that tails container logs from the host. Requires root pods. Mostly useful for troubleshooting or specialized log-routing setups.none— disable Monte Carlo log shipping entirely; rely on your own pipeline
Trade-off: with logShipping: none and metricsCollector.enabled: false, Monte Carlo support won't have direct visibility into agent logs and metrics during troubleshooting — you may be asked to share logs manually if you open a support case.
How do I rotate agent credentials?
-
Update the secret in Azure Key Vault:
az keyvault secret set --vault-name <vault_name> --name mcd-agent-token \ --value '{"mcd_id":"<new-mcd-id>","mcd_token":"<new-mcd-token>"}' -
Force sync the Kubernetes secret from External Secrets Operator:
kubectl annotate externalsecret -n mcd-agent --all \ force-sync=$(date +%s) --overwrite -
Restart the agent services:
kubectl rollout restart deployment mcd-agent-deployment -n mcd-agent
kubectl rollout restart daemonset metrics-collector -n mcd-agent
Updated 5 days ago