GitHub Enterprise Server (GHES) Integration
Integrate Monte Carlo with your self-hosted GitHub Enterprise Server instance to gain visibility into code impact on your data.
Overview
The GHES integration enables Monte Carlo's MC Prevent suite on self-hosted GitHub Enterprise Server instances:
- Prevent bad data changes before they reach production using the PR Agent — Monte Carlo's automated pull request risk assessments.
- Enforce a merge gate using the CI Agent in GitHub Actions or CircleCI.
Note: The GHES integration currently supports the PR Agent and CI Agent only. PR overlays on incident charts and pull request history on the asset page are not yet available for GHES. These capabilities are supported on github.com only.
Step 1 — Allow Monte Carlo's outbound IPs
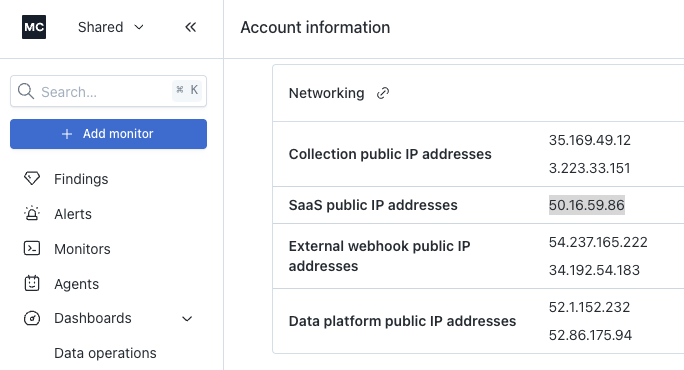
Monte Carlo needs to reach your GHES instance over HTTPS. Add Monte Carlo's SaaS public IP addresses to your network-layer allowlist (security group, firewall, WAF, or corporate VPN).
You can find your account's outbound IPs at **Account → Account Information → Networking ** under SaaS public IP addresses.
Important: Add these IPs at the network layer — not only the GHES application-level IP allowlist. Both layers must permit the traffic.
Step 2 — Register a GitHub App on your GHES instance
In GHES, go to Organization settings → Developer settings → GitHub Apps → New GitHub App.
App settings
| Field | Value |
|---|---|
| GitHub App name | Your choice (e.g., acme-mc) — the slug becomes part of the integration |
| Homepage URL | Any URL (e.g., your Monte Carlo tenant URL) |
| Callback URL | US: https://getmontecarlo.com/auth/callback/githubEU: https://eu.getmontecarlo.com/auth/callback/github |
| Request user authorization (OAuth) during installation | Must be checked |
| Webhook URL | https://integrations.[tenant-id].getmontecarlo.com/gateway/githubReplace [tenant-id] with the Tenant ID for your account, found at https://getmontecarlo.com/account-info#platform |
You must also create a webhook secret. GitHub recommends you choose a random string of text with high entropy. One option to generate this secret is running a command like this:
python3 -c "import secrets; print(secrets.token_urlsafe(32))"Enter that as the webhook secret and save it for reference in step 3.
Repository permissions
| Permission | Level |
|---|---|
| Contents | Read |
| Pull requests | Read & write |
| Issues | Read & write |
| Metadata | Read |
| Checks | Read & write |
Subscribe to events
pull_requestissue_comment
Where can this App be installed?
- Only on this account — if Monte Carlo will only run on this GHES organization.
- Any account — if you'll install on multiple organizations within the same GHES instance.
Make the App public
GHES rejects installs of private Apps unless the installing user is the same one who registered the App. To allow others to install it, toggle Make this GitHub App public in Developer Settings → Advanced → Danger zone.
"Public" in this context means installable within your GHES instance — it is not exposed to github.com or the public internet.
After creating the App
From the App settings page, note these values — you'll need them in Step 3:
- App ID (numeric)
- Client ID (format:
Iv1.xxxxxxxx) - Client Secret — generate a new one from the App settings page
- Private Key — generate and download the
.pemfile - App Name — the URL slug (e.g.,
acme-mcfromhttps://<your-ghes-host>/github-apps/acme-mc) - Webhook Secret — the value you set above
Step 3 — Connect Monte Carlo to your GitHub App
In Monte Carlo, go to Settings → Integrations → GitHub and select GitHub Enterprise Server.
Fill in the form with the values from Step 2:
| Field | Value |
|---|---|
| GHES Host | Your GHES instance URL (e.g., https://github.your-company.com) |
| App Slug | From Step 2 |
| App ID | From Step 2 |
| Client ID | From Step 2 |
| Client Secret | From Step 2 |
| Private Key | Paste the full contents of the .pem file |
| Webhook Secret | From Step 2 |
Click Submit. Monte Carlo redirects you to your GHES App install page. Select the organization and approve the installation. You'll be redirected back to Monte Carlo and the integration will appear in your integrations list.

Step 4 — Configure the integration in Monte Carlo
After connecting, two configuration steps in Monte Carlo are required before the PR Agent will function. Both are in Settings → Integrations → GitHub → (your org) → Edit connection.
Enable the PR Agent for specific repos
The PR Agent will not post on any pull request until you add repos to its allowlist.
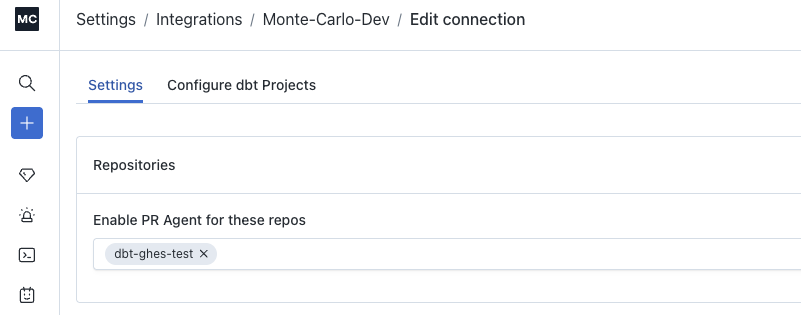
- Open the Settings tab in the Edit connection drawer.
- Under Enable PR Agent for these repos, add each repository you want the PR Agent to review.
If the allowlist is empty, the PR Agent will not comment on any PR — even
mc reviewcomments will have no effect.
Configure dbt project remote URLs
This step is required for the PR Agent to identify which Monte Carlo-monitored tables are affected by a pull request. Monte Carlo uses these mappings to correlate file changes in your GHES repos with monitored data assets. Without them, the PR Agent's blast-radius analysis, downstream lineage impact, and asset criticality scoring will not reflect the actual tables changed.
- Open the Configure dbt Projects tab in the Edit connection drawer.
- For each dbt project, enter:
| Field | Value |
|---|---|
| GitHub project remote URL | The URL of the GHES repo containing the dbt project (e.g., https://github.your-company.com/org/repo) |
| Project subdirectory | Only required if the dbt project lives in a subdirectory of the repo (e.g., analytics). Leave blank if dbt models are at the repo root. |
dbt Cloud users: If your dbt Cloud integration is on data collector v14050 or later, this mapping is populated automatically and no manual input is needed.
Step 5 — Verify
Create a new pull request in any repository where the App is installed. The Monte Carlo bot should post a PR Risk assessment comment, and an MC Prevent: PR Risk Rubric check run should appear on the PR.
It must be a new or re-opened PR after the integration is configured.
PR Agent and CI Agent
Once connected, the GHES integration supports the same PR Agent and CI Agent capabilities documented on the GitHub integration page :
- PR Agent — automatically reviews pull requests and posts a risk assessment comment.
- CI Agent — optional CI pipeline step (GitHub Actions or CircleCI) that enforces a merge gate based on the PR Agent's risk tier.
For full configuration details — including repo allowlists, risk factor weights, and gate policies — see the GitHub integration documentation .
CI Agent on GHES
Depending on your GHES organization's settings, you may be able to use the mc-prevent-action GitHub Action directly. If your organization restricts third-party Actions, copy the action.yml into your own repository and reference it from there.
Troubleshooting
| Symptom | Likely cause | Fix |
|---|---|---|
| MC setup form submit times out | Network layer in front of GHES blocking Monte Carlo IPs | Allowlist Monte Carlo's SaaS public IPs (Step 1) at your security group, firewall, WAF, or VPN |
| Redirect loop after OAuth callback | "Request user authorization (OAuth) during installation" was not checked when creating the App | Edit App settings, check the box, then reinstall |
mc review comment reacts with 👀 but no review comment appears | PR existed before the App was installed | Push any commit to the PR branch (or close and reopen) to fire a pull_request.synchronize event |
| Bot comments use an unexpected slug | The App's slug from GHES is used (e.g., acme-mc[bot]) rather than Monte Carlo's global bot name | Expected behavior |
Limitations
- MC only collects PRs that merged after the integration setup time. Historical PRs are not available.
- The PR Agent does not automatically re-run on every new commit. After pushing a fix, comment
mc reviewto request a fresh assessment for the new head commit. - PR overlays on incident charts and pull request history on the asset page are not yet supported for GHES. These features are available on github.com only.
- Organizations using IP allowlists in GHES must also add Monte Carlo's SaaS public IP addresses to the GHES application-level allowlist in addition to the network layer.
Updated 2 months ago