Custom Connectors
This feature requires an Enterprise or higher plan to use.
This feature is in Public Preview. See here for more information on what this means.
Custom connectors let you integrate any SQL database whose query language Monte Carlo doesn't natively support. You implement a set of SQL templates for your database's dialect, validate them against a test suite, and package everything into a Docker image that layers on top of Monte Carlo's generic agent.
Your connector runs entirely inside your agent deployment (egress-only). No raw SQL or Python logic is sent to Monte Carlo's backend — only sandboxed templates that produce SQL fragments.
When to use custom connectors
Use a custom connector when:
- Your database speaks SQL through a Python driver
- Monte Carlo doesn't natively support it (or supports a different version)
- You need SQL query execution for custom SQL monitors and/or metric monitors
When NOT to use a custom connector:
- Your source is already natively supported and you only need to fill specific gaps. Use the Push Ingest API (augment) instead.
- Your source doesn't speak SQL (REST APIs, file-based systems, non-SQL stores). The framework requires a Python driver with a SQL interface.
- You only need metadata or query logs, not monitors. The Push API is simpler.
Prerequisites
- Docker — the only host dependency. Everything else (database drivers, test suite, build scripts) runs inside containers.
- Database credentials with read access. Write access is only needed if you want to implement functional validation (optional).
- Claude Code (recommended) — an AI coding agent that can implement all ~100 template methods automatically. Not required — you can implement manually if you prefer.
Steps
- Set up the repo — Clone the
custom-connector-setuprepository and review the project structure. - Implement your connector — Use the AI-assisted or manual workflow to implement your template methods and pass the test suite.
- Build the agent image — Export capabilities and build the deployable Docker image.
- Deploy the agent — Push the image to a container registry and deploy using any supported generic agent platform.
- Register the connector type — Run agent validations so Monte Carlo discovers your custom connector.
- Add the connection — Connect through the Monte Carlo UI or GraphQL API.
- Validate with monitors — Create test monitors to confirm that Monte Carlo can compile and execute queries against your connector end-to-end.
1. Set up the repo
Clone the custom-connector-setup repository:
git clone https://github.com/monte-carlo-data/custom-connector-setup.git
cd custom-connector-setup
The repository contains:
| Directory / file | Purpose |
|---|---|
connectors/_base/connector.py | Canonical template with ~100 stub methods across 6 classes. This is the API reference — don't edit it. |
connectors/<name>/ | One directory per connector you create, containing your implementation (connector.py), database driver (requirements.txt), system dependencies (Dockerfile.extra), credentials (credentials.json), and a manifest (manifest.json). |
tests/ | A pytest test suite that validates every template method against your real database. Tests are the spec — don't edit them. |
scripts/ | Helper scripts for scaffolding (create_connector.py) and building the deployable image (generate_agent_image.py). |
output/ | Auto-generated directory containing the exported manifest and passing .j2 templates, created by the test suite. |
2. Implement your connector
Path 1: AI-assisted (recommended)
The repository includes Claude Code skills that automate the full workflow. You run slash commands and only need to manually fill in your database credentials.
| Step | Command | What happens |
|---|---|---|
| 1 | /create-connector <name> | Scaffolds connectors/<name>/ with stub files. |
| 2 | /setup-connection <name> | Researches the database driver, installs it, implements the connection methods, and stubs credentials.json — then pauses for you to fill in real credentials. |
| 3 | /implement-connector <name> | Implements all template methods section by section, running tests after each section and iterating on failures. This is the bulk of the work (~100 methods). Append hybrid to skip metadata and query log templates. |
| 4 | /build-agent-image <name> | Exports capabilities and builds the deployable Docker image. |
The only manual step is filling in credentials.json when step 2 pauses.
Don't confuse these with the push ingestion skills.
Custom connector skills live in the
custom-connector-setuprepo (/create-connector, /implement-connector, /build-agent-image). The mcd-agent-toolkit ships a separate set of skills (/mc-build-metadata-collector, etc.) for generating push scripts.
Path 2: Manual
For teams not using Claude Code:
1. Scaffold your connector:
python scripts/create_connector.py <name>2. Add your database driver to connectors/<name>/requirements.txt:
psycopg2-binary==2.9.93. Add system dependencies (if needed) to connectors/<name>/Dockerfile.extra. Some database drivers require system-level libraries (ODBC drivers, native clients, etc.):
RUN apt-get update && apt-get install -y --no-install-recommends \
    unixodbc-dev \
    && apt-get clean && rm -rf /var/lib/apt/lists/*
Then regenerate the test Dockerfile:
python scripts/generate_test_dockerfile.pyDockerfile.extra contents are injected into both the test image and the deployable agent image. It supports RUN, ENV, and ARG instructions — COPY is not supported because the agent image builds in a temporary directory. If you skip this step, the file remains empty and has no effect.
4. Fill in credentials in connectors/<name>/credentials.json:
{
  "connect_args": {
    "host": "db.example.com",
    "port": 5432,
    "database": "mydb",
    "user": "monte_carlo",
    "password": "secret"
  }
}
The keys inside connect_args are whatever your create_connection() method reads from self.credentials. Use the same format when configuring self-hosted credentials in production.
5. Implement your connector — edit connectors/<name>/connector.py to fill in the base classes. Start with BaseConnector (connection methods), then work through the template classes. Each method's docstring documents what to return. Methods left as pass are treated as "not supported" and the corresponding capability or metric is disabled.
6. Build and test iteratively:
docker compose build

# Verify connection
CONNECTOR=<name> docker compose run --rm test -m connection

# Metadata templates (full mode only)
CONNECTOR=<name> docker compose run --rm test -m metadata

# Custom SQL monitors
CONNECTOR=<name> docker compose run --rm test -m custom_monitors

# Query language prerequisites
CONNECTOR=<name> docker compose run --rm test -m ql_prerequisites

# Metric templates
CONNECTOR=<name> docker compose run --rm test -m ql_metrics
7. Export capabilities:
CONNECTOR=<name> docker compose run --rm test --exportThis generates output/<name>/manifest.json (supported capabilities and metrics) and output/<name>/templates/ (passing Jinja templates).
8. Build the agent image:
python scripts/generate_agent_image.pyConnector classes
The connector implementation is split into six classes:
| Class | Purpose | Required? |
|---|---|---|
BaseConnector | Connection lifecycle — creating a connection, executing queries, fetching results, closing. | Always |
MetadataQueryTemplates | SQL templates for discovering databases, schemas, tables, and columns. | Full mode only |
QueryLogCollectionTemplates | SQL template for fetching query history and logs. | Full mode only |
CustomSQLMonitorTemplates | Templates for custom SQL monitor operations (wrapping queries in COUNT, adding LIMIT). | Always |
QueryLanguageTemplates | ~90 templates for type casting, date/time functions, aggregations, comparisons, and string operations. These enable metric monitors. | For metric monitors |
FunctionalTestOperations | Templates for functional validation — DDL/DML to verify metadata reflects real-time changes. | Optional |
Template patterns
Every template method returns a string — not executable code. Three patterns are used:
Placeholder templates (most common) — {x} is substituted later via .format():
def avg(self):
    return "AVG({x})"
Parameterized templates — Jinja variables passed at render time:
def cast_to_numeric(self):
    return "CAST({{ expression }} AS NUMERIC)"
Static templates — no variables:
def current_timestamp(self):
    return "CURRENT_TIMESTAMP"
Each method's docstring in connectors/_base/connector.py documents which pattern it uses.
Full vs hybrid mode
| Full mode | Hybrid mode | |
|---|---|---|
| Metadata and query logs | Collected by the agent | Pushed externally by you (e.g., via the Push Ingest API) |
| When to use | Your database has queryable system catalog views (information_schema, etc.) | Your database lacks system catalog views, or you already have a metadata pipeline |
| Classes to implement | All 5 (+ optional FunctionalTestOperations) | BaseConnector + CustomSQLMonitorTemplates + QueryLanguageTemplates |
The build script auto-detects mode per connector from the exported manifest. If supports_metadata is true, the connector uses full mode; otherwise it uses hybrid mode. You can also force a mode with --mode full or --mode hybrid.
3. Build the agent image
scripts/generate_agent_image.py creates a Docker image that layers your connector artifacts on top of Monte Carlo's public generic agent base image (montecarlodata/agent:{version}-generic).
| Flag | Default | Description |
|---|---|---|
--version | latest | Agent base image version. |
--connector | All connectors with output/ | Connectors to include (repeatable for multi-connector images). |
--docker-platform | linux/amd64 | Target platform. |
--tag | custom-agent:{version}-generic | Output image tag. |
--base-image | montecarlodata/agent:{version}-generic | Override base image (for local testing). |
--mode | auto | auto (detect per connector), full, or hybrid. |
You can package multiple connectors into a single image, each with its own mode auto-detected:
python scripts/generate_agent_image.py --connector postgres --connector cockroach-db4. Deploy the agent
After building the image:
- Push to a container registry accessible from your deployment environment.
- Configure self-hosted credentials in Monte Carlo using the same
credentials.jsonformat — swap in production values. - Deploy the agent using any of the supported generic agent platforms. The agent is egress-only and works across all supported platforms.
Your agent deployment must use your custom agent image instead of the default
montecarlodata/agent:{version}-genericimage. Update your deployment configuration (Docker Compose, Kubernetes manifest, ECS task definition, etc.) to pull from the registry where you pushed your custom image.
5. Register the connector type
After deploying the agent, Monte Carlo needs to discover and register your custom connector type before you can add a connection.
Your custom connector type is registered automatically when Monte Carlo discovers it on your agent. This happens:
- The first time you enable the generic agent
- When you run agent validations from the Monte Carlo UI (Settings > Deployments > your agent > Validate)
In the agent validations, a Discover connectors step lists all custom and native connectors found in the agent. When custom connectors are discovered, Monte Carlo triggers an async job to register the connector details. This usually takes a couple of minutes to complete.
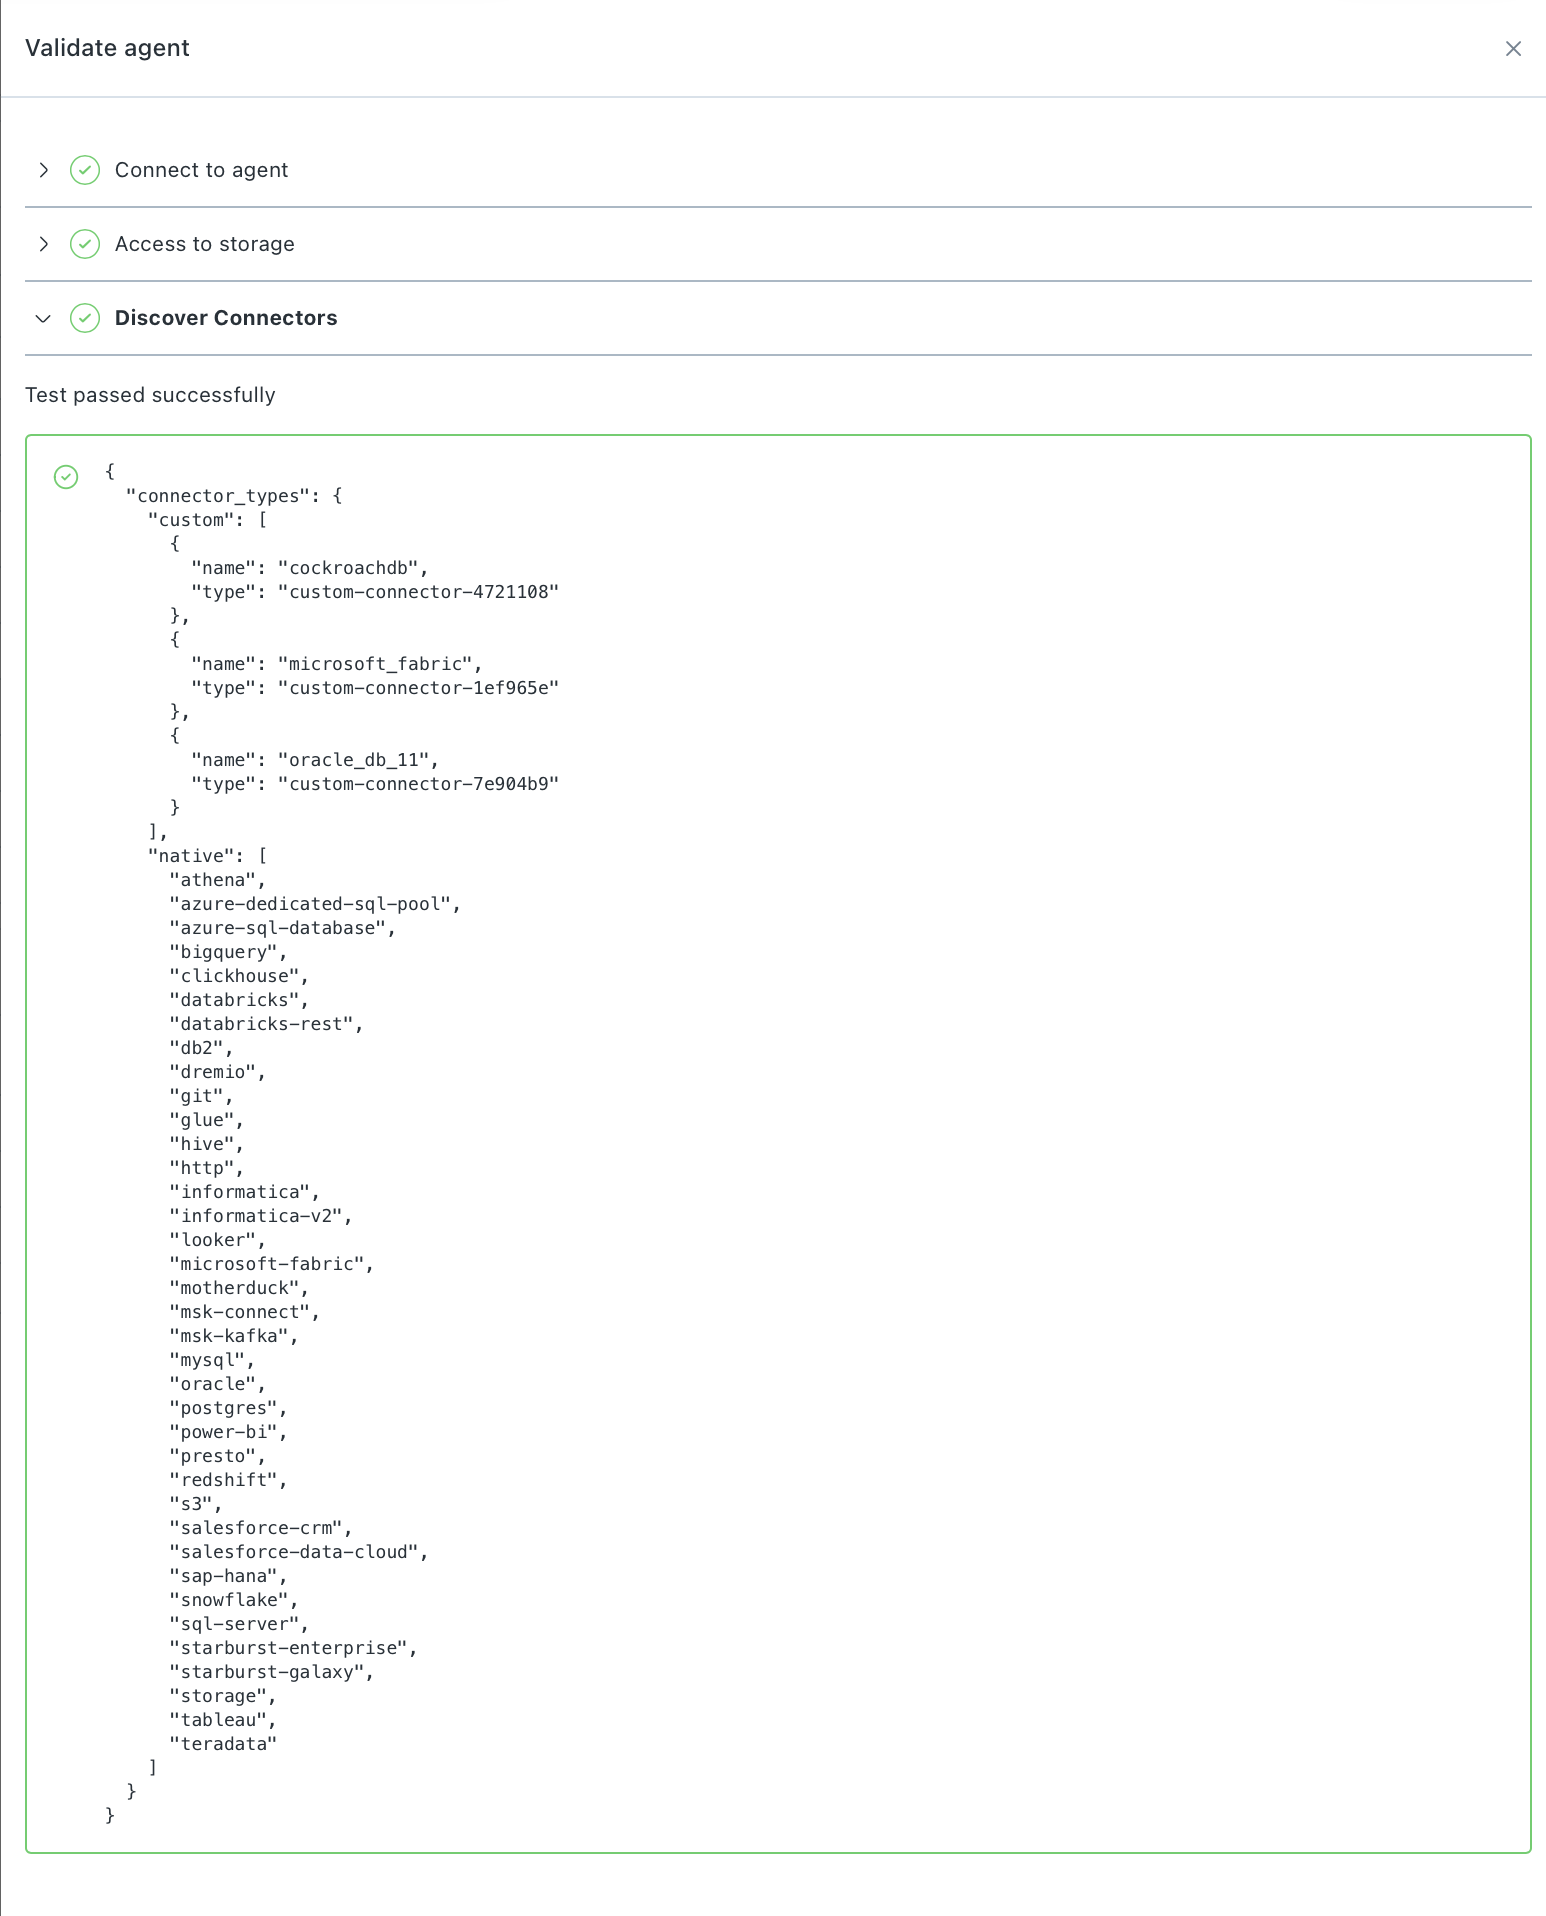
Monte Carlo UI Example
If you update your custom connector and redeploy the agent, re-run the agent validations to resync the connector details with Monte Carlo.
To confirm that your custom connector type has been registered, run this GraphQL query in the Monte Carlo API:
query {
  getCustomConnectors(agentUuid: "<agent_uuid>") {
    customConnectors {
      name
      id
      jobTypes
      capabilities {
        supportsMetadata
        supportsFullQueryLanguage
        supportsCustomSqlMonitor
      }
    }
  }
}
Replace <agent_uuid> with your agent's UUID. The response lists each registered custom connector along with its supported capabilities.
6. Add the connection
Once the connector type is registered, you can add the connection through the Monte Carlo UI or the GraphQL API.
Using the UI
Follow the steps in Setting up a custom integration. Your custom connector will appear in the Connector dropdown when configuring capabilities — select it, provide credentials, and Monte Carlo handles validation and setup from there.
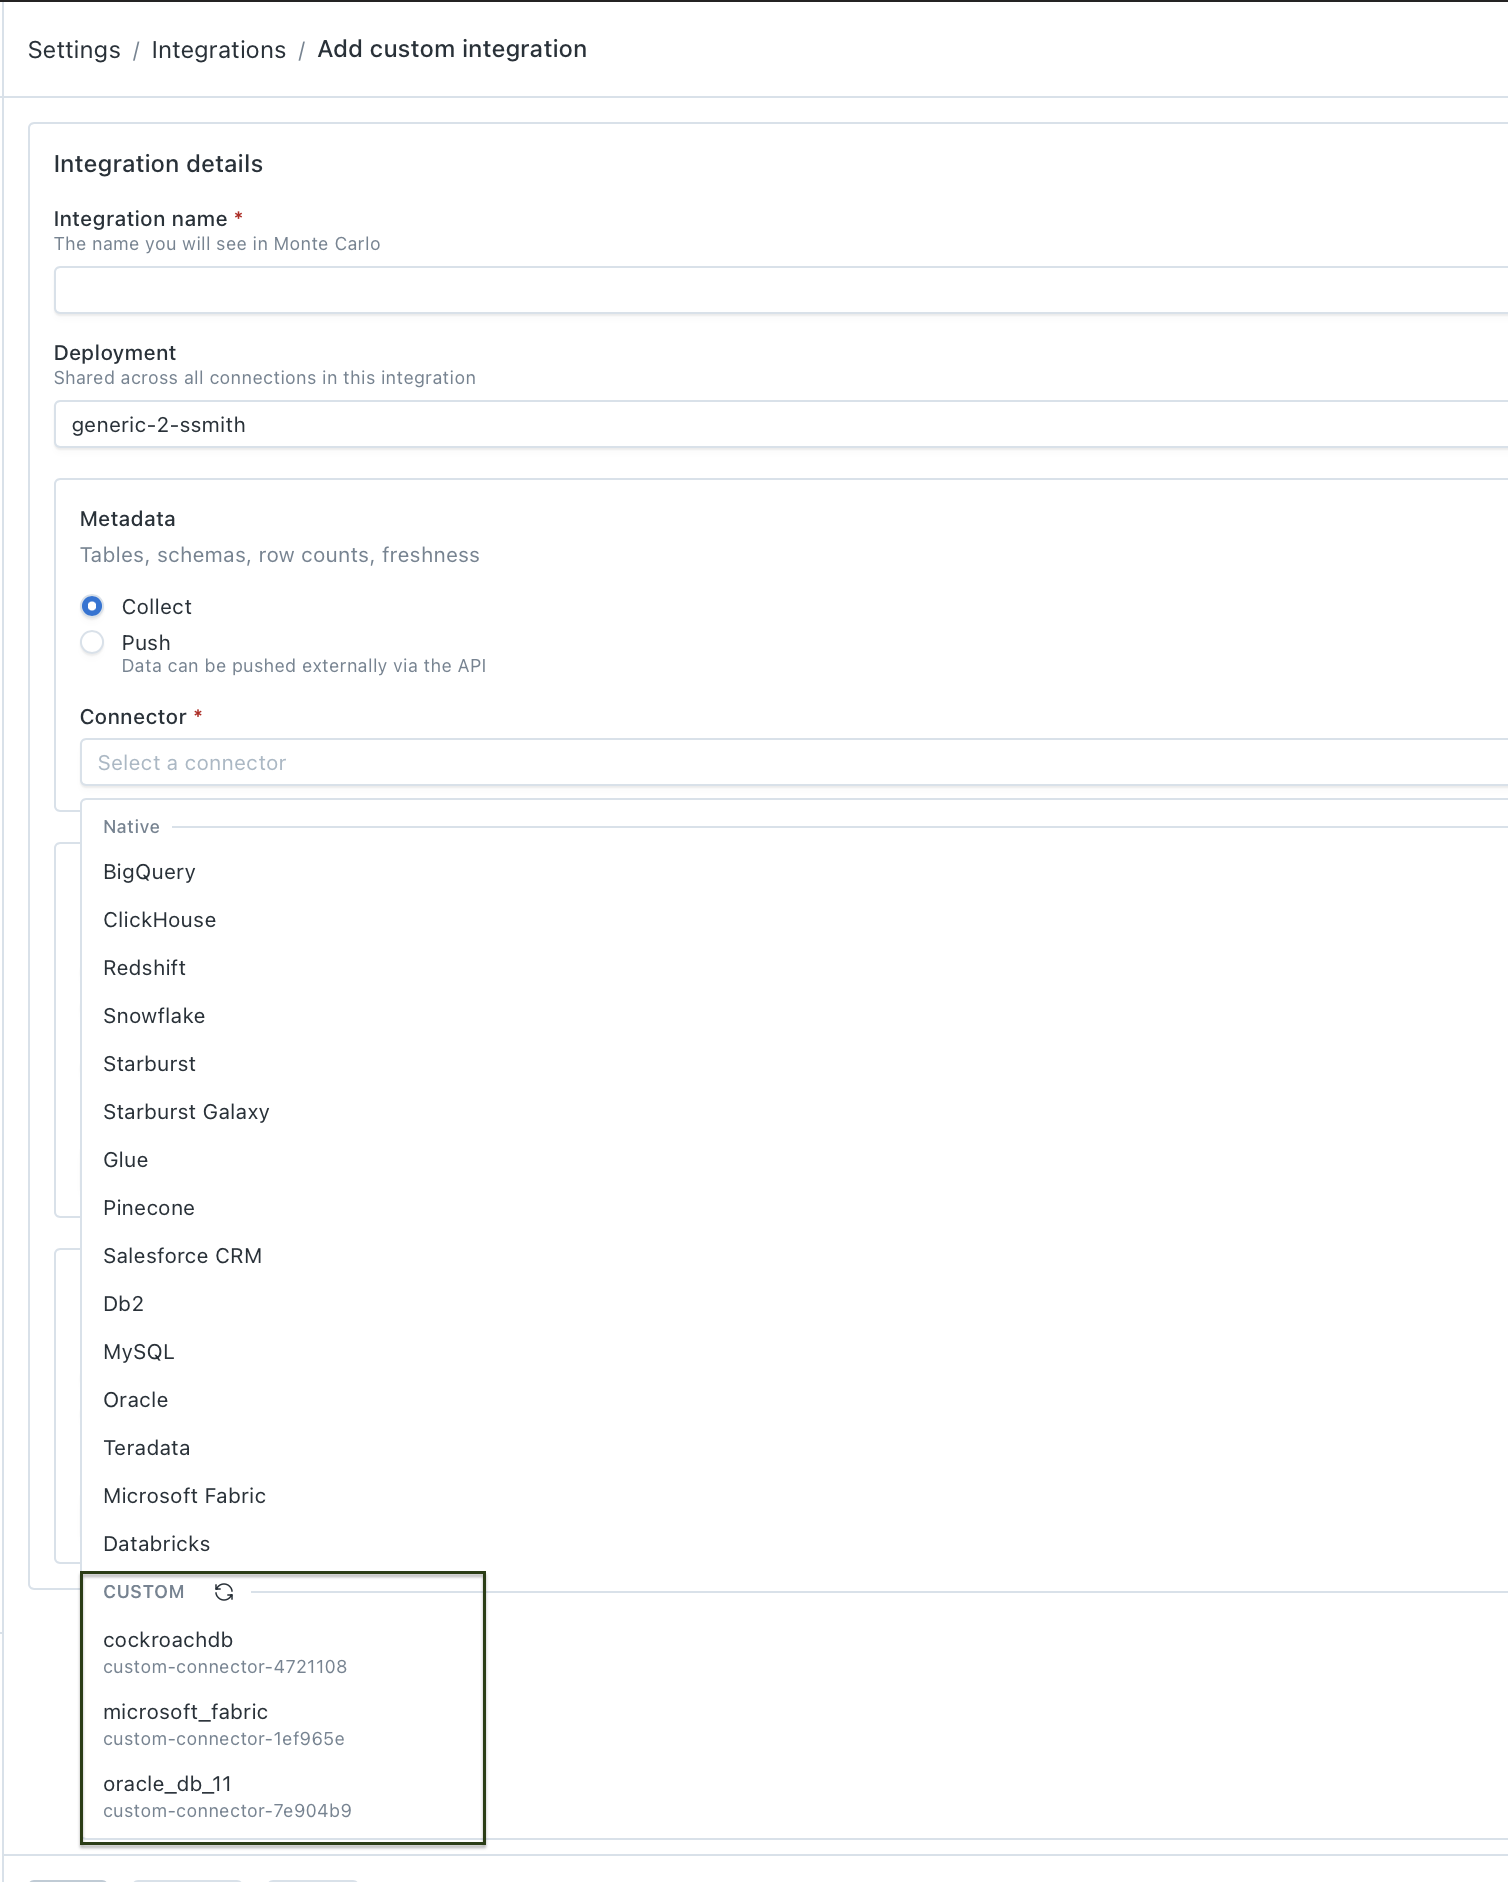
Monte Carlo UI Example
Using the API
If you prefer to automate setup or need programmatic access, you can add the connection via GraphQL.
1. List supported validations for your custom connector type:
query {
  getSupportedValidationsV2(
    connectionType: "<connection_type>"
    dcId: "<dc_id>"
    scope: "connection"
  ) {
    supportedValidations {
      name
      description
      isPrerequisite
    }
  }
}
Replace <connection_type> with the type from getCustomConnectors (e.g., custom-connector-4721108) and <dc_id> with your data collector ID.
2. Run validations to confirm everything is connected correctly. Run each validation, starting with prerequisites:
mutation {
  testCustomConnector(
    validationName: "<validation_name>"
    connectionDetails: {
      selfHostedCredentialsType: FILE
      filePath: "/etc/secrets/integrations/<credentials_file>.json"
      connectionType: "<connection_type>"
    }
  ) {
    key
    validationResult {
      success
      errors {
        stackTrace
      }
    }
  }
}
Work through the validations returned in step 1. The final validation to run is save_credentials, which returns a key you'll need in the next step.
3. Add the connection using the key from the save_credentials validation:
mutation {
  addCustomConnector(
    key: "<key_from_save_credentials>"
    connectionType: "<connection_type>"
    connectionName: "<display_name>"
    name: "<display_name>"
  ) {
    connection {
      name
      uuid
    }
  }
}
Once this mutation succeeds, your custom connector is live in Monte Carlo and will begin running collection jobs according to its registered capabilities.
7. Validate with monitors
Once your tables appear in the catalog (usually within a couple of minutes), create test monitors to confirm that Monte Carlo can compile and execute queries against your connector end-to-end. Create at least one monitor for each type your connector supports — custom SQL, metric, validation, and comparison — to exercise every code path.
Updating your connector
When you add new template methods, fix bugs, or change capabilities in your connector:
- Make your changes in
connectors/<name>/connector.py— implement new methods or update existing ones. - Run the test suite to validate your changes and re-export capabilities:
CONNECTOR=<name> docker compose run --rm test --export - Rebuild the agent image:
python scripts/generate_agent_image.py - Push the new image to your container registry and redeploy the agent.
- Re-run agent validations in the Monte Carlo UI (Settings > Deployments > your agent > Validate). The Discover connectors validation syncs Monte Carlo with the updated capabilities and metrics from your redeployed agent.
Until you re-run validations, Monte Carlo will continue using the previously registered connector details.
Capabilities reference
Depending on which templates you implement, the connector enables:
| Capability | What it provides | Requires |
|---|---|---|
| Metadata collection | Table discovery, schema tracking, volume (row count, byte count), freshness (last update time). | MetadataQueryTemplates (full mode) |
| Query log collection | Query history for lineage and usage analytics. | QueryLogCollectionTemplates (full mode) |
| Custom SQL monitors | User-defined SQL rules executed on a schedule. | CustomSQLMonitorTemplates |
| Metric monitors | Automated field-level health metrics — mean, stddev, null rates, string lengths, timestamp validation, and more. | QueryLanguageTemplates |
The exported manifest.json is the source of truth for what your connector supports. The test suite automatically maps passing templates to capabilities and metrics — which specific metrics are available depends on which QueryLanguageTemplates methods pass.
FAQs
What databases can I build a connector for?
Any database that supports SQL queries through a Python driver. The connector framework is driver-agnostic — you bring the driver and implement the connection methods.
How does push fit in?
A custom connector and the Push Ingest API solve different problems. The connector lets Monte Carlo actively query your database. Push lets you send data to Monte Carlo from your own pipeline. They're often combined. Hybrid-mode connectors skip metadata and query log templates and rely on push for those, while the connector handles SQL monitor execution. Full-mode connectors handle everything natively without push.
Can I include multiple connectors in one agent?
Yes. The build script supports packaging multiple connectors into a single image. Pass --connector multiple times:
python scripts/generate_agent_image.py --connector my_db_1 --connector my_db_2What if my database doesn't have system catalog views?
Use hybrid mode. You skip the metadata and query log templates and instead push that data externally (e.g., via the Push Ingest API). You still get custom SQL monitors and metric monitors.
How do I upgrade the base agent version?
Rebuild your custom image with the new version and redeploy:
python scripts/generate_agent_image.py --version <new_version>Then push the new image to your registry and redeploy the agent.
Do I need to re-implement my connector when the base agent updates?
No. The template API is stable — your connector code doesn't change when you upgrade the base agent version. Just rebuild the image and redeploy.
How do I debug a failing template?
The test suite output shows exactly which method failed, what SQL it produced, and the database error. You can run individual test sections to isolate the problem:
CONNECTOR=<name> docker compose run --rm test -m metadata        # just metadata
CONNECTOR=<name> docker compose run --rm test -m ql_metrics      # just metric templates
Can I test my connector without deploying to production?
Yes. The entire development loop runs locally in Docker. The test suite validates your templates against your real database — no Monte Carlo deployment required until you're ready to go live.
How do I rotate credentials?
Credentials are managed through self-hosted credentials. Rotation works the same way as for native integrations: update the secret in your secret store (AWS Secrets Manager, GCP Secret Manager, etc.) and the agent picks up the new value on its next connection. Further details can be found here.
Updated about 1 month ago