Microsoft Fabric (public preview)
Overview
This guide explains how to set up a Microsoft Fabric integration with Monte Carlo.
What is Microsoft Fabric?
Microsoft Fabric is an analytics platform that supports end‑to‑end data workflows, including data ingestion, transformation, real‑time stream processing, analytics, and reporting. It provides integrated experiences such as Data Engineering, Data Factory, Data Science, Real‑Time Intelligence, Data Warehouse, and Databases, which operate over a shared compute and storage model.
This integration connects Monte Carlo to SQL Analytics Endpoints inside a Microsoft Fabric workspace. The following items inside a Microsoft Fabric workspace have SQL Analytics Endpoint and can be connected using this integration:
- Lakehouse
- Warehouse
- SQL Database (see below about SQL Analytics Endpoint access vs direct SQL DB Access)
- Mirrored Databases: replication into OneLake from sources like
- Azure SQL
- Azure Cosmos DB
- Snowflake
Each item needs to be a separate integration. They will have identical feature support and will look similar from the Monte Carlo's point of view.
SQL Analytics EndpointsThe Microsoft Fabric integration only connects Monte Carlo to SQL Analytics Endpoints. It is also possible to connect Monte Carlo directly to the SQL Database instances running within Microsoft Fabric Workspaces, but that is done using Azure SQL Database integration.
Feature Support
| Category | Monitor / Lineage Capabilities | Support |
|---|---|---|
| Table Monitor | Freshness (via opt-in volume monitor) | ✅ |
| Table Monitor | Volume (opt-in) | ✅ |
| Table Monitor | Schema Changes | ✅ |
| Table Monitor | JSON Schema Changes | ❌ |
| Metric Monitor | Metric | ✅ |
| Metric Monitor | Comparison | ✅ |
| Validation Monitor | Custom SQL | ✅ |
| Validation Monitor | Validation | ✅ |
| Job Monitor | Query performance | ❌ |
| Lineage | Lineage | ❌ |
| Query Logs | Query Logs | ❌ |
Augmenting Collected DataIt is possible to augment the data that Monte Carlo is able to collect via read-only access, to unlock additional features in our product. Specifically, column lineage, query history, and freshness timestamps can be sent to Monte Carlo via Push Ingest API.
More information on monitors in Monte Carlo.
Microsoft Fabric Prerequisites
Monte Carlo requires read-only permissions to extract metadata and, optionally, run SQL monitors against Microsoft Fabric SQL Analytics endpoints. The authentication method is Service Principal. Access is provided via tenant_id, client_id, and client_secret for an authorized Enterprise Application.
Notes / Recommendations
- We recommend creating a dedicated Enterprise Application rather than using existing credentials.
- If deploying behind an IP allowlist or private network, ensure Monte Carlo has network access to the cluster and REST API endpoints. See IP Allowlisting for the IP addresses to allowlist for your deployment.
Installation
This section guides you through setting up a Microsoft Fabric integration with Monte Carlo.
PrerequisitesBefore proceeding, ensure you have:
- A Monte Carlo account with permissions to add integrations
- Admin access to your Azure portal (to create a new Enterprise Application in Entra ID section)
- Network connectivity between Monte Carlo and your Microsoft Fabric workspace
Step 1: Azure Portal Setup
1. Create a new Enterprise Application in Entra ID
We recommend creating a dedicated Enterprise Application for Monte Carlo rather than using existing credentials.
- Navigate to
Microsoft Entra IDinside your Azure portal. - Click
+ Addbutton and selectApp registration. - Enter name
montecarlo. - Click
Register - Note the
Application (client) IDandDirectory (tenant) IDvalues. You will need to provide these values to Monte Carlo.
2. Create an Client Secret in your Enterprise Application
- In your new Enterprise Application, go to
Certificates and Secretssection - Click
+ New client secretbutton to create a new secret, and copy and save the value. You will need to provide that value to Monte Carlo.
Note: you can only see value right after the secret is created. If you don't save it, you will not be able to see it again.
3. Gather authentication information
You will need the following values from your Enterprise Application:
| Field | Description | Where to Find |
|---|---|---|
| Tenant ID | Your organization's ID in Azure Portal | Found in your Entra ID section under Tenant ID, e.g. 4ef6ba51-341b-4b33-89b1-b9140ea62cef |
| Client ID | Your new Enterprise application ID | Found in your new Enterprise Application page under Application ID, e.g. 57031eae-1278-4d79-833e-22f899976203 |
| Client Secret | Value of your client secret | Can only be seen right after secret creation time. If lost, make a new secret in your application. |
Step 2: Microsoft Fabric Workspace Setup
1. Allow Fabric access to the new Enterprise Application at the Viewer level
- In your Fabric Workspace, click
Manage accessbutton in the top right corner. - Click
+ Add people or groups - Type the name of your Enterprise Application (
montecarlo) - Select
Viewerlevel access, this ensures the read-only capabilities for the new application.
2. Gather connection information
You will need the following values from your Microsoft Fabric setup:
| Field | Description | Where to Find |
|---|---|---|
| Host | Your SQL Endpoint hostname | Found in the SQL endpoint tab of your Warehouse/Lakehouse/etc Settings under SQL connection string (e.g. myworkspace.datawarehouse.fabric.microsoft.com) |
| Port | HTTPS port for connections | Default is 1443 |
| Database | Your SQL Endpoint Name | Found in the About tab of your Warehouse/Lakehouse/etc Settings under name (e.g. MyDb1) |
Step 3: Add Microsoft Fabric Integration in Monte Carlo
You can add the Microsoft Fabric integration using the Monte Carlo UI or CLI.
UI
Navigate to Settings then Integrations. On that page click add and select Microsoft Fabric.
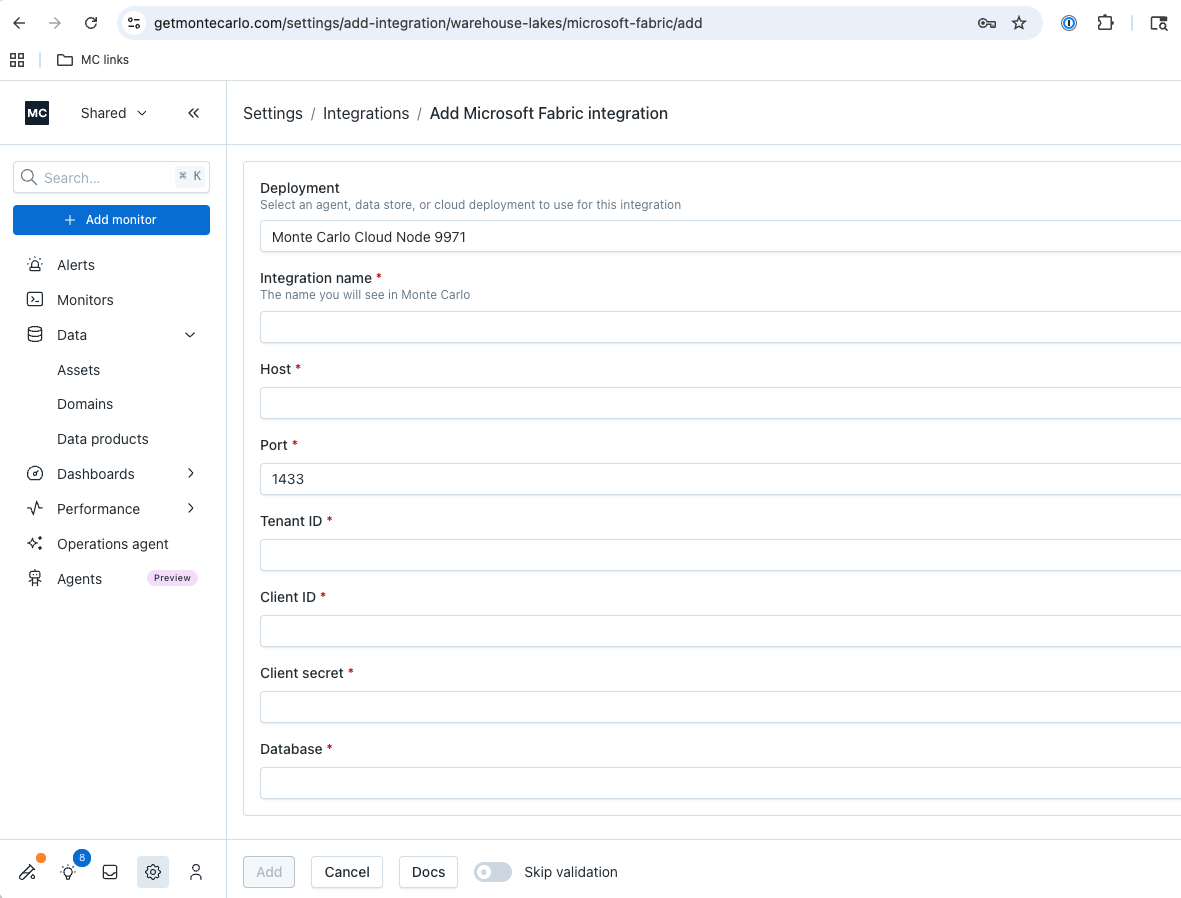
Fill the form with the authentication and connection values gathered in previous steps.
CLI
CLI SetupIf you haven't installed the Monte Carlo CLI, follow the CLI setup guide first.
Run the following command, replacing the placeholder values with your connection information:
Usage: montecarlo integrations add-microsoft-fabric [OPTIONS]

  Setup a Microsoft Fabric integration. For metadata, and custom SQL monitors.

Options:
  --name TEXT             Friendly name for the created integration (e.g.
                          warehouse). Name must be unique.  [required]
  --connection-name TEXT  Friendly name for the connection.
  --port INTEGER          HTTP port.  [default: 1443]
  --host TEXT             Hostname.  [required]
  --database TEXT         Database name.  [required]
  --tenant-id TEXT        Tenant id.  [required]
  --client-id TEXT        Client id.  [required]
  --client-secret TEXT    Client secret. If you prefer a prompt (with hidden
                          input) enter -1.  [required]
  --agent-id UUID         ID for the agent. To disambiguate accounts with
                          multiple agents. This option cannot be used with
                          'dc-id'.
  --collector-id UUID     ID for the data collector. To disambiguate accounts
                          with multiple collectors. This option cannot be used
                          with 'agent-id'.
  --skip-validation       Skip all connection tests. This option cannot be
                          used with 'validate-only'.
  --validate-only         Run connection tests without adding. This option
                          cannot be used with 'skip-validation'.
  --auto-yes              Skip any interactive approval.
  --option-file FILE      Read configuration from FILE.
  --help                  Show this message and exit.
Example:
montecarlo integrations add-microsoft-fabric \
  --name ms-fabric \
  --host datawarehouse.fabric.microsoft.com \
  --database MyDb1 \
  --port 1443 \
  --tenant-id 4ef6ba51-341b-4b33-89b1-b9140ea62cef \
  --client-id 57031eae-1278-4d79-833e-22f899976203 \
  --client-secret -1
After configuring your integration, you can see details, run validations, and delete the connection on the integrations page
Step 4: Configure monitors (optional)
Freshness and volume monitoring for Microsoft Fabric requires creating SQL monitors. Unlike some other integrations, these are not enabled automatically.
To set up Freshness and Volume Monitors:
- Navigate to the table you want to monitor in Monte Carlo
- Click Monitors
- Click Enable
- To enable row count and freshness monitoring on a given table, click the Enable row count monitoring button on the table summary page
- Enable any other desired monitors
For detailed instructions, see SQL Rules documentation.
FAQs
What Microsoft Fabric products are supported?
Anything that has a SQL Analytics Endpoint, which includes Lakehouses, Warehouses, SQL Databases, and Mirrored Databases (replication in OneLake).
What authentication methods are supported?
Currently, Monte Carlo supports Service Principal authentication for Microsoft Fabric.
Why don't I see automatic freshness and volume monitors?
Unlike some other integrations, Microsoft Fabric requires opt-in SQL monitors for freshness and volume monitoring. This is because Microsoft Fabric doesn't expose the metadata timestamps needed for automatic monitoring. See Step 4 in the installation guide for setup instructions.
Are there any known limitations?
- Query performance and query logs are not supported.
- Lineage is not supported.
- Automatic freshness/volume monitors are not available; SQL monitors must be configured manually.
Is it possible to work around these limitations?
Yes, it is possible to augment the data that Monte Carlo is able to collect via read-only access, to unlock additional features in our product. Specifically, column lineage, query history, and freshness timestamps can be sent to Monte Carlo via Push Ingest API.
Updated about 1 month ago